Recommended Posts

Hi there :) 
Apparently there was a bike contest i totally missed!
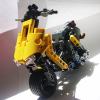
I've kept myself really busy building bikes lately, this is the fastest one i've built so far, probably the fastest ever built i guess?
It's really simple, RC motor, buwizz used as a weight and that's pretty much it :) 
It's also really really easy to control

I got also another one that shares a lot of features with this one that I will publish as soon as the lockdown ends and i can go shoot a video of it. I hope you'll like it!


Share this post


Link to post
Share on other sites

Amazing work! :wub_drool:

44 minutes ago, piterx said:

[...] as soon as the lockdown ends [...]

I've never hated the colour red as much as in the last four months :damn::damn::damn:

Share this post


Link to post
Share on other sites

Great model! I assume the front wheel is freely hinged with a positive castor angle to get that amount of stability.

Share this post


Link to post
Share on other sites

Looks brilliant, I'd like to make it.

Could you make instructions? Or give us some more pictures so we can figure it out?

Share this post


Link to post
Share on other sites

I've had a go at building it. 

The colours are interesting, as it's built from mostly scraps of the Corvette and 42036. It's so bright underneath, it could almost be an official set :pir_tong2:

800x450.jpg

Couple of questions.

As you see I don't have a buggy motor yet, but I've brick built a placeholder and ordered a replica. Are these tyres going to fit or are they too big and I need to get the smaller old school motorcycle wheels? Funny as I had 8422 many many years ago and that would seem the ideal set.

I couldn't figure out how the original headstock area was done from the available pictures, so I just did it on the basis of whatever lined up. It is surprisingly sturdy (form locking the forks helps) but has more rake angle than I'd really like. It has a decent tendency to run straight at "pushing it across the kitchen" speeds so I reckon it will work fine, but maybe it'll steer lazy at high speed. There again back-to-front yokes (all Lego bikes and RC bikes in general seem to have this) seem to suggest more trail is better?

More pictures in my bricksafe album if anyone has any suggestions.

Edited by amorti

Share this post


Link to post
Share on other sites
On 3/19/2021 at 4:05 PM, amorti said:

Looks brilliant, I'd like to make it.

Could you make instructions? Or give us some more pictures so we can figure it out?

First of all, thanks to all you guys for your nice words :)
I made a couple of renders to help you out i hope they will be enough! if not i can render some more!

https://ibb.co/Yc98gcY
https://ibb.co/PYjHM8S

Bike-1-P-Lego.jpg
Bike-1-A-P-Lego.jpg

1 hour ago, amorti said:

I've had a go at building it. 

The colours are interesting, as it's built from mostly scraps of the Corvette and 42036. It's so bright underneath, it could almost be an official set :pir_tong2:

Couple of questions.

As you see I don't have a buggy motor yet, but I've brick built a placeholder and ordered a replica. Are these tyres going to fit or are they too big and I need to get the smaller old school motorcycle wheels? Funny as I had 8422 many many years ago and that would seem the ideal set.

I couldn't figure out how the original headstock area was done from the available pictures, so I just did it on the basis of whatever lined up. It is surprisingly sturdy (form locking the forks helps) but has more rake angle than I'd really like. It has a decent tendency to run straight at "pushing it across the kitchen" speeds so I reckon it will work fine, but maybe it'll steer lazy at high speed. There again back-to-front yokes (all Lego bikes and RC bikes in general seem to have this) seem to suggest more trail is better?

More pictures in my bricksafe album if anyone has any suggestions.

Those tires are too big to fit on that unless you extend it a little bit more adding a 1:2 reduction maybe as well.
I've done dozens of tests and the oldschool ones perform way better for grip and they seem to be the perfect radius to couple with the RC motor to get the maximum performances out of it. The only downside is that you'll get trigger happy with the ludicrous mode and eat through them quite quickly :D I strongly reccomend using it on smooth surfaces!

I've got other 4 different bikes to show you guys all the tests i've done, they all work and they are all different :) soon i will post more!
 

Edited by piterx

Share this post


Link to post
Share on other sites

@piterx thank you! That's really helpful.

I had placed the two 4*2 L-beams differently as I'd assumed it would be axle to axle. I'll try again how you have it :pir-huzzah2:

I did wonder if the moments your video shows headshake could be due to flex or looseness in the frame. So I think some parts of mine could be improvements too, just between the frame's front downtubes. More pin to pinhole, less axle to pinhole connections. 

I can't wait to get my buggy motor and tyres and give it a go :pirate:

@piterx did you compare the grip of the tyres of 8838 and 8422?

I like the look of street tyres better, but I'd get whatever grips more.

Edited by amorti

Share this post


Link to post
Share on other sites

I did indeed :P this will be the bike in my next video one of these days
It's more manouverable than the other due to its lower center of gravity, those tires definitely grip better and are more stable, so if you find em for cheap definitely get them!

The headshakes are something i havent managed to figure out yet, i belive the shock absorber on the back being too soft could be the cause


Bike-2-P-Lego.jpg
Bike-2-A-P-Lego.jpg

Share this post


Link to post
Share on other sites
On 3/21/2021 at 11:02 AM, piterx said:

The headshakes are something i havent managed to figure out yet, i belive the shock absorber on the back being too soft could be the cause

In a real bike there might be a few causes. As far as I know, the most common would be: lack of damping (and/or too low spring rate) in the rear shock, too much power lifting the front so it skims the tarmac, real wheel not in line with front wheel.

There's two of those you can't really fix with Lego since Lego shocks don't have damping and this bike obviously has way too much power.

Putting a stronger spring is easy enough. I'm using the one from 42036 (hard) and in a static test it feels balanced to the front, what do you have fitted?

But, you can definitely do a few things to stiffen the frame and reduce slack across the whole model.

I worked on it some more today. Got the geometry as you have it, relaxed the colour choices, used long panels in the belly pan, and stiffened up the frame which allowed mounting the fuel tank lower.

I also note the buggy motor is attached across an axle; I think it'll be better mounted on non friction pins. Maybe pins with friction would act as damping, maybe they'd just make it too tight, will test it once the motor arrives.

Here's some pics.

20210321_211132.jpg

Decided to order 8422. I'll get an hour of nostalgia building it, then use the tyres for this :)

Edited by amorti

Share this post


Link to post
Share on other sites

^you could effectively dampen it by using friction pins at the suspension arm pivot :)

Share this post


Link to post
Share on other sites
1 hour ago, amorti said:

In a real bike there might be a few causes. As far as I know, the most common would be: lack of damping (and/or too low spring rate) in the rear shock, too much power lifting the front so it skims the tarmac, real wheel not in line with front wheel.

There's two of those you can't really fix with Lego since Lego shocks don't have damping and this bike obviously has way too much power.

Putting a stronger spring is easy enough. I'm using the one from 42036 (hard) and in a static test it feels balanced to the front, what do you have fitted?

But, you can definitely do a few things to stiffen the frame and reduce slack across the whole model.

I worked on it some more today. Got the geometry as you have it, relaxed the colour choices, used long panels in the belly pan, and stiffened up the frame which allowed mounting the fuel tank lower.

I also note the buggy motor is attached across an axle; I think it'll be better mounted on non friction pins. Maybe pins with friction would act as damping, maybe they'd just make it too tight, will test it once the motor arrives.

Here's some pics.


More pics in the bricksafe album.

Decided to order 8422. I'll get an hour of nostalgia building it, then use the tyres for this :)

I do really like your color scheme and the long panel too! Too bad that those big wheels won't fit in the RC motor unless you offset it on the side, so yeah great choice getting the old ones, they grip way better too!
adding the pins to dampen the spring is a good idea, the only reason why i didn't use them is that i didn't like them sticking out :P 

It's awesome anyway, we definitely need more bikes in our builders community :D


Edited by piterx

Share this post


Link to post
Share on other sites

I had fireblades and Daytonas in my youth, now I've a cb300r. Things change when you get a kid!

It's really a shame about the wheels won't fit inside the motor. These bigger wheels are right for the scale already, IMHO. But, with the ≈2.5L lower tank, I hope the smaller wheels won't look quite as mini.

I've never felt the creative spark to make a MOC from scratch. But give me one with great potential, and watch me optimise the heck out of it. Really there's no freeplay left except the "head bearings", and those have to be free to move. I might dig through my Chinese bricks and see what's suitable, ISTR CaDA friction pins have no slack but also minimal friction, might be good here.

Please do give those mods a try on your model? I'd like to hear feedback if you try it.

Edited by amorti

Share this post


Link to post
Share on other sites
On 3/21/2021 at 11:39 PM, piterx said:

Too bad that those big wheels won't fit in the RC motor unless you offset it on the side

My RC motor arrived today, and I've seen what you mean. Extending the swingarm by 2L with a few liftarms and a couple of gears is trivial, but the tyre is *just* too wide to fit in the centre of the swingarm. At that point there's no sensible way to get it working with these bigger wheels.

Oh well I'll have another look at it once my vintage set 8422 arrives. Any luck that one can sit in the shelf with big wheels on it.

Edited by amorti

Share this post


Link to post
Share on other sites
8 hours ago, amorti said:

Stud.io is hard, but kinda fun :D

Thanks to @Philo for the buwizz custom part!

moto1.png

Stud.io file here: https://bricksafe.com/files/A_morti/piterx-fast-rc-motorcycle/moto.io

Dude that looks so good :) have you tried it already?  I've got a new bike ill share today or tomorrow that is way cheaper than that one but fun and relaxing to drive around :)

Share this post


Link to post
Share on other sites

My tyres and buggy motor are here now!

I've done a quick trial in the house - just enough to terrify the dog. A few revisions came out of the trial, mostly turning the bent beam in the swingarm the other way around as that bottom corner was getting in the way of it self-righting, which has added strength and improved ground clearance; and remounting the rigid hoses and flex axles, mostly to allow more solid mounting of the "radiator cowls" which happen to hide the ugly frame bracing, and maybe add a little more strength now they're not mounted on a flex hose.

Looks like this now:

800x600.png   

stud.io file updated - I can't quite believe there are only 226 parts in this thing. Even then, two are PF plugs and if you rationalised a few pins, removed the headlight and 2L pin connectors on the forks, removed the seat pad, put the 21/22 panels on the tail one stud forward, etc... I reckon you could get right around 200.

It really is awesome to see it self-right and just shoot off! Now I just have to look forward to the weekend, and the chance to drive it outside. Cheers, @piterx :pir-huzzah1:

Edited by amorti

Share this post


Link to post
Share on other sites

Create an account or sign in to comment

You need to be a member in order to leave a comment

Create an account

Sign up for a new account in our community. It's easy!

Register a new account

Sign in

Already have an account? Sign in here.

Sign In Now

  • Recently Browsing   0 members

    No registered users viewing this page.