Ts__

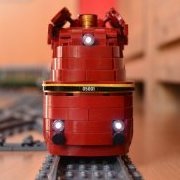
Just another crocodile - SBB Ce 6/8 II "14253" with historical wagons and coaches

Recommended Posts

Hello together

Who does not know it? The Swiss Crocodile. An icon for a long time and has been on my "want to have" list for quite some time.
Then Lego made us happy last year with the set 10277 Crocodile. That was the starting signal for the realization of my dream crocodile.
The Lego version has strengths and weaknesses. But it has made the locomotive better known in Lego circles and generally the praise for the set prevails.
I also praise it, but the weaknesses had to be eliminated. Main criticisms from me were the wrong running gear and the huge gap between the stems.

But I didn't want to hide only the weaknesses and so it became a complete redesign. A few ideas from the Lego Crocodile have certainly survived, also there are general similarities. It would be funny if there weren't, because then Lego or I would have done something completely wrong.

SBB Ce 6/8 II "14253":

SBB Ce 6/8 II "14253"


This locomotive is the oldest surviving crocodile of the class. The "14253" was built in 1919 by the Schweizerische Lokomotiv- und Maschinenfabrik (SLM, mechanical part) and the Maschinenfabrik Oerlikon (MFO, electrical part). Thought and used the locomotive for freight train traffic among others on the Gotthard railroad (1920 - 1924, 1943 - 1976).

Technical data:

    Length over buffers: 19.4 m
    Service weight: 126 t
    Friction weight: 103 t
    Driving wheel diameter: 1350 mm
    Power: 2688 kW / 3650 hp (rebuild Be 6/8 II)
    Speed: 65 km/h

In 1943 it was rebuilt to Be 6/8 II "13253". The rebuild included more powerful engines, so that the top speed was increased to 75 km/h. This was followed by the change to the new engine. This was also followed by the change to the dark green paint scheme. After the rebuild, the locomotive was again stationed and in service at Erstfeld on the Gotthard.

In 1976, the locomotive was handed over to SBB Historic for maintenance. It was refurbished as a ready-to-run museum locomotive "14253" and the original red-brown paint scheme was restored. The locomotive was also reclassified as a Ce 6/8 II, although the more powerful engines of the Be 6/8 II remained installed.

To this day, the locomotive is in service and on display at Erstfeld as a museum locomotive ready to run.

Schweizer Krokodil SBB CE 6/8 II "14253"

Main goals of my version:

- correct running gear
- all wheels equipped with flanges, because the "flying" flangeless wheels usually look unattractive. Consequence was, that the middle axle has to be mounted laterally shiftable (like in the prototype).
- functioning linkage with counterweight
- working lighting with correct light in both directions
- usable power to be able to pull a nice train sometimes
- prototypical details as far as possible and reasonable
- prototypical lettering
- a driver (ok, only 1/4 driver, there was only space for head and hair...)

SBB CE6/8 II 14253

I invested a lot of time in the prototypical linkage. I couldn't realize my idea with Lego parts, nor with ready-made 3D parts off the shelf, so I designed a rather complex part for the triangular rod and a simpler one for the counterweight:

SBB CE6/8 II 14253

I was able to find a small space for Urs:

SBB CE6/8 II 14253


Lego version:

- approx. 1830 Lego parts
- 4 BigBenWheels S for the leading axle, because the wheels are free to see, I decided against the Lego train wheels for optical reasons
- 8 3D-printed parts for the rods
- 1x BuWizz 2.0 as battery and controller
- Lighting brand "Self-Made" with PF connector
- sticker brand "Self-Made"

no other foreign parts and no machined or glued Lego parts.

weight: ca 1050 gram
length: approx 48 cm
width from the model: 8 knobs with slight protrusions from individual details

To switch on the transformer can be removed upwards and so you can get to the BuWizz. The BuWizz is charged in the same way. This is also an advantage of the BuWizz.


SBB Ce 6/8 II "14253" in service with contemporary freight cars:

SBB CE6/8 II "14253" mit SBB J2D und weiteren Güterwagen


All wagons have a concrete prototype with formerly existing numbers

SBB J2D 22179:

Vegetable and fruit wagon J2D with ventilation, color scheme 1950-1965.

SBB J2D 22179


SBB K3 43105:

Standard freight wagon of the SBB, color scheme period ca. 1913 - 1935

SBB K3 43105


SBB J2D 22715

Express freight wagon of the SBB, period ca. 1912 - 1935

SBB J2D 22715


SBB K3 44738:

modernized standard freight wagon K3 of the SBB, color scheme period ca. 1958 - 1968

SBB K3 44738

this wagon has got the tail light attached

SBB K3 44738


The freight wagons are mostly identical, but always differ in details and in the color scheme. Differences are e.g. sometimes with brakeman's cab, sometimes without, number of windows on the brakeman's cab. In the case of the refrigerator car, there is also the ventilation.

Each car weighs about 510-520 grams and requires just over 1100 Lego parts. The high number of parts comes from the elaborate sidewall structure with jumper plates (almost 200 per car) and the higher roof.
To keep the rolling resistance low, I equipped the Lego metal axles with ball bearings again (analogous to the rest of my car fleet).

SBB K3 44738 mit weiteren J2D und K3 Güterwagen


SBB Ce 6/8 II "14253" in its current state as a museum train:

SBB C4 5301:

3rd class coaches with 72 seats of the SBB, built in 1937

SBB C4 5301

SBB AB4 3721:

Built in 1951, 1st/2nd class coaches, 24 seats in 1st class, 32 seats in 2nd class.
This car is equipped with the final signal and therefore runs at the end of the train.

SBB AB4 3721


SBB AB4 3721


Details were hinted at on the underbody:

SBB AB4 3721


detailed bogies were of course a "must" again:

SBB AB4 3721


both cars have an interior with seats (most of them also suitable for figures) and toilets in the ends of the coaches. The middle roof part is removable for playing:

SBB AB4 3721


Car crossover:

SBB AB4 3721 mit SBB C4 5301 Wagenübergang


The passenger coaches consist of about 1550 Lego parts each. The decals are again self-made and all metal axles were equipped with ball bearings. The weight of one of this coaches is almost 1Kg, the length 66 studs.

I think the passenger coaches also cut a good figure behind the crocodile:

SBB CE6/8 II "14253" mit SBB C4 5301

Special thanks to Ronny. The freight cars are based on a design by Ronny, but built from scratch with many changes. For some details for the locomotive there was also good advice from Ronny.

As bonus:

Have fun watching.

Thomas

Edited by Ts__

Share this post


Link to post
Share on other sites

Another jaw-droppingly gorgeous train from you - the loco is beautiful, but I think the van wagons stand out most with their wealth of little details. Beautiful colours and excellent parts usage all around - very well done!

Share this post


Link to post
Share on other sites

Thanks for the great comments...


On 1/17/2021 at 2:39 AM, dr_spock said:

Is it compatible with R40 curves? 

Unfortunately not ;-)

I have my decided for optics and against R40 curves. I myself usually drive on minimum radius R104 and also lay out my models on it, if R40 requires too many compromises.

And let's be honest: 66 knobs long cars in R40 curves looks like 90° turns, doesn't it?


With the Crocodile, it was important to me:
- all 3 wheels should have the flange. Uniform optics and no hovering of a wheel in the curve or switch. This would probably be more difficult to do with R40.
- No gap between stem and cabin. Also goes relatively well with R40 curves. With R104 I also have no gap in the curve outside view.
- Sliding operation: because of the tight curves with R40, the buffers/coupling should turn with the first axle. However, I had the problem with locomotives with single-axle leading axles in the past, so no sliding operation of a few cars through R40 switches is feasible. The leading axle has jammed in the R40 switch. Therefore, I want to fix the buffers / coupler rigidly to the frame, regardless of the leading axle.


On 1/17/2021 at 3:59 PM, zephyr1934 said:

the whole train... both trains actually.

somehow I currently have one locomotive too few. But I am working on it...


8 hours ago, Shiva said:

I am curious where the connection points to the mid section is, etc.

The pivot points are pretty much directly under the front of the cabin, just past the center drive axle.

In the video is a picture without the cabin and hoods of the leading axles. There you can see the pivot points. They are one knob next to the reddish-brown cab floor panel.

The pivot point in each case is a light gray Technic pin 4274.
The car itself rests on tiles of the stems.

Thomas


Share this post


Link to post
Share on other sites

Ahh, I did miss that view, when I checked that video yesterday. It seems to be as close as possible to real life? If I understand correctly a pdf that has a blueprint.

pdf found at http://www.bb25187.eu/DocEnLigne/Doc_Kroko/SBB_Krokodil_VL_UK.pdf and https://docplayer.net/41360418-Sbb-ce-6-8-ii-be-6-8-ii.html.

I think you version could be the best looking Crocodile Locomotive :)

Share this post


Link to post
Share on other sites

Awesome.  Definitely one of the best crocodiles I've seen in LEGO.  Looking forward to seeing more from you in the future!

Share this post


Link to post
Share on other sites
On 1/19/2021 at 12:01 PM, Shiva said:

If I understand correctly a pdf that has a blueprint.

Yes, the position is very similar to the real crocodile. The reason is simple: this way you have the smallest deflection from the stem in the cabin wall.

On 1/19/2021 at 12:01 PM, Shiva said:

I think you version could be the best looking Crocodile Locomotive :)


On 1/20/2021 at 11:04 AM, Vilhelm22 said:

Definitely one of the best crocodiles I've seen in LEGO.

Thank you very much.


On 1/20/2021 at 11:04 AM, Vilhelm22 said:

Looking forward to seeing more from you in the future!

You can also look into the past, I have already shown a few moves there.

But yes, I am already designing the next locomotive. But it may take me half a year.

Thomas

Share this post


Link to post
Share on other sites

I might try to modify the LEGO 10277 to have it in the same position too. Or just remove the articulation. That 1 is a display piece for me.

Or maybe someday rebuild it to what you have done.

Share this post


Link to post
Share on other sites

Thomas, I'm glad we could exchange so much about the long process of developing a second version of your stunning crocodile aswell your development of the 8-wide versions of some my cars :-) They are so advanced I'm thinking about rebuilding mine :laugh:

On 1/17/2021 at 1:09 AM, ColletArrow said:

the van wagons stand out most with their wealth of little details

If you're interested in some of their little 7-wide R40 compatible idols, you could have a look into my flickr album  :-)

On 1/17/2021 at 2:39 AM, dr_spock said:

Is it compatible with R40 curves? 

As Thomas already stated, his sophisticated wheel arrangement unfortunately can't be compatible to R40 curves. But I altered the design in my adaption of his crocodile so it actually can run on R40 curves (with some visual drawbacks like hovering flangeless wheels Thomas wanted to avoid)! I don't want to hijack this thread, so I won't post pictures here, but I have a flickr album with the dark green SBB BE 6/8 13254.

Share this post


Link to post
Share on other sites
On 1/21/2021 at 7:29 PM, Shiva said:

That 1 is a display piece for me.


For a pure display model, however, the Lego crocodile should be visually reworked and its weaknesses eliminated. You don't have to pay attention to any curve radii.

Last weekend, the long-awaited delivery from SuT arrived to finish building the tank cars:

ZCS 23 Lonza:

I have omitted the large Lonza sign so far, it looked very weathered and unattractive in the prototype car.
Maybe I will add it, because it will make the wagons a bit more different and it would fit better to the prototype.

The car itself was already in the crocodile video, but a few individual parts in the right colour were still missing for the presentation. I can now make up for that

50894166308_531187ffac_k.jpgZCS 23 Lonza by Thomas / Ts__, auf Flickr


ZCS 23 Press:

A former Swiss car on the island of Rügen / Germany

50894164043_8d2c3fac58_k.jpgZCS 23 Press by Thomas / Ts__, auf Flickr


ZCS 23 Motorex:

my favourite of the three. It stands out with its bright colour and the large lettering and is an eye-catcher for me. Not too bad, but just the right splash of colour for a dirty goods train.

50894878411_1c283ff54c_k.jpgZCS 23 Motorex by Thomas / Ts__, auf Flickr

50894165453_ffb15ead66_k.jpgZCS 23 Motorex by Thomas / Ts__, auf Flickr


Technical Lego data:

Parts: approx. 360-370 Lego parts, no foreign parts, exception ball bearing
Weight: approx. 260-270 grams

On Flickr I was asked if there is a nub at all pointing upwards. Basically, the cars are simple, just SNOT in almost all directions, but not really complicated. Once you have built the middle part of the boiler, the rest is rather simple.
The wagons themselves are of course almost all identical and only differ in detail apart from the colour. It was this balancing act: they should be the same but not the same.

Group picture without lady:

50894882011_40e8e961d3_k.jpgZCS 23 Tankwagenkollektion by Thomas / Ts__, auf Flickr


Of course, the wagons also belong to the crocodile of mine and complement my freight wagon fleet:

50895000662_72d3df9c17_k.jpgSBB Ce 6/8 II "14253" mit ZCS 23 Kesselwagen by Thomas / Ts__, auf Flickr


Thomas


Share this post


Link to post
Share on other sites

Create an account or sign in to comment

You need to be a member in order to leave a comment

Create an account

Sign up for a new account in our community. It's easy!

Register a new account

Sign in

Already have an account? Sign in here.

Sign In Now

  • Recently Browsing   0 members

    No registered users viewing this page.