Recommended Posts

20201209_195231.jpg

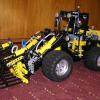
I present to you my start on a Kramer four wheel steer loader.  I will try to update this post with my progress over the next few weeks, which is something that i do not normally do.
I only had portal hubs which gave a good reduction, but the pivot point was going to cause steering issues.  I have created my own axles with reduction at the pivot point. If these present problems, then I have planetary hubs in the post.  Everything is a work in progress and there may be tweeks along the way. 
The plan: 2 x XL motors for drive, servo for steering, XL for lift, M motor for bucket, onboard compressor for 3rd service/quick hitch.  Possible auto valve for 3rd service. Xerion wheels will be used for the rubber.  Comments welcome.

Edited by trekman
update

Share this post


Link to post
Share on other sites

That should be very interesting MOC 

But if hope that you will use universal joints at the end...

Share this post


Link to post
Share on other sites
2 hours ago, mpj said:

Looks promising. What scale is it?

The wheelbase of my model is 200mm.  The real Kramer 5065 is at 1850mm, so it is just over 1:9.
I was doing drive tests today with dual XL motors.  The problem is that reducing the RPM down slow enough for the axles causes high torque on the gear train.  Thankfully I have been able to brace sufficiently to prevent the gears skipping.  more photos will follow.

Share this post


Link to post
Share on other sites

20201213_175600.jpg

The above photo shows the current drive train from the twin motors.  It works well, but will receive some more bracing prior to completion.  there is plenty of "push" in the loader without crunching.

20201213_184533.jpg

I am not happy about the tipping actuator drive line. This is to be reviewed, hopefully to create a more robust and efficient driveline and more foot room in the cabin.


Share this post


Link to post
Share on other sites

From my experience XL motors have this issue of variable power output the more gears I put between them and differential, so I wonder what will be with your MOC...

Share this post


Link to post
Share on other sites

20201217_200643.jpg

i have redesigned the drive train for the tipping actuator so that it does not intrude into the cab.

Below, the cab shape has been defined

20201217_212726.jpg

It will now be a case of assigning spacing to the receivers, autopump switch and loader motors

Share this post


Link to post
Share on other sites

I like framework you made for chassis :thumbup:

Looking forward to see how it performs...when finished.

Share this post


Link to post
Share on other sites

20201220_193159.jpg

The front actuators are connected to Xl for main lift, and M motor for bucket.

20201220_202725.jpg

Showing possible location of Infra Red Sensor.  Space remaining under bonnet will determine shape of auto switch/pump (for third service/quick hitch) 

Share this post


Link to post
Share on other sites

I am happy with battery box placement as any further back would have been too much weight behind the rear axle.

Share this post


Link to post
Share on other sites

I think you will need to move BB one stud forward because you need place for connecting 3 receivers...:wink:

Otherwise very promising project :thumbup:

Share this post


Link to post
Share on other sites
16 hours ago, I_Igor said:

I think you will need to move BB one stud forward because you need place for connecting 3 receivers...:wink:

Otherwise very promising project :thumbup:

Yes well spotted, but I normally use an extension wire which allows me to relocate that "stack" somewhere else.


13 hours ago, M_longer said:

You will have a lot of friction on actuators used for elevation.


I know that is is not as efficient as some of the Official Lego builds, but I am trying to have minimum intrusion into the cab.  the XL motor powers it well and its location worked out very well.

Share this post


Link to post
Share on other sites

I don't have extension wire, so I forgot about that (this causes me a problem on my telehandler...)

Share this post


Link to post
Share on other sites

My quietness over Christmas was largely due to the challenge of making a compact auto switch/pump which would be durable enough and small enough to fit within the skeletal bonnet.  I am pleased to say that by using the older brick type pneumatic switches I was able to adjust the height of the switch better so that it will work correctly with the two switching paddles.  The design had to allow the transmission to be positioned in the centre area, with the pump on one side and the motor on the other..

Some of the rear panels can now be fitted.

20210103_180920.jpg

20210103_182228.jpg

Share this post


Link to post
Share on other sites

20210117_212734.jpg

As you see I have not been idle, but progress is being made.
Rear end is now complete. with auto switch and pump well positioned and working well. The three PF receivers are now positioned.  I received a delivery of four planetary hubs and I have decided to use these in the axles.  This has required a rebuilt of both axles, and a review of the driveline gear train, resulting in less gearing being required.  This has significantly improved performance.  All pneumatics are now routed to the front, and the boom has been refined.

Share this post


Link to post
Share on other sites

Just some updates.  The quick hitch mechanism has been completed and is working very well.  It now operates alongside the 3rd service through a dual diverter valve from the auto switch and compressor.  This allows items such as pallet forks, with no pneumatic connections to be remotely attached and locked.  Items such as a grab can be attached, locked and then switched over to run that 3rd service.

Also you will see the finished work on the rims, and lights.  Push off buckrake is now in development.

20210129_215126.jpg

20210129_215250.jpg

Share this post


Link to post
Share on other sites

I present to you the Kramer 8065 in Lego Technic.
This has been an enjoyable, yet challenging build.  Visually, i think it looks quite good.  However, I must confess that I have had to rework numerous systems, and still I am not that happy, but feel that I need to finish this at present.

The loader lift was redesigned so that rotation drive to the LA was not load bearing from the loader arms.  This resulted in a rework of the front of the cab, but a much simpler driveline, and as a result the loader was able to lift the push off buckrake much better.
A similar system had to be incorporated into the driveline for the bucket tilt, so that the load bearing was not creating friction on the driveline.  This is common place on many official technic models.  These improvements made a big difference to the lifting capabilities of the machine.

Part way through the project I did change to the planetary hubs which made a big difference to the crawling ability, and pushing force.  However as time has gone on, the 2 x XL motors seem to be struggling more and more.  I can only conclude that it may be due to the entire weight of the model, as I cannot figure out why the motors seem to struggle so much. Using one motor made little difference.  If i was doing such a build again, I may have considered separating the power, so that one motor powered one axle and one for the other axle, however i did want to keep the driveline as authentic as possible.

The autovalve design used here works well with no stress on parts and has been very reliable.  This powers the third service, as well as the quick hitch through the diverter valve.
The cab door opens, with a frame to replicate the internal railing which would support the glass panel. 
Thanks for your interest.

Edited by trekman
typos

Share this post


Link to post
Share on other sites

Looks very good. In my case XL motors have that issue of non continuous power output, so I try to use L-motors instead XL

Share this post


Link to post
Share on other sites

Create an account or sign in to comment

You need to be a member in order to leave a comment

Create an account

Sign up for a new account in our community. It's easy!

Register a new account

Sign in

Already have an account? Sign in here.

Sign In Now

  • Recently Browsing   0 members

    No registered users viewing this page.