langko

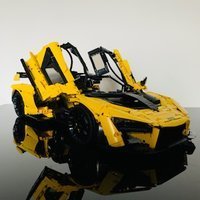
MOC Mclaren Senna 1:8 (2nd version finished!)

Recommended Posts

16 hours ago, keymaker said:

I love your construction of seats. I will propably never use it, because of the scale and supercar theme which are not my thing. But the fact that your seats are beatiful and build with technic pieces - this is the great thing.

Thankyou. I'm glad you like them, took a lot of attempts to get it to work. I'm not a fan of seats made from connectors, and I wanted to try and make them out of panels before playing around with tiles/slopes and the like.

14 hours ago, Gray Gear said:

Those seats really look amazing! too bad they can only work when there is a wall behind the seats...

Cheers! yes and no... no in a sense that the seats are entirely 1 piece, yes because they are mounted into the back wall. Silly me didn't take any photos before I put them in so I made some in studio. Everything is either fixed or form locked and can be built in studio with no collisions, so it works surprisingly well. Those small 'L' liftarms at the back are what mount them in to the monocoque behind. 

Screen-Shot-2021-06-26-at-10-49-25-am.pn

Screen-Shot-2021-06-26-at-10-50-16-am.pn


@Jerry LEGO Creations @chlego Thanks guys, I appreciate the comments. Glad you both like it so far. 

Share this post


Link to post
Share on other sites

Hey! Love the recreation of one of my favorite cars, but how much space do you leave between the glove compartment and the end of the leg space? 


Share this post


Link to post
Share on other sites
21 hours ago, Thirdwigg said:

Those shoulder bolsters are on point. Great mounting solutions. 

Thankyou, those little 21/22 panels are so versatile. The model's chewed through 22 pairs of black ones so far...

3 hours ago, Scoar Sonander said:

Hey! Love the recreation of one of my favorite cars, but how much space do you leave between the glove compartment and the end of the leg space? 


Thanks, I appreciate it! There is a front wall, that hides all the mechanics behind the dash as I didn't want them showing. The glove compartment on the passenger side sticks out from the wall 2 studs. The steering wheel on the drivers side comes out almost to where the seats start. There is a tad over 5 studs legroom between the wall and where the seats start. Couldn't really make it any more than that, due to the mechanics and how close the front wheels are. There are approximately 13 studs from the glove compartment to the back of the seats. The original one was only 9 so its definitely much more spacious overall. Hope that's clear enough :classic:

Edited by langko

Share this post


Link to post
Share on other sites

Thanks! I am trying to build something of my own, but glove boxes and legroom are the places I get stuck on... Definitely clear enough! 

I also just realised that I have 9 studs legroom... :wall:

Edited by Scoar Sonander

Share this post


Link to post
Share on other sites

@Scoar Sonander No worries! All the best with your build. I've been working on this for around 1.5 years by now, so I definitely know you don't always get it right straight away :grin:  If you have any other questions feel free to PM me. I'm more than happy to share what I've learnt if I can. 

Share this post


Link to post
Share on other sites

Ok so I'd say the model is about 99% finished now. There are just a few spots in the bodywork that I just can't seem to figure out the way I want :hmpf_bad:

But here is some more in depth shots of some areas I'm finally happy with. 

First of all the doors. The original used a bionicle ball joint in the bottom hinge, which was flimsy and didn't hold very well. I'm happy to say I made it work this time around without any balls joints whilst also improving the aesthetics. One of the biggest improvements is the addition of a fixed windscreen on this version (9l links). If you look back at the original you will notice that there was no difference between the door and the windscreen, and they both opened as one. Also put the new panels to good use (thankfully they were both available in yellow). There's the little panel to extend the 21/22 panel and the 3x7 panel in the upper part of the door. The down side was needing a pair of #4 connectors to make it all work :pir-cry_sad: Of course the ONLY connecter available in dark azure happens to be the most expensive and rare in yellow... but that's how lego's part availability seems to work haha.

Made sure to keep the clear parts in the sides and roof too, as that is such a signature part with the Senna. In a world were a lot of these technic supercars are started to be similar, at least it gives my model something unique.

IMG-5787.jpg

Here you can see the side view. I tried hard to improve the circled areas in the original model and think I did a decent job. (no cheating with stickers either :pir-tongue:) Those bionicle wings must be one of my new favourite pieces haha, I didn't even know the existed when I made the doors on the original. Improving my part knowledge has helped greatly with the improvement of this model. There are improved mirrors too (no need to copy legos method with the panel haha)

IMG-5788.jpg

IMG-5014.jpg

Easy method for angled brakes too. Plus the bent panels for wheel wells... Got this idea from @Jeroen Ottens and his venom (thank you!) It blanks off some of the mechanics nicely and also adds good structural support.

IMG-5792.jpg

IMG-5794.jpg

And lastly, thought I'd show the method for the rear suspension as it uses the front pieces, but mounted vertically. This is cool as it allows the suspension to be mounted a stud lower and narrower, creating some much needed room for the bodywork around it. 

IMG-5797.jpg

IMG-5798.jpg

Hope you enjoy! and this shows a bit more details to the model instead of just dumping the completed model all at once when it's finished. 

Next major post will show the finished model, whenever it is that I can be happy with the last nagging problems... I'm not going to try and rush it so who knows when that will be.


Share this post


Link to post
Share on other sites
4 hours ago, langko said:

Hope you enjoy!

I did! Thank you so much for the update! :pir-huzzah2:

Share this post


Link to post
Share on other sites

The second version is a huge upgrade! Love the new shapes and yellow fits better than dark azure imo. I especially like those bionicle wing pieces. 

Share this post


Link to post
Share on other sites

I used front wheel hubs for the rear suspension of my Nissan GT-R MOC as well, and it really is way better. More space efficient and especially stronger because the wishbones can be 5 suds apart and not just 3, using the black wheel hub pieces is overall just a superior solution imo.

Nice progress, that longer panel on the door curve makes a huge difference, looks clean.

Share this post


Link to post
Share on other sites

This. version. way. better ! from. the side and door.. I like the orange with black color! The blue black is for your next moc, GTR version.

Share this post


Link to post
Share on other sites

@astyanax Cheers bro, seeing you try upgrade and improve models to the max (sian and pista for example) motives me to do better too, so thank you for that. :pir-huzzah2:

@LvdH Thank you! I honestly lost track of the amount of attempts/hours I've spent on the doors. The even earlier versions in dark azure looked absolutely terrible haha.  I also think the yellow looks better too, both in the model and real life. 

40054934373-8f7556f628-c.jpg

@Gray Gear Ah yes I can see that now looking at the underside shot of your GT-R. Now that I'm paying attention I also notice you had them that way on your current MOC before you added the 4 wheel steering. Definitely agree that it is superior, and will probably be using it for future MOCS too. I got the idea after building the Sian and seeing them used in the back but the normal horizontal way. Figured it was worth a try rotating them and it payed off.

Agree with the long panel, also helps having those slopes available in 2 stud wide versions, dark azure only allowed the single.

@mojitoca thank you, glad you like the looks of it! Definitely won't be a GTR version, I don't need to have 2 MOCS that are so similar, next project will be something different.


Share this post


Link to post
Share on other sites
1 hour ago, langko said:

@astyanax Cheers bro, seeing you try upgrade and improve models to the max (sian and pista for example) motives me to do better too, so thank you for that. :pir-huzzah2:

Wait till you see what I did to T-lego's Centenario -- I'll post photos in 1-2 weeks time. :pir-grin:

BTW if at some later stage you're ever thinking of virtual modeling / instructifying your Senna, let me know if you need a hand... :sweet:

Share this post


Link to post
Share on other sites
23 hours ago, astyanax said:

Wait till you see what I did to T-lego's Centenario -- I'll post photos in 1-2 weeks time. :pir-grin:

BTW if at some later stage you're ever thinking of virtual modeling / instructifying your Senna, let me know if you need a hand... :sweet:

Ooo I can't wait! looking forward too seeing your take on it. (please tell me you found a proper way to fix all the panels over the front arches :wink:) That's something I've been struggling with this model too... it's hard to secure things at the right angles without them affecting the turning of the wheels, so I can see why he did it that way.

As for the virtual modelling I appreciate that, and I'll keep that in mind. I've played around with studio a bit and quite like it for the most part. But part of my day job is to make instructions for the stuff we manufacture so I'm just not sure I want to spend the time doing it at home too :pir-tongue:

21 hours ago, Jerry LEGO Creations said:

Those doors look very cool. I guess is was quite a bit of work to get them right, but it was worth it :P

What are the final things you're going to work on?

Cheers bro. Sometimes it definitely helps leaving the model aside for a few months and coming back later with fresher eyes.

Securing certain panels so they don't rotate around. Also trying to fix one area around the headlights where certain things clash...

Share this post


Link to post
Share on other sites
8 hours ago, langko said:

please tell me you found a proper way to fix all the panels over the front arches :wink:

I do not know of what you speak, my friend.... Oh wait, maybe it's because I re-colored her to Lime and used the Sian's arches on all 4 wheels, remodeling large parts of the front in the process.... :innocent2:

Edited by astyanax

Share this post


Link to post
Share on other sites
14 hours ago, astyanax said:

I do not know of what you speak, my friend.... Oh wait, maybe it's because I re-colored her to Lime and used the Sian's arches on all 4 wheels, remodeling large parts of the front in the process.... :innocent2:

Haha well getting rid of them entirely is technically 1 way to fix it :grin: Look forward to seeing the finished product!

Share this post


Link to post
Share on other sites

I would love to see this car with instructions. It has come so far since the first amazing design. And I agree it definitely looks better and more fitting in Yellow. 

Share this post


Link to post
Share on other sites
On 9/1/2021 at 5:09 AM, Jakedog2316 said:

I would love to see this car with instructions. It has come so far since the first amazing design. And I agree it definitely looks better and more fitting in Yellow. 

I would love also to have the instructions, but we have to be careful with those people copies and sell it.  I think is difficult now to share, but I think maybe he should be working with a factory. @langko

Share this post


Link to post
Share on other sites

Alrighty the cars pretty much done. I'm sure I'll think of some small things to change eventually but for now I think it's about as good as I'm going to get it.

Here's a photos for now showing the much revised front end over the original. Plus an underside shot as that's what's most important for a lot of people :wink:

Phone is flat and needs a charge. If the weathers any good over the weekend (Melbourne so who knows :grin:) I'll film a short video and take some more photos. This version has an active rear wing and front aero flaps too.

800x600.JPG

800x600.JPG

Share this post


Link to post
Share on other sites

Create an account or sign in to comment

You need to be a member in order to leave a comment

Create an account

Sign up for a new account in our community. It's easy!

Register a new account

Sign in

Already have an account? Sign in here.

Sign In Now

  • Recently Browsing   0 members

    No registered users viewing this page.