Ts__ Posted September 7, 2020 20 hours ago, rday1982 said: I like to take a look at how somebody else approached the problem, and maybe make something similar but I'd rarely copy outright because I happen to agree that one's own work is more satisfying in the end. +1, full ack 20 hours ago, rday1982 said: I agree that it's not anybody's job or obligation to share the details. I'm just a little taken aback by the extent to which people guard their secrets in the AFOL community. Again, I'm not about keeping secrets. I'm not the master builder, I am still learning and like to tinker with things. I also like to watch others and also like to exchange ideas. I like to help and show how what is built. The only thing that is not usually available from me: entire models as a file. And that's only for the reason that I don't have to worry about dishonest people later. Unfortunately, the honest ones are unlucky. 20 hours ago, rday1982 said: My interest in this one in particular comes from it being by far the nicest rendering of a Class 5 (one of my favourite steam engines) in brick that I've seen. Whilst there are lots of great models out there, many instruction sets for them, and some wonderful help available, the main reason I was expressing particular interest in this one is that it's absolutely gorgeous. I'd love to be able to model it half as well. I think I see some things I can try for myself, and I wanted a 3D file if possible because that way I can pull it apart and put it back together again, then look for areas I'd like to do differently, and then attempt from scratch to build my own version using what I've learned before so much as touching a physical brick. Thanks and I'll try to give something back... 20 hours ago, rday1982 said: I'm sure that you'll find improvements to make over time as that's the nature of Lego full ack again. Nothing it´s perfect. 19 hours ago, SteamSewnEmpire said: The trick is getting them to run well - but making them look good isn't that difficult. Oh yes. I think my strength is more of the look. I also have a lot to learn in the chassis. My machines run, but there are people who can do it MUCH better... On the subject of what is "easier": European or American locomotives: no ;-) There is no place among the Europeans. With the American, the chassis is certainly much more difficult. Everything after the chassis is just decoration and a few stones on top of each other ;-) With my LMS Class 5, the chassis is really simple: The red box behind the wheels shows the Lego PU Train Motor. For every Motor one HUB. The second connector at the HUBs is used for Lights. Thomas Share this post Link to post Share on other sites
rday1982 Posted September 7, 2020 (edited) 21 hours ago, SteamSewnEmpire said: The trick is getting them to run well - but making them look good isn't that difficult. Ah, the trick for me would be getting them to run *at all*. I can design something that looks relatively nice and will take a straight line. It's even possible (difficult IMO, but I can usually figure it out) to get it to take a turn. Then, putting valve gear on, and getting it to roll around a curve without that flying apart in an explosion of strained plastic. When I was last using physical bricks, that took a little figuring out (I am not a smart man). But putting a motor, battery, and wires, inside is where I'm totally stumped. It doesn't help that I'm limited to digital building for the moment. I usually start with the wheel frame also, and then put on the boiler cap at the front, building up the SNOT brickwork to allow the boiler to take a tube shape. Then I extend that backwards, meet the end of the main frame, and build into the subframe over the trailing truck at the back to get the cab. Detailing the cab follows, then I'll go back along the boiler and ruin the curved lines with attachment points for piping, then hop up to the top and plop on a funnel, boiler hump, and the smooth top, all the way back to the cab again where I'll make a roof that hopefully seems like a continuation of the smooth lines. I've got a collection of locomotives I've designed in Studio which are pretty obviously inspired by things like the Stanier engines or the UP844s, and I'm going to build them when I *finally* can move into a bigger place. Which won't be too much longer, but has definitely been pushed back a few months or more by Corona. I'm going to get some of the rarer and more expensive parts back from my former collection (my brother's kids mostly just like building with the more basic bricks and don't care what horrible mishmash of colours they use), and then hopefully order the rest from Bricklink. Then, I will build in brick what I've put together digitally. I just don't like the lack of detail, and other compromises I've had to make, to balance affordability, range of motion, and the overall looks of the locomotives. I see models like TS's and just despair of ever being able to build something that looks as good and is still functional. Right, that's really enough hijacking of this thread. I'll start a new one with pictures for you to take a look at my horribly blocky, lumpy, locomotive renders. 1 hour ago, Ts__ said: With my LMS Class 5, the chassis is really simple: Thanks, that actually answers a couple of the questions I had about "how". Edited September 7, 2020 by rday1982 Link added Share this post Link to post Share on other sites
SteamSewnEmpire Posted September 8, 2020 8 hours ago, rday1982 said: Ah, the trick for me would be getting them to run *at all*. I can design something that looks relatively nice and will take a straight line. It's even possible (difficult IMO, but I can usually figure it out) to get it to take a turn. Then, putting valve gear on, and getting it to roll around a curve without that flying apart in an explosion of strained plastic. When I was last using physical bricks, that took a little figuring out (I am not a smart man). But putting a motor, battery, and wires, inside is where I'm totally stumped. It doesn't help that I'm limited to digital building for the moment. I usually start with the wheel frame also, and then put on the boiler cap at the front, building up the SNOT brickwork to allow the boiler to take a tube shape. Then I extend that backwards, meet the end of the main frame, and build into the subframe over the trailing truck at the back to get the cab. Detailing the cab follows, then I'll go back along the boiler and ruin the curved lines with attachment points for piping, then hop up to the top and plop on a funnel, boiler hump, and the smooth top, all the way back to the cab again where I'll make a roof that hopefully seems like a continuation of the smooth lines. I've got a collection of locomotives I've designed in Studio which are pretty obviously inspired by things like the Stanier engines or the UP844s, and I'm going to build them when I *finally* can move into a bigger place. Which won't be too much longer, but has definitely been pushed back a few months or more by Corona. I'm going to get some of the rarer and more expensive parts back from my former collection (my brother's kids mostly just like building with the more basic bricks and don't care what horrible mishmash of colours they use), and then hopefully order the rest from Bricklink. Then, I will build in brick what I've put together digitally. I just don't like the lack of detail, and other compromises I've had to make, to balance affordability, range of motion, and the overall looks of the locomotives. I see models like TS's and just despair of ever being able to build something that looks as good and is still functional. Right, that's really enough hijacking of this thread. I'll start a new one with pictures for you to take a look at my horribly blocky, lumpy, locomotive renders. Thanks, that actually answers a couple of the questions I had about "how". He uses a totally different approach from me, I might add. I utilize actual motors, typically situated in opposition, driving a shaft down to the frame, where power is distributed to most of the drivers via a series of gears. I feel pretty strongly about all-loco power, but other people swear up and down by tender power. Honestly, I think there are probably a good 5 or 6 ways to power these things that would work just fine. Share this post Link to post Share on other sites
baard Posted September 8, 2020 Wonderful train, really like how this turned out. And as always, I will ask for a video of the whole thing in action:-) Share this post Link to post Share on other sites
BricksMcgee Posted September 8, 2020 Wow. Some truly superb models! The lining really makes those models stand out that extra mile. Nice work! Share this post Link to post Share on other sites
Ts__ Posted February 23, 2021 (edited) After a long time, I have created a video: enjoy watching Thomas Edited February 23, 2021 by Ts__ Share this post Link to post Share on other sites
The Lego Railway Series Posted October 21, 2021 (edited) This build as absolutely spectacular in every way. Just Wow. I've been a lurker for a while now and I'm always coming back to this one. How did you do the angled tiles for your roof? I have been trying to build an A3 Pacific (not the Scotsman! lol) for a while now and I just cant get the roof shape right. Your Black 5 has the only technique I've seen that even comes close to the shape I'm trying to achieve. I would also love to see the front cab windows if you wouldn't mind. Edited October 21, 2021 by The Lego Railway Series spelling Share this post Link to post Share on other sites
Ts__ Posted October 21, 2021 (edited) Thx! 9 hours ago, The Lego Railway Series said: How did you do the angled tiles for your roof? The sloping tiles are not a problem. They are attached to hinges. More interesting should be the middle roof area, because there you have to close a gap to the sloping tiles. 9 hours ago, The Lego Railway Series said: I would also love to see the front cab windows if you wouldn't mind. I hope the pictures help, if not, ask again and describe what is unclear. Thomas Edited October 21, 2021 by Ts__ Share this post Link to post Share on other sites
The Lego Railway Series Posted October 21, 2021 1 hour ago, Ts__ said: Thx! The sloping tiles are not a problem. They are attached to hinges. More interesting should be the middle roof area, because there you have to close a gap to the sloping tiles. I hope the pictures help, if not, ask again and describe what is unclear. Thomas Oh wow thank you, I wasn't expecting a full multicolored diagram! very clear to understand. also, that's really interesting and I love how you've done it. the sloped tile was the area I though would have the interesting technique but you pulled a switcharoo on me. Share this post Link to post Share on other sites
zephyr1934 Posted October 23, 2021 On 10/21/2021 at 12:10 PM, Ts__ said: The sloping tiles are not a problem. They are attached to hinges. More interesting should be the middle roof area, because there you have to close a gap to the sloping tiles. That is an amazingly complex build. And your head doesn't hurt after you come up with something like that? The way you sneak the cheese brick in for the front window (in the other picture) is just icing on the cake. Was there any reason why you went with a 1x2 tile (green, far left) instead of one of the angled tiles for the corner of the roof? Share this post Link to post Share on other sites
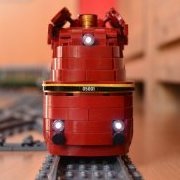
AlexxInc Posted October 24, 2021 Wowie!! This looks amazing, especially those pristine dark red coaches. It looks very realistic great job on this awesome steam locomotive. Share this post Link to post Share on other sites
Ts__ Posted October 29, 2021 On 10/23/2021 at 4:20 PM, zephyr1934 said: And your head doesn't hurt after you come up with something like that? Thx, I love this tinkering. I often first place the bricks in Stud.io the way I want them on the outside (in the LDU grid) and then I try to connect everything. On 10/23/2021 at 4:20 PM, zephyr1934 said: Was there any reason why you went with a 1x2 tile (green, far left) instead of one of the angled tiles for the corner of the roof? The shape of the roof was given by the model, there is no angled corner. Picture LMS Class 5 Also Thanks at Alex Thomas Share this post Link to post Share on other sites
The Lego Railway Series Posted November 8, 2021 On 10/29/2021 at 12:29 PM, Ts__ said: I love this tinkering. I often first place the bricks in Stud.io the way I want them on the outside (in the LDU grid) and then I try to connect everything. hah, this is exactly the same way I build. I've actually learned so much doing it this way because I hate compromising the proportions and the looks of my builds once I've got everything how I want it. Though I'm currently stuck with strictly digital building since I don't have the luxury yet of lots of physical bricks to test out some of my more questionably areas. like right now I'm sweating over the clearance for the leading wheels and the piston on my A1 Pacific. It looks like it should work, but the clearance is soo close I cant be 100% sure it would work unless I test it physically, not to mention the design of the piston itself is fighting me. Share this post Link to post Share on other sites
Ts__ Posted November 10, 2021 On 11/8/2021 at 11:41 PM, The Lego Railway Series said: I cant be 100% sure it would work unless I test it physically, I find it impossible to test certain things like cornering or stability purely digitally. I also design everything digitally, but first I build critical areas in parallel with bricks and after the design I build the whole model with colored bricks. Only then do I buy missing bricks. If you have no or few bricks, this is unfortunately more difficult to do. Perhaps there will be the opportunity for a test build. Thomas Share this post Link to post Share on other sites
KaiW Posted November 11, 2021 What an outstanding, detailled train! Like all your models Share this post Link to post Share on other sites