Sign in to follow this  
Tarix819

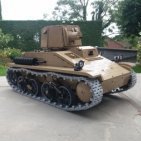
[MOC] Lego Technic RC Vickers Mk. E (B) Light Infantry Tank

Recommended Posts

Hello,

Here is my latest model, which is of a Light Infantry Tank known as the Vickers Mk. E or Vickers 6-Ton, originally designed as a private project by the British arms manufacturer, Vickers-Armstrongs back in 1928. The design was rejected by the British Army, however was bought and built under licence in great quantities by the Soviet Union, Finland, Poland, China, Bolivia and others. The vehicle was used as the basis for the famous Soviet T-26 and Polish 7TP tanks.

The model I have built is the production Type B version. Whereas the Vickers Mk. E (A) had twin turrets with machine guns mounted in each one, the Vickers Mk. E (B) had a single two-man turret with a 3-pounder (47mm) short gun and a coaxial .303 Vickers Gun.

Images of the model can be found at my Imgur post: https://imgur.com/gallery/va9A4IT

YouTube Video: 

Here is a list of features:

-Scale: 1:8.

-Weight: 6.8kg.

-Motors: 9, four PF-XL for driving, two PF-M for the firing mechanism, one PF-M each for the engine, turret traverse and gun control.

-The hull is powered by twin AA battery boxes each fitted with three 3.7v Li-Ion 14500 batteries and three dummy batteries, giving a total output of 22.2v for the hull, which is how such a heavy vehicle drives around without many issues. The turret is powered by a single 7.4v Li-Po.

-Unlike my A34 Comet, which was driven only from the rear, the Vickers is driven from the front and rear, vastly improving mobility. On smooth ground it can neutral steer, on rough ground it can turn in a large radius.

-There are two SBricks fitted in the hull, and one fitted in the turret.

-Track tensioners are mounted on the side to increase or reduce track tension. This makes removing the tracks rather easy.

-The removable engine deck allows access to the AA battery boxes and the straight-six Armstrong-Siddeley Puma engine, which looks and functions like the real one.

-The turret can traverse 360 degrees without any snags.

-Six different hatches can be opened on the turret for maintenance.

-The gun can be elevated and depressed to a limited extent, the coaxial Vickers Gun follows suite.

-The main gun can fire and is rather powerful (More than my A34 Comet). The projectiles fire through the actual barrel and look like real shells rather than just regular technic liftarms.

-The firing mechanism automatically reloads each shot, the spent shell casing is ejected into a collecting tray at the rear of the turret for retrieval.

-When firing, the gun recoils in a realistic manner.

-The magazine can be removed for resupplying, and can hold up to four shots (four shells and four shell casings).

-The suspension system is Leaf-Spring Bogies and is quite unique - I used lego 1x8 tiles to function exactly as leaf-springs do in real life and it works a treat.

-The model features white headlights and red rearlights for a nice effect.

-Other decorative features include a fire extinguisher, shovel, spare roadwheel, rearview mirror, exhaust pipe, radiator and vents.


Building Experience:

This model was quite challenging to build, with most of the initial problems caused by the suspension and the turret. Firstly, on the real Vickers, two bars run width-ways along the chassis to keep each bogie securely attached, however at this scale in Lego it is not possible due to the flexibility of Lego pieces. It took about thirty revisions of the suspension system to stop it from collapsing when driving at full-speed, and oddly enough the actual leaf-spring part was to begin with the most reliable part of each bogey. Thankfully, the final revision fixed this problem completely, though I now understand why the British army rejected such a design . . .

The turret also gave me issues, mostly because of how small it is, with the firing mechanism barely being able to fit inside, with room to elevate, depress and recoil about two-studs' length. On top of this I needed room for the elevation/depression mechanism, the battery box, SBrick, motors and finally room to remove and insert the magazine. I fixed all of these problems to a certain degree, with the only issue being inserting and removing the magazine is a bit fiddly, however I am willing to accept this minor inconvenience for what is otherwise a very functional and decently reliable turret.


Thanks for reading.


Edited by Tarix819

Share this post


Link to post
Share on other sites

Sariel creating fake accounts to post even more tanks! :roflmao:

All jokes aside (no offence to either Tarix nor Sariel obviously), great model! 

It's huge

It's got a great amount of detail

It's got nice working mechanisms

It drives quite fast for such a huge monster

It shoots!

Love it!


Share this post


Link to post
Share on other sites
51 minutes ago, Ivorrr said:

Love it!

Thanks man! 

The more Lego Tanks, the better in my book!

Share this post


Link to post
Share on other sites
12 hours ago, Ivorrr said:

Sariel creating fake accounts to post even more tanks! :roflmao:

You got me there ;) Seriously, great model and I envy you having so much time to build.

Share this post


Link to post
Share on other sites

+1 to what they said.

Awesome creation, can't believe how well it moves for the size.

Share this post


Link to post
Share on other sites
2 hours ago, amorti said:

Awesome creation, can't believe how well it moves for the size.

Thank you! Driving front and rear wheels greatly improved mobility compared to my previous models.

3 hours ago, Sariel said:

Seriously, great model and I envy you having so much time to build.

Thanks, if lockdown was good for one thing this was it!

Share this post


Link to post
Share on other sites

Wow, awesome creation. I would love to see a parts list on it, just out of curiosity to see the count and estimated cost. It is seriously impressive.

Question... what is this about the 14500 batteries and the dummies?  Is there somewhere I can find more information?

Share this post


Link to post
Share on other sites
11 minutes ago, CF 28 said:

Wow, awesome creation. I would love to see a parts list on it, just out of curiosity to see the count and estimated cost. It is seriously impressive.

Question... what is this about the 14500 batteries and the dummies?  Is there somewhere I can find more information?

Thanks, I would too, but sadly I never designed it with instructions in mind, maybe on my next model.

So usually, an AA Battery Box takes six AA batteries - if they are alkaline they are 1.5v each, totalling 9v and if they are rechargeable, they are 1.2v each, totalling 7.2v. Unfortunately, alkaline batteries voltage drops pretty quickly and you have to replace the batteries with others when they finally run out. Instead, I use three 3.7v Lithium Ion (Li-Ion) rechargeable batteries of size 14500 (Which is the equivalent size of AA batteries), giving a total of 11.1v, pretty close to the BuWizz, yet three of these batteries may cost £12 in total - far more cost-effective. Now to prevent frying your SBrick, which you are not supposed to use above 12v, I use three dummy batteries to complete the circuit inside the battery box. This gives me a battery box that outputs 11.1v without any sort of modification or non-lego elements, though the batteries need recharging somewhat more often than with six 1.2v rechargeables.

The batteries I use are 14500 Ampsplus Li-Ions, however I have also used 10440 (AAA) Trustfire Li-Ions, which can go inside a AAA battery box with the same effect. I also believe these batteries are very popular among people interested in Nerf Guns, because they improve rate of fire and such, however with Lego, you can use all the features of the SBrick whilst having BuWizz - level voltage. All at a cheaper price and without the need for modifications or using non-lego elements; essentialy purist-friendly.

Edited by Tarix819

Share this post


Link to post
Share on other sites
5 hours ago, Tarix819 said:

...

Thanks for the info. I'm going to look into that.

I see you're using 2 battery boxes. That must be one to each s-brick to prevent over-loading?

Share this post


Link to post
Share on other sites
3 hours ago, CF 28 said:

I see you're using 2 battery boxes. That must be one to each s-brick to prevent over-loading?

Yep. One battery box and one SBrick per track.

Share this post


Link to post
Share on other sites

Create an account or sign in to comment

You need to be a member in order to leave a comment

Create an account

Sign up for a new account in our community. It's easy!

Register a new account

Sign in

Already have an account? Sign in here.

Sign In Now
Sign in to follow this  

  • Recently Browsing   0 members

    No registered users viewing this page.