Thai bricks Posted March 5, 2020 Does it stall on all your points in the same spot, or just the one? Share this post Link to post Share on other sites
Pdaitabird Posted March 5, 2020 @Thai bricks I only have two switches, but it tends to stall in the straight sections of both at low speed. Share this post Link to post Share on other sites
zephyr1934 Posted March 6, 2020 On 3/3/2020 at 8:49 PM, Pdaitabird said: Thanks for the kind words! A new update: I built this locomotive to use in a shunting puzzle and have now got the layout up and running. I've added a video demonstrating a brief operating session. Very nice little yard. At that size it wouldn't be too hard to set up remote control too. I also like your system for generating the consist, very clever. You could easily do similar to select destinations, lots of great possibilities. On 3/4/2020 at 8:05 PM, Pdaitabird said: Thank you! You're right about the speed - there's a bit of a dead spot on the straight part of the points and I have to fly through it to keep the motor from stalling. Anywhere else on the layout, I can use the lowest speed setting with no issues. Is this a common issue with 9v points or might my track just need a good cleaning? Are you too far away from the power drop? Maybe experiment with a temporary power drop close to the switching yard. If it works you have a solution if it doesn't at least you know it is not due to power drop from all the 9v joints Share this post Link to post Share on other sites
Thai bricks Posted March 7, 2020 2-axle locos stalling on switches is a problem most model railway fans are familiar with. I suggest first checking the switches for corrosion, failing that adding another pair of power pickups to the loco. This won't be easy and you will need to hack some non-lego parts. I think there is a topic or two here on EB on how it's done. Share this post Link to post Share on other sites
Pdaitabird Posted March 7, 2020 @zephyr1934 @Thai bricks It looks like corrosion was the problem...I lightly rubbed the rails with some 600-grit sandpaper and now it works fine. Thanks for the advice! Share this post Link to post Share on other sites
Thai bricks Posted March 8, 2020 I'm glad you solved it so easily. Track cleaning is a chore all track power rail enthusiasts have to deal with. That's why the Dead Rail Society exists. ;) Share this post Link to post Share on other sites
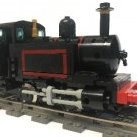
Pdaitabird Posted March 21, 2020 (edited) Warning: Purists, look away! A slight bump, but I've finally added side rods to the engine. To keep everything simple and compact, it's now an inside-cylinder locomotive. Superglue and modified technic parts made for a simple solution. Each "crank pin" is 3/4 of a 2-long cross axle glued to the wheel. (Yes, I split a technic arm down the middle. I didn't have any of the half-width ones in gray. I also slightly reamed out the end holes to give the axles more tolerance.) Here's a clip of the locomotive in action: Thanks for looking! Soli Deo Gloria Edited March 21, 2020 by Pdaitabird Share this post Link to post Share on other sites
zephyr1934 Posted March 21, 2020 11 hours ago, Pdaitabird said: Warning: Purists, look away! Welcome to the dark side! The lounge is over there, you get two weeks off a year to be nice, and we have a generous retirement package. Seriously though, that looks really nice in action. Share this post Link to post Share on other sites
Pdaitabird Posted March 21, 2020 @zephyr1934 Thanks - modifying Lego is a pathway to many abilities some consider to be...unnatural... Share this post Link to post Share on other sites
Paperinik77pk Posted March 22, 2020 On 3/21/2020 at 4:33 AM, Pdaitabird said: Warning: Purists, look away! You made a great modification - small thin wheels (including 9v ones) NEEDED the opportunity to drive some rods! That little shunter is progressing really nicely! Yesterday I was creating an inventory of my blue era trains (missing parts, instructions, boxes, stickers) and I noticed how simple and effective was the possibility to add rods to normal 12v/4,5v wheels, using that little red part attached to the central stud of the wheels. However, the diameter of the half pin (where the rod is attached) diameter is wider than normal Technic parts. ...but the general principle is really nice! Share this post Link to post Share on other sites
Pdaitabird Posted March 22, 2020 10 hours ago, Paperinik77pk said: That little shunter is progressing really nicely! Thank you! 10 hours ago, Paperinik77pk said: Yesterday I was creating an inventory of my blue era trains (missing parts, instructions, boxes, stickers) and I noticed how simple and effective was the possibility to add rods to normal 12v/4,5v wheels, using that little red part attached to the central stud of the wheels. However, the diameter of the half pin (where the rod is attached) diameter is wider than normal Technic parts. I ran into a similar problem with the 9v motor. There is not enough room for a round technic pin between the hub and the rim of the wheel. Fortunately a cross axle just fits! BTW, that locomotive no. 396 in your picture looks like a good candidate for your next XXL project! Share this post Link to post Share on other sites
Paperinik77pk Posted March 24, 2020 On 3/22/2020 at 10:24 PM, Pdaitabird said: Thank you! I ran into a similar problem with the 9v motor. There is not enough room for a round technic pin between the hub and the rim of the wheel. Fortunately a cross axle just fits! BTW, that locomotive no. 396 in your picture looks like a good candidate for your next XXL project! You hit the spot!!! Currently it was the first one I converted (it's a replica) to 45mm gauge , with a 4,5v motor!!! Now I've stolen its wheels for the 7810, but she'll be back soon! Ciao! Davide Share this post Link to post Share on other sites
zephyr1934 Posted March 24, 2020 Oddly though, the Thatcher Perkins was a US locomotive and the set was never available in the US. Share this post Link to post Share on other sites
Pdaitabird Posted June 17, 2020 Apologies for resurrecting this old topic (again!), but I've made more progress in my efforts to squeeze as many features into this small locomotive as possible. I've now added a working headlamp connected directly to the motor (no room for batteries). Since it's a freelance locomotive design set in a fictional pre-grouping railway, I didn't bother with conforming to BR lamp codes. I also added the outside cylinders back on, this time guiding the rods, which are only connected to the back wheels. Check out the video below to see it in action! Thanks for looking! Soli Deo Gloria Share this post Link to post Share on other sites
JopieK Posted June 17, 2020 Really nice update @Pdaitabird. That is a good reason to revive your topic isn't it :) Share this post Link to post Share on other sites
Vilhelm22 Posted June 17, 2020 (edited) @Pdaitabird I’ve only just come across your thread, but this train is amazing! I’m British, so this sort of train is very recognisable - there’s a heritage steam railway quite close to my house as well. Anyway, this is an amazing steam shunter - congratulations! It’s very hard to get that much detail into a small locomotive - especially on the many stripes and curves of British trains. Looking forward to your next train.... Edited June 17, 2020 by Vilhelm22 Share this post Link to post Share on other sites
Pdaitabird Posted June 18, 2020 @JopieK @Vilhelm22 Thank you! It's a fun challenge to work around the limitations of a small size! If anyone is interested in modifying a 9v motor for side rods as I did, the new version works much better than when both axles were coupled. Having cross axles glued to only the rear wheels means less precision in quartering is required. (Even though that would technically make this engine a 2-2-0...shhh, don't tell anyone!) Share this post Link to post Share on other sites
JopieK Posted June 18, 2020 If I would go for it I would use a PU motor so that would even work without glue I think/hope. Those clips in the 12V era were nice but flew often around our ears as I can remember when I was a kid. Share this post Link to post Share on other sites
Pdaitabird Posted June 20, 2020 Minor update: I've added some piping along the boiler (I believe it was@Coal Fired Bricks who had the idea a while back to use coffee stirrers in lieu of expensive flex tubing!) and slightly revised the buffer beams so that the red part is only one plate thick. On June 18, 2020 at 3:16 AM, JopieK said: If I would go for it I would use a PU motor so that would even work without glue I think/hope. Those clips in the 12V era were nice but flew often around our ears as I can remember when I was a kid. I may eventually break down and get a PU motor if one of my 9V motors ever gives up the ghost. I envy those who grew up in the 12V era - that was truely the golden age for Lego trains! On June 18, 2020 at 1:01 PM, Tanner said: Very nice Thank you! Share this post Link to post Share on other sites
JopieK Posted June 21, 2020 The 12V era was indeed a golden age, but I only got two trains (7740 and 7710) and some cars (the yellow crane and the catenary car), two automated signals, an automated level crossing and one signal, later when LEGO moved from 12V to 9V I was able to buy an extra signal etc, but as I still was young I was quite limited in what I could spend on it. Share this post Link to post Share on other sites
Coal Fired Bricks Posted June 25, 2020 On 6/20/2020 at 11:52 AM, Pdaitabird said: (I believe it was@Coal Fired Bricks who had the idea a while back to use coffee stirrers in lieu of expensive flex tubing! Thanks for the credit. Coffie stirrers don't bend well and aren't always the correct diameter so I like to use them for anything that needs to be straight or if I want to use flex tube I experiment with those to find the correct size. NOTE a dab of hot glue may help hold them in place. -Coal Fired Share this post Link to post Share on other sites
BricksMcgee Posted June 28, 2020 Really nice - even without moving rods it looks the part! Share this post Link to post Share on other sites
Pdaitabird Posted June 29, 2020 On June 25, 2020 at 1:23 PM, Coal Fired Bricks said: Thanks for the credit. Coffie stirrers don't bend well and aren't always the correct diameter so I like to use them for anything that needs to be straight or if I want to use flex tube I experiment with those to find the correct size. NOTE a dab of hot glue may help hold them in place. Thanks for the tip! I found that the ones I bought are actually more oval than round in cross section, so rotating them 90 degrees in a clip yields quite a secure connection. 8 hours ago, BricksMcgee said: Really nice - even without moving rods it looks the part! Thank you! Share this post Link to post Share on other sites