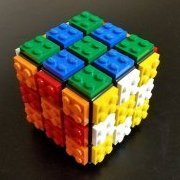
sed6 Posted March 18, 2018 (edited) I have a standard 36 inch by 80 inch hollow core interior door on folding legs that serves many purposes in my hobby room. It constantly gets repurposed for any number of different hobbies I enjoy. Currently I have it set up for my trains and I've tried to cram as much track and functionality into it as possible. Right now my layout has: two complete loops, a crossover between the two loops, a reversing leg, five sidings, nine switches, a passenger platform with crossing, a cargo or maintenance terminal and room to park all my trains. My blue cargo train (60052) and white passenger train (60051) can run at the same time despite the zero clearance between the loops. The BNSF loco can navigate the entire layout but cannot pass another train on the curves because of it overhang. I know it might look a little jam packed to some but it provides me with endless switching and running possibilities. Hope you like! Newest update- Here's a video of my layout today with only my custom trains running. Edited August 9, 2019 by sed6 Updated title and added video Share this post Link to post Share on other sites
richpantson Posted March 18, 2018 nice use of space. Im sure you've tried it already but it looks like you have space on the width and depth for a few flexi pieces. This might allow for the passing on corners Share this post Link to post Share on other sites
deraven Posted March 19, 2018 Really great setup in that space! I agree with richpantson that you could probably add just enough clearance with flex track to add the needed clearance on the curves, but it doesn't sound like that really bothers you and it's a great clean and compact look as it is. I like the color coding on your controllers, too. I think you've inspired me to try something similar on our office desk once tax time is over and the stacks of paper disappear for a while. Share this post Link to post Share on other sites
sed6 Posted March 19, 2018 (edited) 14 hours ago, richpantson said: nice use of space. Im sure you've tried it already but it looks like you have space on the width and depth for a few flexi pieces. This might allow for the passing on corners Actually I hadn't thought of that, great idea! Edit to add: That worked! Just 2 pieces of flex wider and 2 pieces longer allows my BNSF to pass another train on the inside or outside. Thanks again! 12 hours ago, deraven said: I like the color coding on your controllers, too. Good eye! I have parts for one more loco on order and that'll fill up that left most spot :) Edited March 19, 2018 by sed6 Share this post Link to post Share on other sites
harnbak Posted March 19, 2018 (edited) Lovely, perfect for an small space in office or shed. Would it be possible to add a 2nd set of switches (maybe on far side) for the train to enter the middle section without having to change direction/reverse/drive backwards? Edited March 19, 2018 by harnbak Share this post Link to post Share on other sites
*thomas* Posted March 19, 2018 That's a very nice and compact design. Should offer a lot of playability on a small surface. Well done ! As stated, I would also incorporate some flex track pieces in order to have a bit more passing space in the corners. Share this post Link to post Share on other sites
Paperinik77pk Posted March 19, 2018 Nice design!!! A lot of track in such a small space! Share this post Link to post Share on other sites
pyro690 Posted March 19, 2018 Great use of the space! Love it! Share this post Link to post Share on other sites
ColletArrow Posted March 19, 2018 I really like this design, you've crammed in a lot of good features; 5 sidings, 2 continuous runs and a reversing loop to boot. If this was replicated in a larger, more open space with buildings and roads around it, I think it would be pretty awesome. Under that circumstance I would add another crossover between the inner and outer loops such that trains don't have to reverse on it, but in it's current configuration there's no space for that. And it's brilliant anyway. Share this post Link to post Share on other sites
kieran Posted March 19, 2018 Wow, that's a lot in a small space. Share this post Link to post Share on other sites
LEGO Train 12 Volts Posted March 19, 2018 1 hour ago, kieran said: Wow, that's a lot in a small space. I agree ...technical layout in small space Share this post Link to post Share on other sites
sed6 Posted March 19, 2018 13 hours ago, harnbak said: Lovely, perfect for an small space in office or shed. Would it be possible to add a 2nd set of switches (maybe on far side) for the train to enter the middle section without having to change direction/reverse/drive backwards? Not quite enough width on my table, I need 8 studs between the tracks for a crossover on the back and only have 4. Switching in freight yards requires a lot of back and forth anyway, so I'm okay reversing onto the inner loop. Thanks everyone for the positive comments, glad you like! Share this post Link to post Share on other sites
dr_spock Posted March 20, 2018 Great idea! I have an extra door sitting in storage. My spouse has been bugging to get her folding tables back... Share this post Link to post Share on other sites
icemorons Posted March 22, 2018 @sed6 You've done a great job with this! Lots of action packed into a very small space. It looks like you either modified some of the Lego switches, or bought 3rd party ones, since there are some "turnouts" that don't have the normal switch curve pattern. Can you provide any detail as to what methods you used to customize them, or which 3rd party parts you used? Thanks! Share this post Link to post Share on other sites
sed6 Posted March 22, 2018 2 hours ago, icemorons said: @sed6 You've done a great job with this! Lots of action packed into a very small space. It looks like you either modified some of the Lego switches, or bought 3rd party ones, since there are some "turnouts" that don't have the normal switch curve pattern. Can you provide any detail as to what methods you used to customize them, or which 3rd party parts you used? Thanks! Thanks for the compliment. Yes, good eye! I modified many of my switches to a constant radius curve common to every other model railroad switch on the market (except Lego!). The modified switch allows much greater versatility in both placement and usage. Best of all the modified switch can still be used (restored) in its original format making this modification 100 percent reversible. All you need is a thin hobby saw (sometime called a Zona saw), a couple of bricks to serve as a straight edge for your cut, and a 2x4 plate to join the cut pieces together. You will though need to sacrifice a curve piece, but you can use each half of that curve piece, on for a left hand switch and the other for a right hand switch! Here's a link to the process I followed. http://jiri.boha.cz/lego/switches/ Share this post Link to post Share on other sites
sed6 Posted March 23, 2018 (edited) Here's a pic of the cuts you make. Notice also that with the addition of a piece of flex track with the ends cut off you can join two modified switches together for a crossover that maintains the standard 8 studs between ties, again allowing for much more flexibility in your track layout. Compare that to the unmodified switches which give you a ridiculous 18 studs between two parallel lines! Edited March 23, 2018 by sed6 cnat spele Share this post Link to post Share on other sites
*thomas* Posted March 23, 2018 Some very good info here !!! I've been planning a small station / depot lay-out for quite some time, but when laying down tracks, it all seems to wide and very unrealistic. It'll just be a bit more involving, since I have to saw 9V tracks, not PF. Share this post Link to post Share on other sites
bmassaer Posted March 23, 2018 I too will have a very small space to run my trains on. So this information is really, really helpfull! Share this post Link to post Share on other sites
sed6 Posted March 26, 2018 Glad everyone likes! With the recent completion of my 4-4-0 American it was time to see if I could run all four trains simultaneously... Share this post Link to post Share on other sites
sed6 Posted March 28, 2018 I slightly rearranged my track tonight. Took the compound curves out of the front stretch and made a standard crossover using my modified switch which maintains the standard 8 studs spacing on the front. This change also allowed for a longer more useful siding nearest the front. I have 4 stud spacing on the back two tracks and I think I'll add a small firing strip long the back to widen the table another 1.5 inches which will allow for 8 stud spacing and allow another crossover on the back side. I'll make that crossover with right hand switches so my trains won't have to back onto the outer loop. Actually now that I look more closely, I have enough room on the front side to add another crossover, without widening the table! Share this post Link to post Share on other sites
Phoxtane Posted March 29, 2018 This seems like a challenge: How much stuff can we cram into the shape and size of a standard door? I've no idea what a standard door size is, unfortunately. It looks like you'll need to start thinking upwards if you want to have more trains in this space. Share this post Link to post Share on other sites
ElectroDiva Posted March 29, 2018 Nice layout @sed6 - very good use of a very small space :) The biggest problem with Lego Trains is just how much space they take up. I still haven’t found space for a permanent layout in my place so have to pack everything away after every session. Will hopefully fix that when I move from an apartment to a house some time in the next few years. Have often wondered if there would be more of a market for smaller scale Lego trains given how space restricted homes seem to be these days. Share this post Link to post Share on other sites
tmctiger Posted March 29, 2018 Hi @sed6, very nice little technical layout! I guess it is alot of fun to play with it and shunt some trains on it ... I see you have also modified the switches. I also did this for my layout, but only with the twist to preserve the standard track connections points: some images. I do not understand, why Lego wasn't doing this in the first place, the switches are way more versatile this way and building compact layouts is also easier. BR Share this post Link to post Share on other sites
sed6 Posted April 4, 2018 (edited) My layout continues to grow; larger table, more track and more cars! First I lengthened my door by 6 inches and widened it by 2.25 inches bringing it to 86 x 38.25 inches. This allowed me to lengthen the loops by 16 studs, one piece of track, and eliminate the several stud overhang on the ends I had before. Adding a bit of width allowed me to obtain the standard 8 stud spacing (versus the 4 I had) on the back of the loops, eliminating overhang and I also installed a crossover back there. My layout now has 14 switches, 6 sidings, 3 crossovers, 2 seperate loops and 1 reversing loop. This allows for a crazy amount of running and switching fun! I also built some old time passenger cars and a caboose for my 4-4-0 American steam engine to pull. They were fun to design and relatively cheap to build, about $100 for all three IIRC. I'll admit the sidings are a little crowded with all the trains parked, but I'm happy I CAN park them all! Once I pull a train onto the outer loop to run, the inner loop is free for all the switching and reversing my heart desires. The three crossovers make switching from loop to loop a breeze. The crossovers also cut each loop effectively in half, allowing me to use either end of the inside or outside loops as a passing track or a large siding. My childhood N-scale and Lionel trains were just loops with a siding or two. While this might be old news to some of you, I'm just discovering all the fun I can have running trains on a layout with so many options! I hope you like! Edited April 4, 2018 by sed6 cnat spele Share this post Link to post Share on other sites
tmctiger Posted April 4, 2018 Hi @sed6, thats the best version so far! I am surprised how much play value you packed in such a small layout - incredible work! BR Share this post Link to post Share on other sites