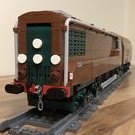
Hod Carrier Posted May 15, 2017 (edited) On 01/06/2016 at 3:27 PM, zephyr1934 said: Your 4 wide beats a lot of the 6 wide out there! I can only imagine what you would be capable of building in 8 wide (beyond perhaps having to take out a second mortgage on your home to pay for it all, grin). Well, I figure that using LDD is free so I'm not bankrupt yet. However, I have decided to dip a toe into the world of "proper" LEGO trains by knocking up this 8-wide rendering of an SNCB/NMBS AM08 Desiro passenger train. These EMU trains can be seen operating throughout Belgium on local and intercity services and are among the most modern passenger trains used by this operator. NMBS SNCB Desiro 08209 Zichem 01082016 by W Daelmans, on Flickr So far I've only got as far as designing the train in LDD but, unlike my earlier Desiro UK, this one is both buildable and intended to be powered. I wanted to make this model to scale, which is why it looks excessively long by LEGO train standards. I took the formula of 1 stud = 15 inches to arrive at a total length of 210 studs. I appreciate that this might make it difficult to operate on anything other than the widest of ME Models radii, but I'm taking looks over operation as my starting point. It would be possible to reduce the length somewhat if necessary, but I'm hoping to avoid that if at all possible. There is a gap between the black and dark bley arches at present because no brick exists that will fill that gap, or at least not on the LDD palette. The intention is to use a length of light bley pneumatic hose instead. Thoughts, comments and reactions are welcomed, especially as this will be my first venture into full-size LEGO train construction. Edited May 15, 2017 by Hod Carrier Syntax Share this post Link to post Share on other sites
LEGO Train 12 Volts Posted May 15, 2017 Very nice CAD work ...I like the doorstep and the livery of this train! Share this post Link to post Share on other sites
Sven J Posted May 15, 2017 While I don't know much about modern EMU trains, this (virtual) MOC is very impressive! I can only assent to LT12V's words. It's also really nice to see a train model in full scale length! As for the gap between the front arches: Isn't the diameter of the pneumatic hose too small to fill the place? I have to admit that I can't think of a better solution at the moment, though. Share this post Link to post Share on other sites
TCRR Constitution Posted May 15, 2017 Very nice. the gap in the front could be fixed, but otherwise, amazing! Share this post Link to post Share on other sites
Hod Carrier Posted May 15, 2017 Thanks guys. I'm glad you're liking it too. 1 hour ago, Tenderlok said: While I don't know much about modern EMU trains, this (virtual) MOC is very impressive! I can only assent to LT12V's words. It's also really nice to see a train model in full scale length! As for the gap between the front arches: Isn't the diameter of the pneumatic hose too small to fill the place? I have to admit that I can't think of a better solution at the moment, though. I fear you may be right about the diameter of the hose, especially as there is a void inside the larger outer arch. I did wonder about threading Technic half bushes onto a flexible axle cut to length, but I guess I shall just have to experiment. It does strike me as slightly weird that there appears to be one size of arch missing from the sequence. Maybe someone somewhere has come up with a custom part to fill the void, if you'll forgive the pun. Share this post Link to post Share on other sites
Nemo57 Posted May 15, 2017 (edited) Great job. Beautiful train turned out. Personally, I have no idea how to improve the train. He's already great. But you can also build a train six broad. Here's the Russian version of Siemens Desiro RUS from the builder of the pavlo. Edited May 15, 2017 by Nemo57 Share this post Link to post Share on other sites
Ashi Valkoinen Posted May 16, 2017 According to my experiences with long cars, a train car with length of 64 studs can be operated easily on standard track geometry. You wrote that your train ended up with 210 studs in total, which is 70 studs for each car, I suppose to have 64 studs for middle car as long as end cars shouldn't be connected to other locomotives or cars on their ends with driver cabs. I also recommend to run it with at least two train motors (PF) and with PF IR receiver V2, with V1 it will slow down or even stop on sharp curves thanks to the high current consumption of PF train motors (...one motor needs less current, but won't run this train). Alltogether it is a really nice design, however I dislike the side of driver's cab - the black curved slope and the grey arch next to each other don't match the real thing, maybe with differently angled SNOT-slopes you can achieve closer match to the original train. You may also consider to drop the usage of old-fashioned black train windows - they are quite expensive and don't match the modern-looking train, consider to use trans-black panels instead. Share this post Link to post Share on other sites
Hod Carrier Posted May 16, 2017 (edited) @Ashi Valkoinen Thanks for the advice and pointers. I've provided one train motor at one end but it wouldn't be difficult to add a second one at the other end too to help it around. I was intending to use an SBrick that I've hidden inside the roof rather than an IR receiver which I think will deliver sufficient grunt. I didn't want to use window panels because, although slender, the Desiro ML does have black window frames, but I do take your point about the cost and availability of the parts I've used in the LDD file and will probably substitute them for something else. It may not appear so from the prototype photo I posted for comparison, but the front profile of the Desiro ML is curved rather than slanted and the SNCB/NMBS livery follows those curves up to the roof. There is meant to be a narrow pale grey strip between the black panel surrounding the cab window and the darker grey stripe that runs up to the roof, which is the part that's missing so far. I'm not very experienced with SNOT techniques so I might not be heading in the direction you were thinking, but I have revised the design around the cab slightly to deal with the gap. Not sure if this is any better. Edited May 16, 2017 by Hod Carrier Share this post Link to post Share on other sites
Ashi Valkoinen Posted May 31, 2017 (edited) Hello, sorry for the late reply. I think your updated design is better, but it is my personal point of view. I see the pain you (and all those who build such a complex MOC, I mean curves and narrow differently colored strips) have, you have always the decision which detail you leave to go and which you keep. And still, it is a wonderful MOC, I hope we can see it for real in the future. Windows: The black window frames you use are 3 bricks high (72 LDU, LEGO Digital Unit), and 4 studs wide (80 LDU, 1 stud is 8 mm, 20 LDU, 1 brick is 9,6 mm, 24 LDU), so if you use some SNOT technique with increased window height (with only one plate, 8 LDU), you can build a window with brick-built black frame around it. It means some additional weight compared to train window parts, but availability and costs is an important factor. :) Also I just remembered that new version trans black panel (with side supports) look exactly from side view as they have black frame, since the edges has the "side support" which looks almost black compared to the whole surface of trans black panel, and the bottom and the top of the panel looks black, too, where you connect it to other bricks. I think it is worth to try how it looks on your train. Edited May 31, 2017 by Ashi Valkoinen Share this post Link to post Share on other sites
Hod Carrier Posted May 31, 2017 @Ashi Valkoinen Don't worry about the time it takes to reply. I'm sure we're all busy with our real lives outside of the hobby. I'm sure you know from your own experiences that design is always a question of compromise. If you decide to accentuate one detail it usually means that you have to sacrifice some other detail, so you always have to decide which details are most important and which you can do without. For every prototype there will be many many different ways of interpretation. The cab design for this MOC is still evolving as it moves slowly towards completion. I hope you will be pleased with the changes I'm making. Other areas too are being updated and altered, either to improve the appearance or to account for the availability of parts. I intend to build this model for real but I don't want to make my usual mistake of changing the design after the first BL orders have been placed. I'm interested about the new trans-black wall panels you mention. Is there a new part number for these? Share this post Link to post Share on other sites
Ashi Valkoinen Posted May 31, 2017 Panels: older design, ID 4215https://www.bricklink.com/v2/catalog/catalogitem.page?P=4215#T=C newer design, ID 60581https://www.bricklink.com/v2/catalog/catalogitem.page?P=60581#T=C on 60581 there is a side support to prevent accidental break of the part, since it mean thicker material from side view, in case of trans black panel it looks almost black from side view. I looked around for photos on my laptop, if I have any about the trans black part, but currently I haven't any photos like this. 36 minutes ago, Hod Carrier said: @Ashi Valkoinen ll evolving as it moves slowly towards completion. I hope you will be pleased with the changes I'm making. Other areas too are being updated and altered, either to improve the appearance or to account for the availability of parts. I intend to build this model for real but I don't want to make my usual mistake of changing the design after the first BL orders have been placed. It is good to develop MOC only in LDD, but it happened to me more than once that something I liked in LDD I dislike in real life, and I started to order parts after the first build. In some cases some builds are not stable enough to run it for many days without cracking apart, and with my Stadler FLIRT I designed a totally renewed front after 5 years I built the first train. So there was no chance to fix it in LDD. :D I'm looking forward for the finished MOC, if they were supposed to run in Hungary, I would build this color-variation of Desiro ML: http://www.tauernbahn.at/img/201610/4744_301_REX_Lanzendorf-Rannersdorf_12_09_2016_Alfred_Schmid_1024.jpg Share this post Link to post Share on other sites
Peter Feys Posted August 22, 2021 @Hod CarrierThis looks amazing. I'm currently working on a massive version of the Antwerp Central train station and would love to put 2 or 3 of these on the platforms. Any chance you would want to share the LDD file of the NMBS desiro with me? (or sell it, no need to just see your work used for free of course) Share this post Link to post Share on other sites
zephyr1934 Posted August 22, 2021 Greetings @Peter Feys and welcome to the Train Tech form. It is always great to have new contributing members. However, please do not revive 4 year old threads to request something from the original poster or make a passing comment. I believe you become able to send private messages after your 10th forum post, at which point it would be appropriate to ask your question directly of the author via PM. Share this post Link to post Share on other sites
Hod Carrier Posted August 23, 2021 On 8/22/2021 at 10:47 AM, Peter Feys said: @Hod CarrierThis looks amazing. I'm currently working on a massive version of the Antwerp Central train station and would love to put 2 or 3 of these on the platforms. Any chance you would want to share the LDD file of the NMBS desiro with me? (or sell it, no need to just see your work used for free of course) Thanks for the compliment. @zephyr1934 is right about forum etiquette, but as a new member it's maybe something you weren't aware of. I'm sure many people here would be very interested to see more of your plans for your model of Antwerp Central, as it's a fabulous station in real life and would make for an amazing diorama as well as allowing you to unlock the private message function. We're also quite a helpful bunch and happy to share ideas, tips and tricks that you may find useful. The AM08 design is a bit outdated now and I think I'd want to make some changes to it before sharing it. I also don't know how strong or stable it might be because I've never built it in real bricks. I should also warn you that it is a monster at around 210 studs long and is not likely to want to go around standard LEGO curves. However, I would be happy to allow you to use the design "as is" and to modify it to suit your purposes. Share this post Link to post Share on other sites