DugaldIC

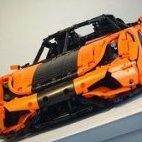
Aston Martin Vantage GT3 (instructions and parts list now available, thank you Thorsten50)

Recommended Posts

On 04/09/2017 at 4:46 PM, Lego_GBC_NL said:

 In terms of functionality I guess there'll be no issue with regards to driving (2x XL) and steering (servo), but I'm a bit worried when it comes to the 4 speed sequential gearbox (M motor). Will this work when using an IR receiver and IR remote control? 

Thanks for the interest and I apologize for the overly late delay in response, the past few months have been very busy and haven't checked eurobricks in quite sometime. Unfortunately due to the size of any other batteries they won't fit where I built around the buwizz. However another builder removed the passenger seat to fit a pf battery and stuffed the recievers where the buwizz sits. According to him everything worked well! 

@Mysh thanks for sharing this thing looks incredible!! :thumbup:

Share this post


Link to post
Share on other sites

@DugaldIC Thank you so much for your reply! I agree, it looks awesome.

Would be great to know, what pieces we need at different colors to make this mod. Does anyone know anyone who could make and sell these stickers?

Share this post


Link to post
Share on other sites
Just now, Mysh said:

@DugaldIC Thank you so much for your reply! I agree, it looks awesome.

Would be great to know, what pieces we need at different colors to make this mod. Does anyone know anyone who could make and sell these stickers?

Unless you paint or buy fake l3pin garbage, only orange is possible at this time.  I get my stickers from Japp

Share this post


Link to post
Share on other sites
1 hour ago, DugaldIC said:

Thanks for the interest and I apologize for the overly late delay in response, the past few months have been very busy and haven't checked eurobricks in quite sometime. Unfortunately due to the size of any other batteries they won't fit where I built around the buwizz. However another builder removed the passenger seat to fit a pf battery and stuffed the recievers where the buwizz sits. According to him everything worked well! 

No problem at all. Thanks for your reply, at least I now know what my options are. Need to think about it as removing the passenger seat is not really a preferred solution, so I might reconsider investing in a BuWizz afterall (and new phone :tongue:). Then I can simply follow the instructions and build the original MOC without having to make changes. Already purchased a new 42056-1 set, so that's a good starting point.

Share this post


Link to post
Share on other sites
31 minutes ago, technic_addict said:

Unless you paint or buy fake l3pin garbage, only orange is possible at this time.  I get my stickers from Japp

By lepin, you mean decool? Lepin only sells 42056 in orange.

Share this post


Link to post
Share on other sites
9 minutes ago, Mysh said:

I am looking at the instructions spacing is super tight, it's hard to add extra suspension.

I am looking at this mod to increase the 6.5L stiffness:

Was also looking at the brick owl. Was wondering if it's possible to replace the suspension mechanism with another stiffer one:

https://www.brickowl.com/catalog/lego-parts/technic/shock-absorber

Any ideas?

The stiffest spring is already being used in 6.5L size.  I see no reason why using the half bush on the hard spring wouldn't work to make the suspension stiffer.

Share this post


Link to post
Share on other sites
12 minutes ago, Mysh said:

I am looking at the instructions spacing is super tight, it's hard to add extra suspension.

I am looking at this mod to increase the 6.5L stiffness:

Was also looking at the brick owl. Was wondering if it's possible to replace the suspension mechanism with another stiffer one:

https://www.brickowl.com/catalog/lego-parts/technic/shock-absorber

Any ideas?

That sir is brilliant :)

Share this post


Link to post
Share on other sites

@Mysh

1 hour ago, technic_addict said:

@DugaldIC does the suspension require this?

Unless you wanted to reduce the amount of stress on torsion its really not needed. I set up the suspension so that the suspension and swaybars are torsioned and is super stiff the way it's set up. You could give it a try and remove the torsion from the swaybars? 

Share this post


Link to post
Share on other sites
On ‎10‎/‎29‎/‎2017 at 2:56 PM, DugaldIC said:

@Mysh

Unless you wanted to reduce the amount of stress on torsion its really not needed. I set up the suspension so that the suspension and swaybars are torsioned and is super stiff the way it's set up. You could give it a try and remove the torsion from the swaybars? 

I am building it now and I like the way your have setup the torsion bars.

Share this post


Link to post
Share on other sites

Slight error in the PDF on page 5 step 6, the grey 5x7x1 frame should be flipped upside down to allow the 24 tooth gear to not rub against the frame.

I'm busy building it and will update on other errors I find if any..

Regards, Snipe

Share this post


Link to post
Share on other sites

Also the liftarm 15L on page 1, step 5 jams the same 24 tooth gear. I'm not sure what the best fix is since I've not built the entire model yet.

Regards, Snipe

Edited by SNIPE

Share this post


Link to post
Share on other sites
12 minutes ago, SNIPE said:

Also the liftarm 15L on page 1, step 5 jams the same 24 tooth gear. I'm not sure what the best fix is since I've not built the entire model yet.

Regards, Snipe

You may have assembled something incorrectly because I don't recall any issues so early in the build.

Share this post


Link to post
Share on other sites

hmm Here is a cutaway of how I built it in LDD (I have also copied this to a real model)

Phg8YUm.png

Edited by SNIPE

Share this post


Link to post
Share on other sites

@DugaldIC, I just wanted to say how impressive this design is. Is there any way I can contribute to you or @Thorsten50the instruction maker?  I just finished the last BrickLink order to fill out missing parts for this build without PF or pneumatics. Really looking forward to completing.

Edited by jeffmcclain

Share this post


Link to post
Share on other sites
On 2/17/2018 at 5:50 PM, SNIPE said:

hmm Here is a cutaway of how I built it in LDD (I have also copied this to a real model)

Phg8YUm.png

See this is an old post, but this should work with the frame oriented the way shown in the screenshot, with the open ridges turned upwards that is, but the beam can surely give problems.

Share this post


Link to post
Share on other sites

Hello,

I just starting building this awesome model (finally! :classic:), but I’m having some doubts about part of the rear suspensions. My issue is with part ID 6536 (Technic, Axle and Pin Connector Perpendicular) and the angle this part (and the 7L axle that goes through it) should have on page 29 - steps 19/20 of the PDF instructions made by @Thorsten50 and on picture IMG_9615.jpg of the Photo Sequence Building Instructions made by @DugaldIC. See pictures below.

PDF%20Building%20Instructions%20-%20Page


Photo%20Sequence%20Building%20Instructio

Part ID 32009 (Technic, Liftarm 1 x 11.5 Double Bent Thick ) later on forces part 6536 to be in this non-straight angle. Initially this is fine, but once the red shock absorber is attached to the black L-shaped 2x4 liftarms, the 7L axle and part 6365 are under an enormous amount of pressure and the left and right sides of the structure are unequal/uneven. Looking at pictures made by others it seems that this +/- 30 degrees angle is intentionally and is supposed to be there, but in all pics I’ve seen the structure as such remains straight/even. Problem seems to be that the other side of the 7L axle doesn’t make the same angle as this side is fixed by the 2x 6632 (Technic, Liftarm 1 x 3 Thin). See my own picture below.

DSC00106a.JPG

For the designers/people who already built it: anyone remembers having an issue with this or anyone can advise me or knows what’s going wrong in my build? Must be a building mistake somewhere, but after some hours I still can’t figure it out. Built the rear suspensions using the PDF instructions as well as the Photo Sequence Building Instructions, but both have the same outcome. I’m afraid to continue the build as I’d like to avoid having to take apart a lot later on.

Thanks in advance for your help on this! :classic:

Share this post


Link to post
Share on other sites
4 hours ago, Lego_GBC_NL said:

Hello,

I just starting building this awesome model (finally! :classic:), but I’m having some doubts about part of the rear suspensions. My issue is with part ID 6536 (Technic, Axle and Pin Connector Perpendicular) and the angle this part (and the 7L axle that goes through it) should have on page 29 - steps 19/20 of the PDF instructions made by @Thorsten50 and on picture IMG_9615.jpg of the Photo Sequence Building Instructions made by @DugaldIC. See pictures below.

I also noticed this, but I think its supposed to be a roll bar or something hence why it twists the axle slightly. Or its used to create a positive caster angle (AKA McPherson strut suspension)/

Edited by SNIPE

Share this post


Link to post
Share on other sites
9 hours ago, Lego_GBC_NL said:

For the designers/people who already built it: anyone remembers having an issue with this or anyone can advise me or knows what’s going wrong in my build? Must be a building mistake somewhere, but after some hours I still can’t figure it out. Built the rear suspensions using the PDF instructions as well as the Photo Sequence Building Instructions, but both have the same outcome. I’m afraid to continue the build as I’d like to avoid having to take apart a lot later on

Later on in the build, the outer ends of these 7L axles are fixed by the main structure and will straighten out as your build evolves. The 7L axles are used as torsion bars, which is not uncommon in suspension setups. It has nothing to do with caster or anti-roll bar (the anti-roll bar is added in step 47). The 7L axles are used this way because the shockabsorbers are too soft to carry the weight of the final build. In this case I think it would have been better to use 2 shockabsorbers, it might still require a torsion bar, but not with this much bending.

800x722.jpg

Share this post


Link to post
Share on other sites
On 12/15/2018 at 3:39 PM, jeffmcclain said:

@DugaldIC I just wanted to say how impressive this design is. Is there any way I can contribute to you or the instruction maker?  I just finished the last BrickLink order for this without PF or pneumatics. Really looking forward to completing.

Thank you, I appreciate the offer but it's quite alright. I built this one free for everyone, however I'll start charging on future builds. I'm currently in the process of a year long build which will hopefully be done early next year. 

@Lego_GBC_NL @Didumos69

Thanks for your concern and input, but didumos is correct it is there for Torsion bar and not for anything else. It is under a bit of stress but I wanted to make a 1/8th scale build with one shock per wheel and torsion bar was the only way I could make it work. It definitely isn't that common, hence the confusion however it does hold the weight nicely and has good spring back. As far as I know it hasn't given out on anyone's builds yet, but if you don't add it the back end will sag worse than the Porsche front end :laugh:

Share this post


Link to post
Share on other sites

Create an account or sign in to comment

You need to be a member in order to leave a comment

Create an account

Sign up for a new account in our community. It's easy!

Register a new account

Sign in

Already have an account? Sign in here.

Sign In Now

  • Recently Browsing   0 members

    No registered users viewing this page.