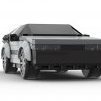
cehnot Posted May 8, 2016 I finished this a few weeks ago and wanted to share with you my rendition of the classic 1967's anime show Mach Go Go, known in the USA as Speed Racer. I owned the movie version sets years ago and had to sell them off while paying for college. One of the things I hated was how simple the cars were made and hardly looked like the movie versions. Though I enjoyed the film, the Mach 5 was redesigned from the original anime to fit their needs. I had some issues with the body design and the back tail fins, but overall I enjoyed seeing them recreate my childhood cartoon into a live action film. I wish they did a better version of it, but frankly, I was happy it was a tricked out and colorful movie. Spent a lot of time looking at old cell frames from collectors of the original mach 5 design, as well as several blue prints made of the car over the years. All this made me adore the car more and become sorta emotional to know that so many slight changes took place between all the ERTL models, Hot Wheels, Johnny Lighting, and various toy sets. When you look back to the classic anime the car was actually quite hard to draw in various poses. There were several modern takes on the classic cartoon and only 1 faithfully recreated the mach 5 in CGI matching the anime, in all its glory. That show was called Speed Racer: The Next Generation. The car was seen in only 2 episodes and replaced by their version of the Mach 6. I loved how much detail they put in the vehicle and it was great to use for this car as reference. I have seen some high end metal replicas and only 1 car company did it, but never got it made because 4 or 5 years the license was taken away and they had to cease production of what was shown at a toy fair. That was one sweet car. A great article from Diecast Magazine showing various types of Mach 5 versions available for purchase. http://www.diecastxmagazine.com/blog/2016/01/21/mocking-up-the-mach-5-2/ The ultimate Toy if they ever made it. Allegory premiered in 2012 SDCC a collector's dream car. They found the original blue prints, got the original cell art and recreated it on the computer. They shoed off videos of how accurate this thing was and nothing compares to its beauty. http://news.toyark.com/2012/07/14/sdcc-12-limited-edition-mach-5-pics-6155 Check out this awesome video from the event they created showcasing this loved item. They would have created my most expensive and surely happiest toy ever. I love the show. https://vimeo.com/66120063 THEN THEY LOST THE LICENSE RIGHT BEFORE ORDERS WENT OUT. Created a masterpiece and lost it. See the article below. http://www.comicbookresources.com/?page=article&id=41994 Joyride recently created the car into a die cast 1/18 collectible and it is very close to the original specs. Its much cheaper and easily available to order. Resaurus The 6inch Resaurus toy set was closest to original anime. Bulky, but close. I liked how the anime by episode 50 actually slimmed down the car a bit and didn't keep it so round like this toy. Ertl This die cast replica has some awesome features. Its quite unique as it has all the weapons and actions features you would expect in a toy version. Otaku This is one expensive inaccurate replica. It looks like a real car, but shape is wrong. I would purchase this $800 replica if it was closer to the body I like. But if I cared little about accuracy, then this would be the ultimate toy! http://www.ebay.com/itm/like/121903268826?lpid=82&chn=ps&ul_noapp=true Enough of the reference. ONTO THE CARS I created 4 versions of the car. Each version has significant rear spoiler and muffler changes. I had to alter each rendering from the cockpit and back in order to make it closer to the anime and Allegory rendering. Photo 1 As you can see, the major difference between these two cars are the rear spoilers. The one on the left makes a great profile picture of the car and accurately matches the outline of the car. Unfortunately, the space between the spider and body is quite noticeable and disliked. This is why I kept all 4 models. I already ordered my parts off Bricklink to build these two versions and see if I could moved the spoilers to enhance the one on the left and rebuilt it in LDD. Photo 2 The lineup. Going from left to right, Car #2 fits the best overall shape and model of how protruded the mufflers need to be, unfortunately, based on how I built the models I used 2 binoculars attached to each other to get that length and you can see one of the binoculars behind the wheel well. Not too fancy. #1 fits the overall look and shape I wanted, minus the spoilers. I could merge #1 and #4 to create the correct under carriage and mufflers as well as correct spoilers, but again there is a gap in-between the fins and body. If LEGO created wedge plates without knobs I could make this work by double up the plates and use another technique to hide the gap. Photo 3 Car #3 and #4 both have the correct rear wheel cover angle like you see in the tv show. I may do a 5th version where I combine #1 and #3. The largest issue is when doing this, I had to heavily modify the framework underneath to get the wheel slightly inside and keep the shape the correct 8 stud width without rubbing against the wheel. I think the total width of the rear wheel is 7 to 7.5 studs wide. Photo 4 Seems easy, but these body frames were difficult to keep together. I had to reenforce each shape to make the rear work. These models do not have a working front hood and rear storage compartment. I may want to build 2 or 3 models first to see how durable they are, then try to create an opening hatch. I had an earlier version with this idea I kept in case it could work. I just don't want to chance it until I try to see how the real models work. SPECIAL NOTE: I wish LEGO Created 1x3 inverted transparent yellow slopes. I will use Transparent Clear for the real car build. Photo 5 A great profile on the car #2 where you see the binoculars behind the rear wheel. Not happy bout those. Photo 6 Shows you how the front looks. A bit hard to see without a blue render. There is an air intake below creating the "smile" like in the anime. The anime creators said they designed the car to have a smile underneath where the 2 buzz blades come out so that the car smiles as he zooms past his enemies. Simple old anime approach to comedy. Photo 7 A better angle of the car. Photo 8 This is Car #4, see how the spoilers create that awesome point just like the real car? Photo 9 Nice profile, great rear wheel well cover, terrible that the plate wedges don't offer the same shapes without knobs. Blue Renders This is my first attempt at doing these. Any suggestions on creating better renders or somehow getting better lighting to make the white easier to see, PLEASE LET ME KNOW. Share this post Link to post Share on other sites
Th3_Br1ck_Kid Posted May 11, 2016 Take that Lego! If they built the Mach 5 like that Lego Speed Racer would have until 2011! P.S. Please build Mach 6! Share this post Link to post Share on other sites
cehnot Posted May 11, 2016 I think i may give away the LDD for free like I recently did on my 74 stud long Ghostbusters firehouse and the LDD of my revamped Ecto-1. I might want to build Racer X car first. I don't know. I am also nearly finished with my revised Delorean from Back To The Future. The reason I gave these away was so others could enjoy building them and modifying them. If anybody could improve them, add a trunk or engine I would be honored. Share this post Link to post Share on other sites
cehnot Posted May 17, 2016 I may need to have professional stickers made for this. I purchased a LEGO brand sticker sheet and realized that the "5" logo and "M" logo are stylized for the live action film and way too small for this. Looking into it, The press house I use for my comic art prints want 250-500 quantity for $31-$35. I just need 1 set. Would there be any interest in buying these? I will upload a photo of the 2x3.5 sheet i want to get made. Share this post Link to post Share on other sites
cehnot Posted May 18, 2016 I have been a graphic designer for 15 years now, LOGO creation and recreation sorta comes pretty natural to me. The following images depict what I was working on trying to bring to life a 1967 cartoon logo. There have been many revisions to the logo and slight modifications by die cast and toy companies. Photo 1 Top Row: My preferred "5" Logo created from modifying the Allegory model version and original Intro ending logo. One at the front of the intro sequence then a 3d turnaround at the end. The first is quite thin and the later is much thicker. The thicker number would make more sense since it needs to be seen from far away. 2nd Row: Allegory model recreation. Based on various photos from the 2012 SDCC show. 3rd Row: 1967 Intro recreation. The 54 episode tv cartoon had too many flaws and even the intro showed 2 completely different logos. 4th Row: Speed Racer: The Next Generation CGI tv show brought back the original Mach 5 digitally recreated. Allegory used this model to help build theirs along with the original blue prints from 1965-1967. Photo 2: The high res jpg from The Next Generation helped out a lot. This was taken from a promotional poster art. The original logo has rounded corners on all the tips and I thought it felt too soft so I took them off. Photo 3 I used various Japanese License Plates to recreate an official plate for the Mach 5. The Mach 5 License Plate reads as 21 on top and 2787 below in the cartoon and manga. Japan uses a dash between their license plate numbers since 1963. I will include both versions in the sticker. Share this post Link to post Share on other sites
cehnot Posted May 18, 2016 (edited) I combined Car #1 and #3 to see how it would look. The shape and body looks great. I wish LEGO created wedge plates without studs as options for us. Overall, I think this nails it. BlueRenders with photoshopped "M" and "5" Logo as well as a nice Japanese License Plate with Speed's actual plate number from the Manga. Photo 1 Here is the proposed size and placement for my stickers. Photo 2 Trying to get the correct size and placement for the "5" according to the various models and reference I have. I think this fits quite nicely. The size for the circle is the same size as the wheel rim. The size and shape of the logo changes everywhere I looked except the original blue prints and the Allegory model. They place it on the door with the same basic size as the rim. This fits well on the side of the LEGO model. Photo 3 I changed some of the bottom structure a bit to make it more durable. The model also has a trunk compartment, but no hinge yet. I need to see how durable it is with the allowed space. Photo 4 You can sorta make out the under air intake "smile" I did not add a "M" rendering on this version since it looks sorta weird without an actual sticker placed. Photo 5 I placed the rear license plate onto the proposed plate. I like how Ecto-1 had lines and a few dots to indicate the shape and screws. Photo 6 I think this will be just about the right size. Edited May 18, 2016 by cehnot Share this post Link to post Share on other sites
ritzcrackerman Posted May 18, 2016 Damn, son! Love this!! Share this post Link to post Share on other sites
ritzcrackerman Posted May 18, 2016 Are you planning to post the LDD file? I wouldn't mind playing with it myself. Share this post Link to post Share on other sites
iammac Posted May 18, 2016 I had completely written this theme off... too bad TLG didn't open with THESE! Share this post Link to post Share on other sites
cehnot Posted May 19, 2016 I built the model and reworking it to make it more durable. When I am happy with the internal structure, I will reverse engineer it and make the final LDD available. Share this post Link to post Share on other sites
cehnot Posted May 19, 2016 (edited) Final Speed Racer Mach 5 LDD Version 1 http://www.chrisehno...h5_final_01.lxf Version 2 http://www.chrisehno...h5_final_02.lxf Thank goodness I built this model. There were so many durability issues with the digital model. I am waiting for a few pieces to arrive in the mail, like the inverted 1x3 Slope transparent clear (hard to find and not made for public sets. Only 2 vendors have it, and I bought extras. Also, the rims will be chrome. I already own them, just waiting for final pieces to take some photographs. The new model has a super strong frame. The front arches above the wheels are the only parts that are semi flimsy. That is because of how I needed to attach them with 1x1 tiles. The LDD has 2 variations in case you want a more durable front. The first option is seen in the BlueRender below. The second option has a 1x4 plate below the 1x3 slope for durable headlights. This does not work very well for the accurate Mach 5 profile. Both models have a trunk compartment that can be modified for hinges to open. Edited May 19, 2016 by cehnot Share this post Link to post Share on other sites
cehnot Posted May 20, 2016 Speed Racer Sticker Sheet Looks like if I want pre-cut stickers I need to buy 250 and it will cost me about $245 for the batch. Yikes. If I don't have them pre-cut, they will cost me about $85 for 250. Share this post Link to post Share on other sites
B Rick Posted May 20, 2016 Very nice model. Love how you try to be so accurate as possible to the original design. For stickers... Do you need that much of em? You can always search for people or small companies to make you a one-off stickersheet. Share this post Link to post Share on other sites
cehnot Posted June 1, 2016 I am waiting for stickers to be printed and mailed. I ordered 10 sticker sheets. Share this post Link to post Share on other sites
cehnot Posted June 8, 2016 My fiancee pointed this out to me online: While looking for toys for her son, she saw that the front of the car looks like the Ecto-1. She is right. Check out those awesome white wheel wells. That might work well for my Mach 5 or another white sports car. I know this isn't LEGO, but... Share this post Link to post Share on other sites