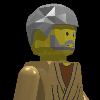
DanSto Posted April 25, 2015 (edited) After R2-D2 mid-size MOC, C-3PO mid-size has now appear into the lego Star Wars galaxy. C-3PO and R2-D2 by Dan_Sto, on Flickr It is fully articuled and a full grey version exists also. C-3PO elements by Dan_Sto, on Flickr C-3PO meets himself (or not) by Dan_Sto, on Flickr C-3PO (5 views) by Dan_Sto, on Flickr More pictures can be found into this Flickr Album. Complete building instructions for C-3PO and R2-D2 and the corresponding Bricklink Wanted List can be downloaded at this page. C-3PO says you good bye. C-3PO Hello ! by Dan_Sto, on Flickr Edited April 25, 2015 by DanSto Share this post Link to post Share on other sites
GuyDudeMan27 Posted April 26, 2015 Looks great! I love the way you made the head. It's simple, but works perfectly. I love the overall sliminess of him, especially in regards to the legs. I like the use of yellow opposed to gold, since it looks very feasible. Your R2 looks great as well! Share this post Link to post Share on other sites
MikeMo Posted April 26, 2015 (edited) My favorite detail is the pIston/actuator (lever) of his inner arm. Great detailing!! Edited April 26, 2015 by MikeMo Share this post Link to post Share on other sites
DanSto Posted April 26, 2015 Thanks. The building instruction files were not accessible to everybody : this is now fixed. Share this post Link to post Share on other sites
Israel Hands Posted April 26, 2015 Fantastic, and thanks for sharing Share this post Link to post Share on other sites
DanSto Posted April 28, 2015 (edited) Some remarks concerned the head which was not found very nice because of its too large mouth and the too squared face. With the help of oeuf_en_gelee from the HFR french forum, I propose you an alternative head. What do you think about this new head ? Edited April 28, 2015 by DanSto Share this post Link to post Share on other sites
BEAVeR Posted April 28, 2015 Unbelievable work, DanSto! I love how you recreated the iconic character on a reasonable scale without loosing any detail! The details stand out immedeately, like on the arms or around the neck, and you even managed to get some on the legs. What makes this model really stand out to me though, is the attention you paid to the shapes. It's very easy to miss the v-shaped hips, but you captured it. Same goes for the angled battery. And I'm astounded by the perfect parts usage for the shoulder pieces. Another nice feature is how you managed to round the face, and hitting the limits of the bricks, but using that layered texture to feature the rim around his head. Very clever compromise! The shapes on the torso are also a very nice addition. Also thanks for including the digital files. I enjoyed looking at the clever techniques you used, and still can't quite get over how those arms stay firmly attached... So far for the praise. I guess you like comments for improvements just as much! While most of the shapes are really nice, in other places I think there are improvements possible. Take the torso for example: you have a very pronounced straight horizontal rim. Maybe this could be replaced by a part with more of a curve to it, like a mudguard, to follow the shape of the disc more like in the original (I tried this and it looks quite nice, although it would seem you'd have to redo the entire torso to incorporate that piece). And I don't know whether it would be feasible to replace those square torso panels by inset ones with a slope contour to create more of a v-shape at the base of the neck. Talking of v-shapes, the one in the hip piece might be a little bit too pronounced. It could easily be replaced by wedge plates with a less steep angle. It might also be possible to add a second layer of plates with a different angle to create the layering effect on the original. A small change could be to replace the bows on his knees with cheese grates, to mimick the interesting hinges better. And while it's a nice feature that your model has ten fingers, it makes his hands look bigger and less delicate. I wonder if scrapping a finger would help the model more than cripple it. You loose accuracy, but it might start to look a bit better. Another possible tiny improbement could be to add a droid arm in between the two minifig hands on the neck. That way you can already create a faint v-shape, and the thicker dot in the middle will recreate yet another detail of the original. The head is by far the most difficult part, I reckon, and while it turned out as a nice model, there might be a better representation of C-3PO's face. I agree that the mouth is too wide. The solution you posted above is better, but I'm not too fond of the fact that the biggest parts of his cheeks are missing. The nose isn't quite there yet as well. It's pretty difficult to recreate such a tiny v-shape, but maybe the new shield part (15070) could be of help if you SNOTted it with the stud pointing downwards. Maybe the same part (or a similar one) could be used to create some eyebrows. I realize these parts would be extremely difficult to implement properly though, but I wouldn't be surprised if you somehow managed it! It might be a bit easier to include two studs on the side of the head to mimic his bolts. And maybe the bottom part of the rim surrounding the head that is curved could be straightened. You see that the lower half of C-3PO's head is angled, but straight when viewed from the front. So maybe an angle section would do the model good. You could benefit from it to include that extra protrusion that resembles an ear. I hope I didn't discourage you with that load of comments about things that could be better. But I imagine that someone with your building level wants to learn even more but can't find a proper challenge. And every challenge that distracts you from the REC is to my advantage . But seriously, tremendous job. It's great how you can make large scale dioramas, small vignettes, detailed vehicles and fine characters. I can't wait to see what's next, although I imagine it would be something to do with Kashyyyk. Anyway, keep on building and keep on learning. I won't miss a step in your 'career'. Share this post Link to post Share on other sites
DanSto Posted April 29, 2015 Unbelievable work, DanSto! I love how you recreated the iconic character on a reasonable scale without loosing any detail! Thank you. The details stand out immedeately, like on the arms or around the neck, and you even managed to get some on the legs. What makes this model really stand out to me though, is the attention you paid to the shapes. It's very easy to miss the v-shaped hips, but you captured it. Same goes for the angled battery. And I'm astounded by the perfect parts usage for the shoulder pieces. Another nice feature is how you managed to round the face, and hitting the limits of the bricks, but using that layered texture to feature the rim around his head. Very clever compromise! The shapes on the torso are also a very nice addition. Also thanks for including the digital files. I enjoyed looking at the clever techniques you used, and still can't quite get over how those arms stay firmly attached... Nice analysis. I am glad to see that you enjoy some particular details liek the angled battery. For some particular details, I had to use cuted hoses like for the shoulder. One important thing is also to get light arms so that the friction at the shoulder can hold it. far for the praise. I guess you like comments for improvements just as much! While most of the shapes are really nice, in other places I think there are improvements possible. Take the torso for example: you have a very pronounced straight horizontal rim. Maybe this could be replaced by a part with more of a curve to it, like a mudguard, to follow the shape of the disc more like in the original (I tried this and it looks quite nice, although it would seem you'd have to redo the entire torso to incorporate that piece). And I don't know whether it would be feasible to replace those square torso panels by inset ones with a slope contour to create more of a v-shape at the base of the neck. I agree, the straight horizontal rim has to be improved : I will try mudguard or more simply curbed slopes. For the torso panels, I don't know because I want to avoid studs to appear. Talking of v-shapes, the one in the hip piece might be a little bit too pronounced. It could easily be replaced by wedge plates with a less steep angle. It might also be possible to add a second layer of plates with a different angle to create the layering effect on the original. A small change could be to replace the bows on his knees with cheese grates, to mimick the interesting hinges better. I am not sure to see what you are meaning : which v-shapes part do you mean and how do you suggest to use the cheese grates (part 61408, isn't it) ? And while it's a nice feature that your model has ten fingers, it makes his hands look bigger and less delicate. I wonder if scrapping a finger would help the model more than cripple it. You loose accuracy, but it might start to look a bit better. Why not but C-3PO is based on a human with 5 fingers per hand not like Jar Jar who has only 4 : the 5 fingers contribute to reinforce its "humanity". Another possible tiny improbement could be to add a droid arm in between the two minifig hands on the neck. That way you can already create a faint v-shape, and the thicker dot in the middle will recreate yet another detail of the original. I think it is not possible to include the dot because I need the open stud of the jumper to fix the minifig hands. And for the faint v-shape, I have nothing to fix it. This is the limit of such a size : you do not have too much possible attachments and you have too choose which element fits the best and sometimes, you have to drop some details. The head is by far the most difficult part, I reckon, and while it turned out as a nice model, there might be a better representation of C-3PO's face. I agree that the mouth is too wide. The solution you posted above is better, but I'm not too fond of the fact that the biggest parts of his cheeks are missing. The nose isn't quite there yet as well. It's pretty difficult to recreate such a tiny v-shape, but maybe the new shield part (15070) could be of help if you SNOTted it with the stud pointing downwards. Maybe the same part (or a similar one) could be used to create some eyebrows. I realize these parts would be extremely difficult to implement properly though, but I wouldn't be surprised if you somehow managed it! I don't think that this could be done because the face is only 3 studs, 3 studs high and 2 plates are allowed for the thickness. It might be a bit easier to include two studs on the side of the head to mimic his bolts. And maybe the bottom part of the rim surrounding the head that is curved could be straightened. You see that the lower half of C-3PO's head is angled, but straight when viewed from the front. So maybe an angle section would do the model good. You could benefit from it to include that extra protrusion that resembles an ear. The bolts are an element I tried to include but I finally gave up because of the need to include a 14704 1x2 plate for fixing the head to the torso which takes to much room. I hope I didn't discourage you with that load of comments about things that could be better. But I imagine that someone with your building level wants to learn even more but can't find a proper challenge. And every challenge that distracts you from the REC is to my advantage . On the contrary, I like to have an honest feedback and suggestions for possible improvments. This is another reason for which I made the instruction because it is essential to see the inner build. As you know certainly, first we are looking for a shape, then a colour and finally how to fix it : this is a similar challenge to the REC where we are in competition but I think I am not really a potential winner . But seriously, tremendous job. It's great how you can make large scale dioramas, small vignettes, detailed vehicles and fine characters. I can't wait to see what's next, although I imagine it would be something to do with Kashyyyk. Anyway, keep on building and keep on learning. I won't miss a step in your 'career'. Thanks. However, for personnal reasons, I have decided to no more participate to the TechLUG Star Wars contest. So, my next Star Wars MOC will nothing have to do with Kashyyyk, sorry. It took me 7 weeks to build the nectar and 7 weeks for C-3PO : it looks like one MOC every 2 months. I am now "working" on a very high speed train and an Architecture Building. So, I would say that the next Star Wars MOC will come for the end of this year. Thank you for having blogged it. Share this post Link to post Share on other sites
BEAVeR Posted April 29, 2015 Glad you like the feedback. I will attempt to clarify where you asked For the torso panels, I don't know because I want to avoid studs to appear I agree, you can't show those dreadful studs! In the solution I suggested, you'd replicate the shape of the panels with a couple of stacked 1x2s and a 1x2 cheese grate slope (the one you mentioned), so that it looks right when you view it from the side. So it would be necessary to place it at it's side in the torso, preferably with an inset to make it subtle. This would be very difficult. It just occurred to me that instead of 2x2 tiles, you could use a traffic panel, like the octagonal one, or even the round one (you know, those half-plate thick pieces with a clip at the back). I am not sure to see what you are meaning : which v-shapes part do you mean and how do you suggest to use the cheese grates (part 61408, isn't it) ? You're right about piece 61408. As for the v-shape. Have a good look at C-3PO's pelvis. In the center, right under the tubes of the waist, it bends down a little, creating a v-shape. You already recreated it with the 3x3 45 degree corner plates. The angle that creates is a bit too steep in my opinion. Furthermore, that v-shape returns several times as a layered effect across the pelvis, pointing to the crotch. It would be nice if you'd recreate that extra feature, and you could achieve that possible with a layer structure of different corner plates. Why not but C-3PO is based on a human with 5 fingers per hand not like Jar Jar who has only 4 : the 5 fingers contribute to reinforce its "humanity" How about a compromise: what would happen if you'd use battle droid arms for the fingers? They can be put closer together, so that you could include 5 fingers while having a slimmer hand. The segmented look would fit right into the creation as well. Thanks. However, for personnal reasons, I have decided to no more participate to the TechLUG Star Wars contest. So, my next Star Wars MOC will nothing have to do with Kashyyyk, sorry. It took me 7 weeks to build the nectar and 7 weeks for C-3PO : it looks like one MOC every 2 months. I am now "working" on a very high speed train and an Architecture Building. So, I would say that the next Star Wars MOC will come for the end of this year It really amazes me that the C-3PO took as long to build as the Sarlacc. It only shows how much dedication went into this project. I'm sorry to hear you won't be doing the Techlug contests, as they provided some very original topics. But I imagine you will build even better things when left entirely to your creativity. I'm looking forward to what you'll build next! Share this post Link to post Share on other sites
DanSto Posted April 30, 2015 Both droids are now on Ideas https://ideas.lego.com/projects/101629 and are awaiting your support . Share this post Link to post Share on other sites
Blondie-Wan Posted April 30, 2015 Yes, I saw them a short while ago and supported them. Good luck! Share this post Link to post Share on other sites
BrickG Posted May 3, 2015 They're actually quite charming. :) Share this post Link to post Share on other sites
gaut1202 Posted May 3, 2015 (edited) Hi Dan, Nice MOC, cool that you managed to get a 3PO for your R2. You built it at scale and the final result is quite interesting, good job ! Despite of that, three points : - As Beaver said for the hands, robot arms (exo force) could be much better, there are alvaible in gold and silver for both versions. - The head is too big, too long. 1 stud less longer would be better. You just have too many details there. For example, the jumper creates a caricatual nose. - Why did you decide not to show studs ? Because of the tiles on the torso, it seems too blocky. Still, the articultions give to the MOC a lot of playability, which was I think your first goal to match with R2, and you rendered a lot of areas really well ;) . Edited May 3, 2015 by gaut1202 Share this post Link to post Share on other sites
DanSto Posted May 3, 2015 (edited) Hi Dan, Nice MOC, cool that you managed to get a 3PO for your R2. You built it at scale and the final result is quite interesting, good job ! Despite of that, three points : - As Beaver said for the hands, robot arms (exo force) could be much better, there are alvaible in gold and silver for both versions. - The head is too big, too long. 1 stud less longer would be better. You just have too many details there. For example, the jumper creates a caricatual nose. - Why did you decide not to show studs ? Because of the tiles on the torso, it seems too blocky. Still, the articultions give to the MOC a lot of playability, which was I think your first goal to match with R2, and you rendered a lot of areas really well ;) . Hi Gaut, Thank you for your interest into this version of C-3PO. Concerning the hands, I think that the exoforce one, despite their more suited colour, will give too huge fingers to C-3PO. I do not agree that the head is too big or too long : when you compare to the blueprints you can see it is a little bit too large. C-3PO head is made of two parts : a forward one which is thinner that the backward one and this is what I have tried to include. For the nose, I have shown another version without the stud and with a smaller mouth. Concerning studs, my feeling is that they are too large for appearing on the torso and make sense only when there is a circular details on the droid. A C-3PO which matches with my old R2-D2 was clearly the first goal of my build . Edited May 3, 2015 by DanSto Share this post Link to post Share on other sites
gaut1202 Posted May 3, 2015 For the nose, I have shown another version without the stud and with a smaller mouth. Ok, it do look much better but with the central collar less (only the for- and backward parts), it could become even better, and you could than use plates to control the width. I can understand for the tiles on the top, but not on the bottom of the body and on the legs. It's not really smoothly incorporated there. A C-3PO which matches with my old R2-D2 was clearly the first goal of my build Which explains the alvailbility of colours and the LBG version, to be more affordable than an other version . Share this post Link to post Share on other sites
DanSto Posted August 23, 2015 A small "update" with a red arm according to preview images of Star Wars VII C-3PO with red arm as expected in Star Wars VII by Daniel Stoeffler, on Flickr Share this post Link to post Share on other sites
MontyPython Posted August 23, 2015 Odd couple! Fantastic work, they both look really nice. Share this post Link to post Share on other sites
Darth Kylo Ren Posted August 23, 2015 Wow I don't know what to say. I love the old c3po talking to the new one. Share this post Link to post Share on other sites
Mr Man Posted August 24, 2015 Doesn't the TFA version also have a silver leg or has it been patched up with gold? Share this post Link to post Share on other sites
DanSto Posted August 24, 2015 It seems to be golden again (source : http://www.starwars7news.com) Share this post Link to post Share on other sites
Mr Man Posted August 24, 2015 Hmm, interesting. So they are slowly replacing him limb by limb . Share this post Link to post Share on other sites
Kristof Posted August 25, 2015 I really like the scientific approach you take. Both C3 and R2 are fantastic models (although R2 is my favorite - brilliant in given scale). Regarding C3's head, I think it's proportionally very close, though the face expression is somehow very far from being true to the original. I'm not sure whether I could do better - most likely not - but I ber it's possible. I hope you find a way because after that being fixed, you have a perfect figure :) Share this post Link to post Share on other sites
DanSto Posted December 23, 2015 This droids is now integrated into a new Ides project with R2-D2 and BB-8 : https://ideas.lego.com/projects/124638 After one week on Ideas, this droids project is one of the most popular Great thanks to all of you who supported it. However, it still needs your support to reach the first milestone of 1000 supports . Share this post Link to post Share on other sites
Lord Tyrus Posted December 23, 2015 I've only just seen this. All three droids look great. You have done a great job proportion-wise with all of them. Regarding the head, it's not completely accurate expression-wise, but looks fine to me. I'm not sure how else you'd go about doing it. Anyway, keep up the good work! Share this post Link to post Share on other sites
DanSto Posted December 23, 2015 Thanks. C-3PO will maybe have a second version in one or two years (new small parts are needed). I hope you supported my project . Share this post Link to post Share on other sites