Srbandrews

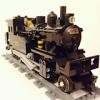
London Transport 0-6-0pt Pannier ex-GWR 5700 (WIP)

Recommended Posts

After beginning my Lego train building career with a large engine, I had a real yearning to create a smaller engine. I originally had in mind to either build something LMS because I really like the dark red colour elements or another GWR loco (just because their the best). I hadn't until recently seen the GWR 5700 series in the maroon livery they wore after being bought by London Transport in the 50s. As soon as I saw them I thought it was pretty inevitable that I was going to try to make one from Lego sooner rather than later:

vDLlwKJ.jpg

I had a pop at building in 7 wide, which seems to be what everyone suggests for british loading gauges and it seems to have worked out ok, although the boiler plate is actually 6 wide plus door rails. You'll notice that the boiler is a little on the short and fat side; that's because I wanted to keep it as in-scale as possible with my King class. I'm quite happy with how the boiler looks anyway.

1oI9L8I.jpg

TGxxdlW.jpg

zy0otfg.jpg

This is where I'm at after two bricklink orders. I don't use LDD so I just try to work out in my head and on paper what I'm going to need and then see where that gets me. The parts that I know I need to change are:

Make the dome in dark red (I couldn't get the parts I needed from either seller from my first orders)

Improve the buffer bars and add some kind of coupling.

Squeeze in a little more detail.

If anyone has any specific suggestions for how it could be improved, I'd be more than happy to hear them.

I would really like to add a London Transport decal to the side of the boiler. Does anyone know the best way to go about getting clear vinyl stickers printed?

Thanks.

Edited by Srbandrews

Share this post


Link to post
Share on other sites

Thanks Gareth! I think your designs are ace so I'm very grateful for your feedback. I notice your Class 43 has some nice custom decals. How did you do them / where did you get them printed?

Share this post


Link to post
Share on other sites

Hi SRB, the larger ones are vinyl cut using a CriCut machine, I found online some one had made a British transport ttf file so it was not to tricky. This was only good for larger decals though. Small ones are for now printed on label paper and cut out. When my requirement is big enough I will have professional stickers made up using the clear plastic and white ink solution. My other rule of thumb with decals is never to 'make a part' with them, only to use decals to create the painted signs on the trains, I think it is a slippery slope when decals are used to create, round windows, windscreen wipers and so on.

Edited by garethjellis

Share this post


Link to post
Share on other sites

The first thing I can think of is, you should probably use Big Ben Bricks medium drivers for this tank locomotive, since it's so much smaller than the King Class (which should probably be using BBB XL drivers) -- there's a 0.5-meter difference in the driver diameter of the real locomotives, but you've used the same part (the L driver) for both here. This part is also probably a closer representation of the smokestack.

I'd also move the front buffer beam forward a bit, and change the cones on the buffers to red. I'll also suggest lowering the splashers/wheel arches the same way I suggested for Redimus's Q class. The footplate is often the hardest thing to model on British and European locomotives (a problem made even harder by the narrower width of British designs).

The maroon coloring is fantastic -- I tend to build locomotives in neutral colors, so I'm often envious of these more colorful models. Keep up the good work!

Share this post


Link to post
Share on other sites

Nice engine, would be good to get it going but I appreciate all the space requirements for PF. I have to say that I agree BBB Medium sized wheels would look better but that s just my opinion so feel free to ignore me.

Share this post


Link to post
Share on other sites

Thanks very much for the comments everyone. You're right about the BBB medium wheels being a better size, but I have a nagging feeling in my head telling me only to use original Lego elements. I can't really explain it but I'm going to follow it anyway.

Jtlan, I can see that your method for building a boiler plate is probably the best way to ho here and I will definitely work on integrating that design in this engine. It may take a couple of iterations before I get there, but I think lowering the overall height by 1 plate would be worth it. I have been looking out for one of those palm tree pieces in black but none of the sellers I've ordered from so far have had them.

Snowvictim, while I can certainly see the allure of powered locos, I made the decision from the outset not to try to power this one. It just wouldn't be possible to fit a full set of PF components in here, and the fact is I only have the oval of track that came the Constitution so I wouldn't get much payoff for all the effort and expense.

And Gareth. I totallu agree with you about limiting the extent of sticker use. While I really admire the amazing details of what some modellers have managed to achieve, it's not a route I would want to go down - I'm mainly interested in custom logos and lettering. I'd just like to get the gold London Transport lettering on the 1x8 tile under the hand rail and perhaps an Lxx number on the cab. I'd like a couple for my King too.

Edited by Srbandrews

Share this post


Link to post
Share on other sites

Some improvements: Rebuilt the buffers and buffer beams, replaced the dome and made it taller, added more gold rails and a lamtern:

KyRoXm8.jpg

RxYWfwc.jpg

w1PuquY.jpg

Q76elr8.jpg

Quite happy with how it's looking.

Share this post


Link to post
Share on other sites

I like your modifications. I think it makes a huge improvement. Great stuff. I think it just needs thinner side rods.

I've always been a fan of tank engines and the pannier tank looks great and even more so in this livery :wub:

Edited by Pizzareno

Share this post


Link to post
Share on other sites

Thanks guys. Side rods-wise, I know these aren't ideal, but I prefer them to building them out of multiple thin rods overlapping. Every time I try building rods out of axles and connectors, like I see lots of people doing, they always end up fractionally shorter than they should be and jam the wheels. Is the trick to just pull the axles out of the connectors a little bit?

Share this post


Link to post
Share on other sites

How about custom side rods like zephyr1934 produces?

I've considered them, but they're a bit pricey and that's before adding on the shipping from the USA. I might think about them again when I have a few more locos that might benefit from them, but then I'm really not especially keen on the idea of using custom parts.

Share this post


Link to post
Share on other sites

I can wholeheartedly recommend zephyr's rods (hmm, that sounds a tad risque), they really do make a massive difference.

As for your own MOC, my only criticism is it looks a little too... how to put it... Ivor the Engine. You've got the details, and some of the proportions, but the whole thing looks a bit on the short side. Otherwise great build and nice attention to detail.

Share this post


Link to post
Share on other sites

Love what you have so far, but one detail really jumps out to me: why is the back of the bunker open? It looks like all the coal would fall out.

Share this post


Link to post
Share on other sites

The photos of your locomotive look really really good (ah, look at that daylight slipping in under the boiler just like so many real locomotives). And the dark red just ads so much more to it. However, compared to the real photo, it does seem a little too short (but perhaps that is due to the angle that shot was taken from???).

The one change I STRONGLY recommend is to replace the pin connector on the stack with the older version that does not have the slit. Probably not worth a special order, but put it on your wanted list and add it to your order when you are buying something else from a store that happens to have it in stock.

As for the rods, I personally think the axle+connector are the best pure lego design, e.g., as in this moc. I just packed the locomotive with a 1x10 brick and used it to ensure proper spacing before each run... that and I think I only powered one axle and did not have any bands on the other wheels to ensure there was as little force as possible on the rods. If you have a lot of patience, you might be able to stuff just the right amount of plastic from a polybag to both make the spacing perfect and keep it pure lego.

Share this post


Link to post
Share on other sites

As for your own MOC, my only criticism is it looks a little too... how to put it... Ivor the Engine. You've got the details, and some of the proportions, but the whole thing looks a bit on the short side. Otherwise great build and nice attention to detail.

You're quite right. It's mainly down to the boiler being a little short and a little too deep, as well at the large drivers meaining it rides slightly higher than ideally it should. Like I said above, I went up to 7-wide-in-places with this but was keen to keep the length proportional to my mostly 6-wide larger locomotive. I never planned to make it look 'cartoony' but I quite like that about it now.

Love what you have so far, but one detail really jumps out to me: why is the back of the bunker open? It looks like all the coal would fall out.

Thanks Kumata, and yes you're absolutely right. I only built it like that initially as a kind of stopgap, and somehow I forgot it wasn't done. Need to get some dark red panels.

The photos of your locomotive look really really good (ah, look at that daylight slipping in under the boiler just like so many real locomotives). And the dark red just ads so much more to it. However, compared to the real photo, it does seem a little too short (but perhaps that is due to the angle that shot was taken from???).

The one change I STRONGLY recommend is to replace the pin connector on the stack with the older version that does not have the slit. Probably not worth a special order, but put it on your wanted list and add it to your order when you are buying something else from a store that happens to have it in stock.

As for the rods, I personally think the axle+connector are the best pure lego design, e.g., as in this moc. I just packed the locomotive with a 1x10 brick and used it to ensure proper spacing before each run... that and I think I only powered one axle and did not have any bands on the other wheels to ensure there was as little force as possible on the rods. If you have a lot of patience, you might be able to stuff just the right amount of plastic from a polybag to both make the spacing perfect and keep it pure lego.

Thanks Zephyr, I had no idea that old version of the pin connector existed. That would look much better, although I'm also on the lookout for a black palm tree segment that somebody else said would be the best piece for the chimney. I will do my best to get both to try out.

Share this post


Link to post
Share on other sites
Thanks Zephyr, I had no idea that old version of the pin connector existed. That would look much better, although I'm also on the lookout for a black palm tree segment that somebody else said would be the best piece for the chimney. I will do my best to get both to try out.

Not meaning to shill, but my own pannier tank MOC uses the black palm tree segment as a funnel, so you can look at that to judge whether you think it'd look better on your own pannier. Personally I feel it's a little short, you might be more satisfied keeping the technic pin/dish combo.

I dunno, I keep trying to think of more useful criticism but I can't really. Even the driver looks good!

Edited by Kumata

Share this post


Link to post
Share on other sites

Not meaning to shill, but my own pannier tank MOC uses the black palm tree segment as a funnel, so you can look at that to judge whether you think it'd look better on your own pannier. Personally I feel it's a little short, you might be more satisfied keeping the technic pin/dish combo.

I dunno, I keep trying to think of more useful criticism but I can't really. Even the driver looks good!

Your BR Pannier is really nice, Kumata. I see what you mean about the chimney: perfect shape, but while alone it wouldn't look too short, it comes out shorter than the dome. I see also that you went for a 12 stud long boiler, so I must not be the only one who just thinks Collett should have made his prototype slightly shorter ^_^

Added a completely fictitious cab interior this morning using some odd spares. Doesn't stand up to srutiny, but it looks good just glimpsed from the outside.

16281853626_4182b5ab52_c.jpg

LT 5700 Pannier Cab Interior by Srbandrews, on Flickr

Edited by Srbandrews

Share this post


Link to post
Share on other sites

I really like your 57xx, you did a great job! I think Lego's driving wheels look a bit oversized, but BBB medium drivers might look a bit undersized :sceptic:

Your BR Pannier is really nice, Kumata. I see what you mean about the chimney: perfect shape, but while alone it wouldn't look too short, it comes out shorter than the dome. I see also that you went for a 12 stud long boiler, so I must not be the only one who just thinks Collett should have made his prototype slightly shorter ^_^

Added a completely fictitious cab interior this morning using some odd spares. Doesn't stand up to srutiny, but it looks good just glimpsed from the outside.

I tried my hands on the 75xx too, and after looking at it now I think my cab is too long. But I also got the boiler 14 studs long, so there is a difference :sweet:

Anyway I don't want to spoil your thread, but here is my model if you want to see it:

15870285912_1a3b61eabe_c.jpg

I might adapt some of your ideas, hope that helps :classic:

Edited by ScotNick

Share this post


Link to post
Share on other sites

That's a really great design with amazing detail, Scotnick. I think your boiler length is definitely closer to the original. Wheel size is a bit of a funny thing here because the lego large drivers are pretty much spot on for size, but you can't get anything like the overlap through the plate that the original has, so you have to raise it up.

I see from your other MOCs that you have built a lot of Railway Stories engines so I assume you based yours on Duck. One thing I learned from looking at images to build mine was that there's a difference between the way Duck is most often depicted and the original 5700s: apart from at the smokebox, the 5700 boiler is flat at the top, level with the panniers whereas Duck is arched like your MOC.

Well, the wheels are a problem with every Lego model built 6 or 7 studs wide. Also that huge flange is a problem as, as it makes the wheel appear bigger than it actually is. The driver diameter of the 57xx where only a little bit smaller than standard gauge, so the wheel should be smaller than Lego's gauge, which is about 11.5 plates, whereas the large Lego driver is about Lego's gauge. So the solution would be in the middle, but that is exactly the problem :classic:

And yes, I've built many Railway Stories engines, I made a thread some time ago, which I should actually update. I just recently uploaded them on Mocpages (if you're interested at all) : http://www.mocpages.com/moc.php/404664

And yes, I based my model on Duck when I started designing it. I didn't realize this difference in designs for a long time, but also I didn't change this model since about 2 years. But I myself changed a little bit and now go for more realism than some years ago, when I actually designed this model.

And as you might see here, the 57xx isn't flat at the top (I'm probably going too far here :grin: )

32-218_1529752_Qty1_ruler.jpg

The only way you could model this is angling 1x2 curved slopes. I tried it with 1x3 slopes, but they're too long: http://www.brickshel...ry.cgi?f=552074 (still moderating)

Anyway, I'll try my best to help, if I can :thumbup:

Edited by ScotNick

Share this post


Link to post
Share on other sites

Now this probably is going too far, especially since I don't really build for accuracy, but model railway miniatures are not always themselves perfect representations. On the prototype, the 'lump' over the boiler is incredibly slight, certainly I would say far finer than lego resolution.

http://upload.wikimedia.org/wikipedia/commons/c/cc/Brithdir_ex-GW_'5700'_0-6-0PT_working_for_the_National_Coal_Board_geograph-2571899-by-Ben-Brooksbank.jpg

The raised area over the firebox is much more pronounced but, for that, it's either go up a whole plate, which would be too much, or start fiddling around with brackets to get a half-plate height difference, and that would probably end up a bit fragile.

Your hose hand rail looks pretty good. I've never even considered trying to recreate the rail going around the smokebox door. Do you know if what you've done in LDD can be pulled off in reality?

Share this post


Link to post
Share on other sites

Create an account or sign in to comment

You need to be a member in order to leave a comment

Create an account

Sign up for a new account in our community. It's easy!

Register a new account

Sign in

Already have an account? Sign in here.

Sign In Now

  • Recently Browsing   0 members

    No registered users viewing this page.