JM1971 Posted May 15, 2014 Posted May 15, 2014 (edited) Image 1 shrinks every part to get a clean gap, Image 2 is default, both images took 2 minutes 47 seconds to render, compared to bevels this method is around 5000% faster, it does not work on parts like bushes on axles because they shrink the same amount. You can edit the file in a text editor to change the shrink size to suit your needs as shown below. #ifndef(ldd_ppv_x_shrink_amount) #declare ldd_ppv_x_shrink_amount = 0.025; #end #ifndef(ldd_ppv_y_shrink_amount) #declare ldd_ppv_y_shrink_amount = 0.025; #end #ifndef(ldd_ppv_z_shrink_amount) #declare ldd_ppv_z_shrink_amount = 0.025; Installation: Make sure povray and ldd2pov are closed, copy file below to your LDD2POV folder, make sure part position variances are checked and bevels unchecked in ldd2pov. https://www.dropbox....n_variances.zip Thanks to Martin the author of ldd2pov for helping me do this. Edited May 15, 2014 by JM1971 Quote
Superkalle Posted May 16, 2014 Posted May 16, 2014 Looks great. Maybe the shrinkage are a tiny, tiny bit too much though. How would it look if you chose for example 0.015? Quote
Renderbricks Posted May 16, 2014 Posted May 16, 2014 (edited) Interesting. POV-Ray will render the highlights the same way like MODO. They follow the diagonal edges of the tesselation. Too bad that there are no proper normal maps coming from LDD: Edited May 16, 2014 by virtualrepublic Quote
JM1971 Posted May 16, 2014 Author Posted May 16, 2014 (edited) Looks great. Maybe the shrinkage are a tiny, tiny bit too much though. How would it look if you chose for example 0.015? 0.025 was the original setting I used but was not really enough to demonstrate it as the gap was unnoticeable in a lot of areas so I upped it to 0.05, I'll do some some renders soon with different values. Interesting. POV-Ray will render the highlights the same way like MODO. They follow the diagonal edges of the tesselation. Too bad that there are no proper normal maps coming from LDD: Martin said in and email "Good solution for POV-Ray would be enhanced meshes. It should not be that difficult to add such algorithm for generating fillets. Many modelling tools support it, but I haven't seen the algorithm. So probably some custom has to be written." I don't really know what that means though. Edited May 16, 2014 by JM1971 Quote
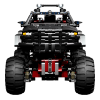
JM1971 Posted May 16, 2014 Author Posted May 16, 2014 3 More renders @ 1920x1080, 0.015 is a tad small for this resolution but would look great at 4k, 0.025 is the default I set to, the 9398 on the first post is 0.05, lastly a render at 1.0 and this is just weird. Quote
Superkalle Posted May 16, 2014 Posted May 16, 2014 I like 1.0 best Joking aside, I have to agree that 0.025 looks best for this model Thanks for doing the testing! Quote
JGW3000 Posted May 16, 2014 Posted May 16, 2014 lastly a render at 1.0 and this is just weird. But, could be a quick way to make pdf instructions, as you can see how many of the internal parts are connected Quote
hrontos Posted May 16, 2014 Posted May 16, 2014 (edited) 0.025 was the original setting I used but was not really enough to demonstrate it as the gap was unnoticeable in a lot of areas so I upped it to 0.05, I'll do some some renders soon with different values. This shrink amount is in brick size units and it is exact amount which is subtracted from the brick size. LDD2POV declares also ldd_part_scale variable, which is now declared like this: #ifndef (ldd_part_scale) #declare ldd_part_scale = 0.99999; #end You can try to define this value at the begining of the POV file. This value is relative, not in brick units. So 0.99 means that each brick will be 99% of it's original size. Martin said in and email "Good solution for POV-Ray would be enhanced meshes. It should not be that difficult to add such algorithm for generating fillets. Many modelling tools support it, but I haven't seen the algorithm. So probably some custom has to be written." I don't really know what that means though. This approach for "bevels" by shrinking is good for larger models, but on close-up renders it will still visible, that edges are sharp and not really beveled. Enhancing mesh and generating fillets on it is demonstrated for example here. I did not find sample algorithm. I found only some 3D Max or Blender plugins, which are written in some script language using capabilities of these tools. So it is not low level enough to rewrite it for POV-Ray. But if anybody has experience with this, it would be great to cooperate on such algorithm. Current beveling in LDD2POV is based on operations with solid objects in POV-Ray which are well supported, but "difference" operation is slow on renders and that's why beveled models are so slow to render. Edited May 16, 2014 by hrontos Quote
JM1971 Posted May 17, 2014 Author Posted May 17, 2014 But, could be a quick way to make pdf instructions, as you can see how many of the internal parts are connected This shrink amount is in brick size units and it is exact amount which is subtracted from the brick size. LDD2POV declares also ldd_part_scale variable, which is now declared like this: #ifndef (ldd_part_scale) #declare ldd_part_scale = 0.99999; #end You can try to define this value at the begining of the POV file. This value is relative, not in brick units. So 0.99 means that each brick will be 99% of it's original size. Interesting, and could be used for instructions like this, but not so many parts at once, thx for ideas. Quote
Recommended Posts
Join the conversation
You can post now and register later. If you have an account, sign in now to post with your account.