Victor Imaginator Posted July 4, 2016 Posted July 4, 2016 I have nothing to show at this moment, but making a topic looks right thing for me. But photos coming soon) I used motorcycle wheels, so, according to Sariel's model scaled, my model will be in 7:1 scale. I plan to fit (I can fit everything at this scale really :) this functions: - rear suspension that looks like original, - fake flat 4 engine, - 4 speed gearbox, - Ackermann steering, - working steering wheel and HOG, - openable doors and engine cover. Maybe I'll add MacPherson strut at front and/or caster angle, maybe I'll add reverse gear. It will be my first scale model, and I scared a little that I will fail with all these wonderful curves (I realm like these old racing cars). But, at least, I already have unusual rear suspension and will make some new MOC anyway) Quote
Didumos69 Posted July 4, 2016 Posted July 4, 2016 Given your inventive suspension setup history, I'm looking forward to seeing your front and rear axles . Quote
offroadcreations Posted July 5, 2016 Posted July 5, 2016 This sounds like it will be a pretty big model, but I know you can do it. Can't wait to see the results! Quote
Nazgarot Posted July 5, 2016 Posted July 5, 2016 I'm very excited to see how you will pull this off. If you need some background material I can recommend this site: http://www.smcars.net/threads/porsche-550-spyder-factory-drawings.3205/ Best of luck with this project! -ED- Quote
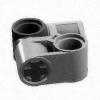
Victor Imaginator Posted July 5, 2016 Author Posted July 5, 2016 Promised photos. Sorry for smartphone quality, i hope it's ok for this early WIP status) Rear axle is a little bit complicated. You can see small turntables with attached 15L beams - it's arms placed almost like in original. Main difference - in real 550 Spyder there's torsion bars, while i used regular lego springs. On real car there's shock absorbers not, a coils + absorbers. To prevent wheel hubs from falling off i used 6L links at the bottom, and one 9L link between hubs at the top. It works not like the real car, 9L link works like horizontal coil at rear axle in Koenigsegg, keeping wheel vertical from uncompressed side while cornerning. Front axle with Ackermann is a placeholder now, just to feel overall proportions of the car. Like real Spyder - front wheels placed slightly wider, than rear. Half stud each wheel exactly. On real Porsche gearbox is placed in one casing with differential. I didn't replicate it exactly, but Z20 gear meshing with differential also meshed with Z12 gear. So here's two shafts from axle to gearbox rotating at different speeds, gearbox is partially placed in differential casing) Also here's two chains used, just because i like chains, it adds some to technic models for me, like pneumatics, but chains. I don't sure that gearbox will survive another rebuild, i'm really happy only with rear axle now) More updates coming soon. Quote
syclone Posted July 6, 2016 Posted July 6, 2016 I think you will have bump steering with the 6l links angled like that. Quote
Victor Imaginator Posted July 6, 2016 Author Posted July 6, 2016 I think you will have bump steering with the 6l links angled like that. No, I will not) There's no suspension at all, so no bump steering) It's a temporary placeholder only, now I'm doing MacPherson - it's almost ready. Quote
Victor Imaginator Posted July 7, 2016 Author Posted July 7, 2016 Small update, i finished MacPherson. Shock absorbers seems too large to fit under that low 550's hood, so i already thinking about making something simplier, or using compact pushrod suspension. But, at least, i finally have working MacPherson with all that kingpin, caster, camber and Ackerman. Never builded that thing before and proud of result) I only hope that i will find enough time to finish 1st august. As usual - all photos are clickable for higher resolution. Quote
Didumos69 Posted July 7, 2016 Posted July 7, 2016 (edited) Looks very sturdy! Could also be useful for a bigger model. One question, I would think the angled 6L thin liftarms on top of the shocks should be able to tilt slighty in turns, but they appear to be rigid. How does that work? Or am I missing something? Edited July 7, 2016 by Didumos69 Quote
Victor Imaginator Posted July 7, 2016 Author Posted July 7, 2016 (edited) Didumos69, if I push very hard on top of front axle - yes, thin 6L beams bend a little. But this construction is rigid enough for 1-1,5kg model. And real Spyder have very light front, while all heavy things placed between seats and rear axle. And even if my model will weight 2kg or more - wide range of upper mount with more sturdier angled and cross connectors will fit without problems. Sad, there's no shorter coils with axle holes in Lego( P.s. You said "bigger"... It's already 7:1 scale, more bigger???) Edit: P.s. added. Edited July 7, 2016 by Victor Imaginator Quote
Didumos69 Posted July 7, 2016 Posted July 7, 2016 (edited) Didumos69, if I push very hard on top of front axle - yes, thin 6L beams bend a little. But this construction is rigid enough for 1-1,5kg model. And real Spyder have very light front, while all heavy things placed between seats and rear axle. And even if my model will weight 2kg or more - wide range of upper mount with more sturdier angled and cross connectors will fit without problems. Sad, there's no shorter coils with axle holes in Lego( P.s. You said "bigger"... It's already 7:1 scale, more bigger???) Edit: P.s. added. You're right, 7:1 is big enough, so forget what I said about bigger. Somehow it doesn't look very big but that's probably because of the wheels. I immediately believe this is rigid enough for several kilo's. I didn't mean that the thin liftarms would bend, what I meant was that they should be able to swing along with the pin that connects them to the shocks. This pin will swing slightly forwards and backwards in turns. Part of the rotation of the shocks in turns will be passed on to the thin liftarms, just like how a U-joint passes rotation. However these liftarms can't rotate/twist/swing. If there would be a 90 degree angle between shocks and liftarms, then the liftarms would not twist. Hope this helps making clear what I mean. Edited July 7, 2016 by Didumos69 Quote
Victor Imaginator Posted July 7, 2016 Author Posted July 7, 2016 Ah, you mean that pin. Shocks are secured tight to the hubs, with some inclination added. That 3L pin-hole-pin at upper mount stays at desired angle not by friction, but by shock and mount angles (as you can see - it's not a perfect straight line ;). And whole steering works without any friction - LBG frictionless pin on top and LBG axle-towball at the bottom. So even if that pin and liftarms really tilt a little, i can't notice. Quote
Didumos69 Posted July 7, 2016 Posted July 7, 2016 I didn't think it was relying on friction in pins, my concern was that it relied on slack to compensate for the tilting of the liftarms. But it's probably only a very small amount as the angle between the liftarms and the shocks is not far from 90 degrees. And it doesn't affect steering. So alltogehter this makes a very nice McPherson setup! Quote
JamesJT Posted July 7, 2016 Posted July 7, 2016 Chassis looks great, reminds me of where I was a week ago. I made this to help you. 1 square = 1 stud Will you do the body in panels or flexi axels? Quote
Victor Imaginator Posted July 7, 2016 Author Posted July 7, 2016 Wow, JamesJT, thanks) I never think about making 1 stud grid, while i already have blueprint with most of sizes in studs. I dont think too much about bodywork, but flex axles with beams on top of them looks suitable for this task. Like front wheels arches in my Spirit of Baja: I plan to make car white or LBG, but if i use beams only - it can be converted to original flat silver color) Time will tell, i don't sure yet. Quote
Victor Imaginator Posted July 9, 2016 Author Posted July 9, 2016 (edited) I wasn't pleased with my MacPherson solution - it was too high for that car, so i build another one, smaller and unusual. Main problem with MacPherson strut is ability of lego shock absorbers to bend instead of compressing if force pointed not straight. While 'kingpin inclination' isn't really mean that i need to incline shock absorber itself. After few hours of almost pointless connecting pieces together i found solution that takes less space and even works smoother than previous version. Here's kingpin inclination, more accurate Ackermann steering, caster angle and much less camber angle wobbling. Pros: kingpin inclination isn't enough for this wheels (nothing enough for this wheels really =), whole suspension setup is 1 stud wider that i need - it's hard to make 0.5 stud offsets here, but maybe i will manage this later by making whole front axle even studs wide. As you can see i used 6.5L absorbers - i never seen Lego MacPherson using this absorbers. Absorbers placed vertically and there are two vertical axles serving as rails (for smaller models one vertical rail is enough - i tested). And i wanted this many time ago - i used 7L steering racks as weird cross connectors in place where no other part fit better =) edit: typos Edited July 9, 2016 by Victor Imaginator Quote
Didumos69 Posted July 9, 2016 Posted July 9, 2016 Cool concept! I like the use of sliders combined with the 6.5L shocks. I've seen attempts where the 6.5L shock had been wrapped with all kinds of parts to keep it in position. This is much better. Quote
tomek9210 Posted July 9, 2016 Posted July 9, 2016 Sheepo used those shock absorbers in his Mustang's Macpherson suspension. His solution is much simpler. Quote
Victor Imaginator Posted July 9, 2016 Author Posted July 9, 2016 Didumos69, thanks) I knew that you'll like it) Sheepo used those shock absorbers in his Mustang's Macpherson suspension. His solution is much simpler. Sheepo's solution doesn't fit my needs - it's 1-2 studs higher and don't use standart wheel hubs. And, more important, it's not mine solution) I really like to make something new myself. Quote
Chade Posted July 10, 2016 Posted July 10, 2016 This looks really good (and big). Looking forward to the final product Quote
Victor Imaginator Posted July 17, 2016 Author Posted July 17, 2016 Lacking of time and hot weather caused massive slowing of my building abilities. But, i finally finished chassies. 7:1 scale may look large enough to fit everything, but 550 Spyder is almost smallest Porsche, if not the smallest one. Was very hard to fit gearbox + chairs to very thin frame, while keeping frame robust enough. Gearbox is very simple 4+N, only difference from typical Lego gearboxes - i make it flat, not 2-layered. And put 24+8 pair near differential, because 24Z gear grinding my kitchen table when suspension is compressed) So, here's 2 drive shafts as it was before, in the beginning of building. And, part of the frame serves as part of chairs - even 1 stud higher makes chairs too massive for 500 Spyder. I think it's looking ok. And i managed to make front axle even studs wide, so it's almost perfectly sized now. Now only bodywork left, i don't sure that i will succeed, but i trying) Quote
Victor Imaginator Posted July 22, 2016 Author Posted July 22, 2016 Almost done. I hope that i'm not ran out of LBG beams) Quote
B-Legos Posted July 22, 2016 Posted July 22, 2016 Taking shape nicely, guessing the white flex axles represent the glass for the windscreen? Quote
Victor Imaginator Posted July 22, 2016 Author Posted July 22, 2016 Taking shape nicely, guessing the white flex axles represent the glass for the windscreen? Exactly) Quote
Recommended Posts
Join the conversation
You can post now and register later. If you have an account, sign in now to post with your account.