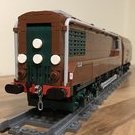
Hod Carrier Posted May 31, 2016 Posted May 31, 2016 (edited) It's been a little while since I posted up a new model as I've been busy with getting the house and garden straight. I've also needed to take a bit of a break from the headache that is the TRAXX. But fear not, for I have not been idle. After creating a couple of commuter trains I thought it was time to tackle something a bit sexier. Staying with the Dutch theme I decided to have a crack at the Thalys, and here is what I came up with. It's a Thalys PBA set in the original livery. At the moment it's very much truncated, but I do have additional cars ready on LDD awaiting parts ordering. However, I wanted to just check first how the build would go and make any alterations necessary before committing to buying the necessary parts. The model makes use of the dark red colour. I'm pleased I was able to stick with this colour although I knew it was a gamble because some parts may not have been available. As it turned out the only part I couldn't get was the profile brick used for the cooling grille on the side of the power cars, so unfortunately I've had to build the sides using plain bricks instead. Passenger doors are SNOTed to make them look like, um, doors rather than needing stickers. Jacobs bogie in the middle. I've improved the bogie design to make it more detailed and slightly slimmer than the ones used on the DD-VIRM or SLT. Of course, as the Thalys PBA is basically a TGV Reseau in different colours I thought I would see what else I could come up with. As you can see I think I went a bit mad. As well as the Thalys and TGV Reseau I made some tweaks to back-date the model to represent the original TGV Sud-Est sets. There's the classic orange and grey (desktop HE anyone...?), the newer TGV Lyria colour scheme and also a TGV Poste. I also scraped together acceptable trailers to make a TGV Reseau Duplex. A little more on my Flickr page if you like. A note on the stickers. As before I have made my own stickers using my desktop printer. However, unlike before when I used ordinary paper mailing labels I tried to use something a bit different to give a better finish. The power car logos are printed on photo paper and stuck on with double-sided tape while the trailer logos are printed onto clear mailing labels. I think that both are better than ordinary labels, but there is still room for improvement. The thickness of the photo paper leaves a white edge all around while the carrier film on the clear labels is textured and therefore still visible. I shall be changing all of these at some point for printed logos on self-adhesive vinyl once I have sourced some, and will also have another go at colour-matching the dark red. **EDIT** Syntax tidied up. Edited May 31, 2016 by Hod Carrier Quote
Nemo57 Posted May 31, 2016 Posted May 31, 2016 Very interesting concept and a great design. Excellent color. The shape of the nose of the locomotive made and looks smart. A curved rails are? Quote
Hod Carrier Posted May 31, 2016 Author Posted May 31, 2016 Hi Nemo: Thanks very much. I'm glad you like it. Not sure about your question. I might have misunderstood, but there are no curved rails in the photos. Quote
soccerkid6 Posted May 31, 2016 Posted May 31, 2016 Extremely detailed train! I'm impressed with how nice it looks despite the small scale Quote
Nemo57 Posted May 31, 2016 Posted May 31, 2016 Hi Nemo: Thanks very much. I'm glad you like it. Not sure about your question. I might have misunderstood, but there are no curved rails in the photos. There are some details. a curved, single track, in real Lego? You can do a full range of motion for your beautiful train? Quote
THERIZE Posted May 31, 2016 Posted May 31, 2016 (edited) Again awesome micro-mocs. Dark red looks great and the stickers look good. However I think that you should change the middle red brick on the front to a transparent one. It looks like a chuggington train Edited May 31, 2016 by THERIZE Quote
LEGO Train 12 Volts Posted May 31, 2016 Posted May 31, 2016 Well done ...epic mini size hi-speed train! Quote
dr_spock Posted May 31, 2016 Posted May 31, 2016 Nicely done. 2 engines and 2 cars looks right for a set. Quote
Rotundus Posted May 31, 2016 Posted May 31, 2016 I like it! So... this was built for the LEGO narrow gauge track and works out to be 5-wide? Quote
Hod Carrier Posted May 31, 2016 Author Posted May 31, 2016 (edited) Thanks guys. I'm glad you're liking it. :o) There are some details. a curved, single track, in real Lego? You can do a full range of motion for your beautiful train? I have got some narrow gauge curves from the Alien Mothership set, but they are very tight. I don't think there's enough bogie articulation for this train to take them. Besides, it's a high speed train so it's most often seen on long straights and gentle sweeping curves where it can get right up to top speed easily. ;o) I think that you should change the middle red brick on the front to a transparent one. It looks like a chuggington train Unfortunately the classic look of TGV family has split windscreens and pairs of light clusters. So... this was built for the LEGO narrow gauge track and works out to be 5-wide? Er, well not really. I've just settled on 4-wide as being a nice scale for modelling that is large enough to convey some detail and correct proportions but small enough to display without taking up too much space and is economical on bricks. There wasn't ever any conscious decision to take advantage of LEGO narrow gauge track, mostly because of the length of the cars. I have tried to make a powered model at this scale (see here) but it wasn't entirely successful. There is an update to come on it, but that model is ultimately destined for the parts bin. Edited May 31, 2016 by Hod Carrier Quote
zephyr1934 Posted June 1, 2016 Posted June 1, 2016 This round of builds looks fantastic! Your 4 wide beats a lot of the 6 wide out there! I can only imagine what you would be capable of building in 8 wide (beyond perhaps having to take out a second mortgage on your home to pay for it all, grin). In any event, excellent work squeezing in so much detail in such a small package. A note on the stickers. As before I have made my own stickers using my desktop printer. However, unlike before when I used ordinary paper mailing labels I tried to use something a bit different to give a better finish. The power car logos are printed on photo paper and stuck on with double-sided tape while the trailer logos are printed onto clear mailing labels. I think that both are better than ordinary labels, but there is still room for improvement. The thickness of the photo paper leaves a white edge all around while the carrier film on the clear labels is textured and therefore still visible. I shall be changing all of these at some point for printed logos on self-adhesive vinyl once I have sourced some, and will also have another go at colour-matching the dark red. That's a great idea using photo paper to get the right sheen. Another trick is to use plain white paper and then packing tape to get the sheen. In either case super secret trick is to use felt tip markers to color the edge of the paper and eliminate the white lines on the edge. There wasn't ever any conscious decision to take advantage of LEGO narrow gauge track, mostly because of the length of the cars. How about the narrow gauge ramp tracks (yuck yuck yuck) Quote
Hod Carrier Posted June 1, 2016 Author Posted June 1, 2016 This round of builds looks fantastic! Your 4 wide beats a lot of the 6 wide out there! I can only imagine what you would be capable of building in 8 wide (beyond perhaps having to take out a second mortgage on your home to pay for it all, grin). Thanks Zephyr. Never yet been moved to make the leap to 8-wide, but never say never. That's a great idea using photo paper to get the right sheen. Another trick is to use plain white paper and then packing tape to get the sheen. In either case super secret trick is to use felt tip markers to color the edge of the paper and eliminate the white lines on the edge. Photo paper does give a nice sheen, but the decision to give it a try was to achieve a crisper print finish compared to conventional paper labels. I did have a scout around to see if I had a felt tip in a close enough shade to colour the edges but sadly I didn't have any to hand. I'll have a look at the vinyl option and see how thin that is by comparison. Quote
Redimus Posted June 2, 2016 Posted June 2, 2016 Do the classic TGV shaped Thalys predate the more iconic chubby ones? I'd never run across them until now. Quote
Hod Carrier Posted June 2, 2016 Author Posted June 2, 2016 Basically yes. There are three generations of the TGV. The Horizon Express is based on the original TGV Sud-Est sets. The second generation is the TGV Reseau which keeps the iconic nose shape, while the third generation, the TGV POS, does away with it for a blander and less interesting shape with a single central windscreen. The Thalys PBA (Paris, Brussels, Amsterdam) is the one I've modelled and is a TGV Reseau. The "chubby" ones are Thalys PBKA (Paris, Brussels, Koln, Amsterdam) which are TGV POS. I'm not sure of the precise numbers without looking it up, but I'm fairly sure that there are more Thalys PBKA than Thalys PBA, which might be why you've not come across them before. Hope this helps. Quote
Hod Carrier Posted August 4, 2016 Author Posted August 4, 2016 I hope you'll forgive the topic bump for a little update. The Thalys has grown!! I've added a couple of centre coaches in the form of a bar car and a 2nd class coach. It's still 4 cars away from reaching it's full length but already it's too long for any of my tables. As indicated before, I have changed the stickers for self-adhesive vinyl. The transparent stuff is much better than the mailing labels I was using before because the film itself is much less visible when stuck on to the model. However, the white vinyl used on the power cars is not quite as thin as I'd hoped. That said, it's very easy to use and gives a nice, crisp finish. Quote
Sven J Posted August 4, 2016 Posted August 4, 2016 Wow. I'm speechless... I never would have thought that it is possible to build such detailed, well-proportioned models in this tiny scale. Your Thalys looks great! :thumbup: As for the stickers: For the white lettering on my MOCs, I have also tried several solutions. Finally, I made good experience using a Dymo label printer. The self-adhesive labels are available in a variety of colours, e.g. white on transparent background, black on transparent, and even black on gold (from a third-party manufacturer). Quote
Hod Carrier Posted August 4, 2016 Author Posted August 4, 2016 Thank you very much. That's high praise indeed coming from such a talented LEGO artist as yourself. I've discovered that half the challenge is in selecting the right prototype, as some trains are easier to reproduce at this scale than others. Thanks also for the tip. I was aware of the Dymo range of label printers but I hadn't got around to looking at them in detail. Can you use them to print custom graphics from your computer? Quote
Sven J Posted August 4, 2016 Posted August 4, 2016 (edited) [...] half the challenge is in selecting the right prototype, as some trains are easier to reproduce at this scale than others. That’s very much the same for large scale models… Thanks also for the tip. I was aware of the Dymo range of label printers but I hadn't got around to looking at them in detail. Can you use them to print custom graphics from your computer? Basically, yes. You can use any font you have installed on your computer, and you can also import graphic files. In some cases, however, it may be that you find the printer’s resolution a bit low for that (300 dpi, as far as I can remember - there are higher-resolution label printers in the market, but they are much more expensive). To give you an impression how it looks: The „GHH“ logos on my passenger waggons were printed from .png files. Edited August 4, 2016 by Tenderlok Quote
Hod Carrier Posted August 5, 2016 Author Posted August 5, 2016 May I ask, what model Dymo printer are you using? Quote
LEGO Train 12 Volts Posted August 5, 2016 Posted August 5, 2016 It's a "LabelManager Wireless PnP". Thanks for the hint! Quote
Lego Dino 500 Posted August 5, 2016 Posted August 5, 2016 This looks great! Mind posting any pictures of the trucks? That's my greatest weakness at sub-scale builds. Quote
Hod Carrier Posted August 5, 2016 Author Posted August 5, 2016 (edited) Certainly. Any fine details are going to be compromised at this scale and I admit to having compromised myself on this and all my MOCs so far. For me the key is getting the proportions correct and trying to invoke rather than faithfully replicate details like bogies. In any case, few people would look too closely at things like that. But for the Thalys, as with other TGVs, it was important to get the air suspension tanks on the bogies because they are an obvious detail. Hope this helps. Edited August 5, 2016 by Hod Carrier Quote
UrbanErwin Posted August 5, 2016 Posted August 5, 2016 Wow, for such a small scale you captured the details really well Quote
Recommended Posts
Join the conversation
You can post now and register later. If you have an account, sign in now to post with your account.