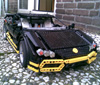
Jurgen Krooshoop Posted December 16, 2014 Posted December 16, 2014 (edited) Welcome to the build-review of (IMO) one of the finest mid-scale MOC's this year: Madoca1977's Corvette C3 Stingray. Madoca was so kind to provide photo-instructions of this MOC, which allowed me to make an MLCad-file and complete building instructions. The instructions can be downloaded here. Blakbird made some renders to complete this project. Specifications: Number of parts: 1187 (including the remote-controller) Size (WxDxH): 21 x 49 x 14 studs Propulsion: 2 x L-motor, rear-wheel-drive Steering: 1 x Servo-motor Power-source: 1 x 8878 rechargeable battery or 88000 AAA-batterybox Lights: 4 x PF-LED's Building process: Building this MOC starts with making the rear-chassis, which has the drivetrain and suspension. The suspension-design is very interresting and unlike any suspension design I've ever seen. It uses Unimog ball-joints to create independent suspension while still having a very narrow chassis, while still mainaining the differential for the rear-wheel-drive. Also, the space for the battery-box is prepared, allowing the batterybox to be perfectly centered. Next is the front-chassis. Again the suspension design is quite original. It must have been quite a challenge for Madoca to fit the complete independent suspension system for a model this slim. The suspension travell is quite small. Both the left and right wheel share the same set of LBG 6,5L shock-absorbers. This section also has the Servo-motor for steering. It's was bit trucky to build because one of the axles in the steering system had to be rotated 45 degrees to achieve a perfect return-to-centre-steering. The steering lock is not the biggest which can be achieved with the servo-motor, but this is due to the use of 6571 small steering arm . Next is attaching the L-motors to the front-chassis and joining the 2 chassis-sections for 1 complete chassis. The final construction feels sturdy and well-braced and well-supported. This chassis will survive heavy driving sessions ! Then we add all the remaining Power-Functions elements. Since this model has 4 sets of PF-lights, there are a lot of wires ! But there's enough space for every wire to be well hidden inside the chassis. All the lights are connected to 1 PF-switch. The bodywork for the rear section is up next. This is the first preview of the sleek lines and curves of this MOC. Panels and liftarms are placed in angled posisions in very creative ways. The rear bonnet provides easy access to the battery-box, which can easily be removed for exchanging batteries. After finishing the rear end, another surprise is coming up, which is my favorite feature of this model. There's a smart switching system, which connects the PF-switch to a lever in the dashboard and to the elevating-mechanism of the headlights. When operating this lever, the lights pop out and are switched on simultainiously, marvelous !!! All that's left is to finish the bodywork. The more panels are added, the nices the model looks. And that's what makes it one of the nicest MOC's this year: the final model looks extremely good. I compared it to some photo's of the real car, and it's surprising to see how detailed the lines and curves of this car are reproduced using technic panels, liftarms and connectors. And it's especially remarkable, since it's only a MID-scale MOC. Kudos to Madoca for this exquisite design ! The only thing I didn't like so much is the colour of the seats. Since they're black, they are barely visible from the outside and don't stand out at all. It would like it more if they were DBG or LBG. But building them in DBG would require changing the design, since 1 of the parts used is not available in DBG. Performance: Allthough the model is relatively heavy for it's size, the driving-performance is very nice. It drives quite fast. And the final steering-lock is acceptable, taking into account the length of the car and the specific steering-parts used. The original model uses 2 24z white clutch-wheels in the drivetrain. I deceded to replace them with DBG 24z gears for a more direct response. I kept the white clutch-gears in the instructions. One thing I liked less is that some details of the bodywork (especially the headlights) come off easily while driving. The bodywork is a bit fragile and cannot withstand accidental collisions very well. There were a few tricky parts to build. Placing the PF-switch and routing all the cables to the correct position was quite a task. Rare parts There are only a few rare parts in this MOC. These are the 6571 steering arm small, the 6574 gear-rack 1x2 with 2 ball joints and the red 19L flex-axles, of which you need 4. And then there are 4 red connectors #4 and 6 red connectors #5 Some more pictures: Pintures in full resolution can be found here Edited December 16, 2014 by Jurgen Krooshoop Quote
Foggy Posted December 16, 2014 Posted December 16, 2014 Wowwww, nice looking model! I love the old Vettes.... Quote
gmshades Posted December 16, 2014 Posted December 16, 2014 Don't forget the rare red #3 connectors. If I remember right there are 10 of them. Nice review of a great moc! Quote
M_longer Posted December 16, 2014 Posted December 16, 2014 I am always amazed when I see your instructions. Is it really possible to do with MLCad and LPub only? Quote
Jurgen Krooshoop Posted December 16, 2014 Author Posted December 16, 2014 (edited) @gmshades: Connectors added to the rare-parts list. @M_Longer: Yes, The resulting PDF is the direct output of LPub. Edited December 16, 2014 by Jurgen Krooshoop Quote
M_longer Posted December 16, 2014 Posted December 16, 2014 @M_Longer: Yes, The resulting PDF is the direct output of LPub. It seems that I have much to learn :) Quote
Jurgen Krooshoop Posted December 16, 2014 Author Posted December 16, 2014 @M_Longer: Whenever you have specific MLCador LPub-related questions, you can contact me at info@jurgenstechniccorner.com Quote
Osuharding1 Posted December 16, 2014 Posted December 16, 2014 I have built and reviewed this model as well. It is indeed absolutely stunning. It is an excellent representation of the real Corvette. It is a lot of fun to drive and provides a fantastic building experience. I personally prefer the detailed photo sequence as the instructions as it presents a bit of a new challenge to build it. Quote
Rishab N Posted December 16, 2014 Posted December 16, 2014 Its such an awesome MOC I hope to build it someday when #3 connectors arent so expensive Quote
darksheep Posted December 16, 2014 Posted December 16, 2014 I built this as well , really love it !! I made it in black using 16 l flex axels so it was much cheaper cause you don't need the red connectors. Quote
rumpletump Posted December 17, 2014 Posted December 17, 2014 I built this MOC very soon after madoca posted the photo instructions.. It is excellent. I splashed out for the red #3 connectors but could not afford the power function elements so I built it with a few mods.. Rear wheel drive V8 engine in the front HOG Steering New headlight pop-up mechanism No junk in the truck (battery box) I used only a small handful of extra parts and the exterior is completely unchanged. All bodywork, panels, positioning, angles and scale are identical to the original. Quote
Rishab N Posted December 17, 2014 Posted December 17, 2014 Do you have any pictures of your mod? Quote
rumpletump Posted December 17, 2014 Posted December 17, 2014 Do you have any pictures of your mod? No.. But I still have it built so I will take a couple if you like Quote
OneMoreRobot Posted December 17, 2014 Posted December 17, 2014 Thanks for this review & instructions. I'm currently half way through the build via Madoca's photos, have enjoyed the build so far - instructions look great (as usual) thanks very much. Have gone for a Tan coloured interior (on the Red body) as per Jantjeuh's Black/chrome deluxe version. Here Quote
5imon Posted December 17, 2014 Posted December 17, 2014 Wow! I somehow missed this model so far. Very interesting building techniques and a lot of functionality for such a small car. I'll have to build it (luckily, I was generous to myself and have bought some red #3s a year ago when I made Nathanaël's Concept Car. Just need 2 more... and some PF lights. Quote
afol1969 Posted December 17, 2014 Posted December 17, 2014 It seems that I have much to learn :) If you are willing to work with MLCAD/LPUB - do it! You'll not regret ist and you're able to create the instructions for your Moc's if you want to rebuild them, when disassembled. But bring a lot of time and patience, you'll need it. And work with it regulary. It's one and half year I use MLCAD, and I still do not know all functions although I work every day on it. If you have any questions, just ask. @Jurgen: As always very good instructions from a very good MOC . And now I think, the forum should add an "instruction Maker" sign to them who make regulary instructions Greetings Alex Quote
rumpletump Posted December 17, 2014 Posted December 17, 2014 Do you have any pictures of your mod? Hi..... The pics as promised for my mods.. Check them out on my bricksafe..... http://bricksafe.com/pages/rumpletump/Corvette%20C3%20Mod Quote
jantjeuh Posted December 17, 2014 Posted December 17, 2014 I still prefer my black & chromed version But this is an awesome MOC for sure, absolute must-build! Quote
M_longer Posted December 17, 2014 Posted December 17, 2014 If you are willing to work with MLCAD/LPUB - do it! You'll not regret ist and you're able to create the instructions for your Moc's if you want to rebuild them, when disassembled. But bring a lot of time and patience, you'll need it. And work with it regulary. It's one and half year I use MLCAD, and I still do not know all functions although I work every day on it. If you have any questions, just ask. @Jurgen: As always very good instructions from a very good MOC . And now I think, the forum should add an "instruction Maker" sign to them who make regulary instructions Greetings Alex Oh I am working in MLCad at least for a month now, and I am discovering new options. I have a model that was built for a contest on LUGPol (Technic model that looks like set, and have 1000 parts in total), and I have made instructions for it. Only thing that is missing are pneumatic tubes, which are problematic, becuase my PC slows down after adding another synthed parts :( http://bricksafe.com.../Forest Tractor Quote
Madoca 1977 Posted December 17, 2014 Posted December 17, 2014 (edited) Thank you, Jurgen. What a christmas present! It was the most challenging to shape those lines using technic panels. Much harder than any other my MOCs. Although finished model had left some gaps on its body, I thought it was acceptable for sharing. Edited December 18, 2014 by Madoca 1977 Quote
Rishab N Posted December 17, 2014 Posted December 17, 2014 Hi..... The pics as promised for my mods.. Check them out on my bricksafe..... http://bricksafe.com...Corvette C3 Mod Wow nice mod. It barely looks different from the original which is great Quote
JGW3000 Posted December 17, 2014 Posted December 17, 2014 I'm building this in LDD in preparation for identifying which parts I have and to what color the red parts will be changed to (black, if you haven't guessed). Although only 1/3 of the way through, I am very impressed with the compactness and unique use of parts. I especially like having a chance to use this part, , which for me has been useless until now. Can't wait to pull parts and get building! Thanks to Madoca for the great design and Jurgen for the BI Quote
Jurgen Krooshoop Posted December 17, 2014 Author Posted December 17, 2014 @Jurgen: As always very good instructions from a very good MOC . And now I think, the forum should add an "instruction Maker" sign to them who make regulary instructions Yes, I really like the idea of an "Instruction Maker" sign Quote
__________________________ Posted December 18, 2014 Posted December 18, 2014 (edited) Madoca1977 builds always deserve better instructions better than the Google pictures he's taken. . . :thumbup: Also thanks for keeping the number of rare pieces reasonably low! Any chance of instructions for his Supercar? http://www.eurobrick...showtopic=83913 Edited December 18, 2014 by TheLegoExpert Quote
zux Posted December 18, 2014 Posted December 18, 2014 Any chance of instructions for his Supercar? http://www.eurobrick...showtopic=83913 Check his G+ page Quote
Recommended Posts
Join the conversation
You can post now and register later. If you have an account, sign in now to post with your account.