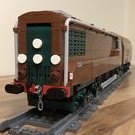
Hod Carrier Posted May 27, 2015 (edited) A few weeks back my girlfriend and I spent a little time in the Netherlands visiting the tulip fields and other attractions. We based ourselves in the Ibis opposite Leiden Centraal station where we had an uninterrupted view of the comings and goings in the station. As a railwayman myself I found it all quite interesting to see how things worked differently from the UK, especially the double-deck trains. Principle among these were the DubbeldeksInterregiomaterieel or Verlengd InterRegio Matrieel (DD-VIRM) operated by Nederlandse Spoorwegen (NS) that formed the backbone of the intercity services. In fact, all of the train services we caught during our stay were of this type. All this got the creative juices flowing and had me wondering whether or not it could be rendered in LEGO. There are already a number of excellent Dutch trains rendered in glorious 8-wide so I thought I would try the more modest size of 4-wide purely as a static model. As I'm sure some of you might have realised, a smaller size actually raises more issues than a larger size. It took two weeks of tinkering with LDD to come up with a shape that I was happy with, primarily because to me the signature of these trains is the body profile and a lot of work was required coming up with a way of making square bricks follow this profile. There then followed two weeks of waiting for the postman and another week of trying to fit all these bits together. The design is not entirely perfect as the structure is not strong until all the various parts are joined into a whole, but no amount of head-scratching could come up with a better solution. So here it is. A 4-wide DD-VIRM car. A close-up view is a little unforgiving. This is just a single vehicle at the moment, built as a prototype. There are improvements to come, but mostly in the form of efficient brick usage, structural strength and ease of construction. The appearance is likely to remain unchanged, unless anyone can see areas for improvement. Edited May 27, 2015 by Hod Carrier Share this post Link to post Share on other sites
Rijkvv Posted May 27, 2015 The VIRM has not an easy buildable shape, but you managed it. Well done. Share this post Link to post Share on other sites
Duq Posted May 27, 2015 That's quite impressive. The only bit that needs improving (and I don't know how just yet) is the top edge of the front. There has to be a way to make that a little more rounded... Share this post Link to post Share on other sites
Hod Carrier Posted May 27, 2015 (edited) Thanks Richie. I think I probably underestimated the complexity of the shape and therefore the build, but I'm feeling happy with the outcome. I'm hoping the other three cars will follow on in due course. Duq: I did have quite a long play with the front end but the small size of the model makes it tricky. The first arch on the roof is straight but the windscreen section is tilted. Therefore the space is not 1x1 which limits the type and shape of parts that will fit into the space without fouling. Edited May 27, 2015 by Hod Carrier Share this post Link to post Share on other sites
THERIZE Posted May 27, 2015 A VIRM, brings the memories of having no seating back. Share this post Link to post Share on other sites
dr_spock Posted May 29, 2015 Nicely done. Love those yellow blue color combinations. Share this post Link to post Share on other sites
zephyr1934 Posted May 30, 2015 4 wide trains are fantastic, a real challenge to get something that looks good and you've tackled that challenge head on. Great work. It does need a few more units though. Share this post Link to post Share on other sites
Hod Carrier Posted May 30, 2015 Hello chaps, Thanks for the feedback. :o) zephyr1934: The real trains are either 4 or 6 cars in length and I will be adding more cars to make up a complete unit in due course. However, I want to make sure that I'm happy with the prototype car first and that all issues are addressed and changes are made before I start to add cars. I think a 4 car unit will be sufficient, at least at the moment. There is also a 4-wide Sprinter Light Train (SLT) currently sitting on the drawing board. It's still being worked on in LDD and is a little way off being prototyped, but watch this space as they say. Duq: I've taken your comments on board about the shape of the cab roof and have gone away and re-profiled the entire roof, which actually brings it a bit closer to that of the real trains. This has also made it possible to give a better shape but it does bring a raft of new problems, chief among which is how to attach the roof to the rest of the model. More work is still required and raises the possibility of having to "modify" bricks. What do you think? Share this post Link to post Share on other sites
Man with a hat Posted May 31, 2015 Very nice. The curved sides look amazing. And the new version of the front also looks good. Share this post Link to post Share on other sites
Duq Posted May 31, 2015 I like it! That piece works really well for the roof. Would be a shame if you had to modify parts though... Share this post Link to post Share on other sites
Hod Carrier Posted May 31, 2015 Yes, I agree. It really would be the last resort. As it stands, there is the option to go for a slightly less optimal roof profile that could be attached in the same way as the existing roof. This might have to be the option I take. Share this post Link to post Share on other sites
Hod Carrier Posted May 31, 2015 (edited) Well, here it is I guess. VIRM v1.1. While this can be attached in the same way as the existing roof the profile is less than optimal. I would prefer to build the entire roof to the same profile as the front section but this just can't be done due to the size of the gap at the top of the body. The compromise to be made here was either a break in the profile or a large gap all around the edge due to the need to add an additional tile along the underside of the roof to permit attachment to the supports. As you can see from the next image, I decided to go for a break in the profile in order to prevent the model growing any taller. A little sneaky peek inside...? Oh, go on then. Edited May 31, 2015 by Hod Carrier Share this post Link to post Share on other sites
zephyr1934 Posted May 31, 2015 That is looking great. One thought on the roof, if this will only be for display you might be able to let gravity do the attaching for you. Share this post Link to post Share on other sites
THERIZE Posted May 31, 2015 Hello chaps, Thanks for the feedback. :o) zephyr1934: The real trains are either 4 or 6 cars in length and I will be adding more cars to make up a complete unit in due course. However, I want to make sure that I'm happy with the prototype car first and that all issues are addressed and changes are made before I start to add cars. I think a 4 car unit will be sufficient, at least at the moment. i still see some 3 car sets. Share this post Link to post Share on other sites
Hod Carrier Posted May 31, 2015 zephyr1934: Thanks for the praise. I'm still fairly new as an AFOL and am still learning the techniques, so it's really encouraging to get positive feedback. As you might be able to tell, I'm a bit of a perfectionist and will keep working on a project until I'm completely satisfied with the result. Gravity is certainly one option, but I think I would prefer the roof section to be held on (or at least located) somehow, even if it's not conventionally joined. Another possibility would be to use friction between vertical pieces on the frame and the underside of the roof, although by the strict rules of LEGO construction this might render the build "illegal". Unfortunately this is something that I can't try with LDD first because it doesn't seem to recognise either of these otherwise well-known forces. Ha ha!! THERIZE: I thought all the 3 car units had been rebuilt and lengthened, but I defer to your greater knowledge on this point. Clearly my sources are incorrect. I certainly don't recall seeing any during my brief visit to The Netherlands, so maybe they don't operate along the Amsterdam to Den Haag corridor. It certainly gives me a nice growth progression, from 3 to 4 and eventually to 6 cars. If you had the option, wouldn't you build the longest formation possible...? Who knows, maybe I'll eventually build a double set of 8 or even 10 cars length. Share this post Link to post Share on other sites
Hod Carrier Posted May 31, 2015 (edited) ...and now to build it. And so, let us hasten unto Bricklink with sweaty palms and a lengthy shopping list. I'll do it tomorrow. Ha ha!! Edited May 31, 2015 by Hod Carrier Share this post Link to post Share on other sites
Duq Posted May 31, 2015 If we're going to be technical anyway, if it's a VIRM then it has to be 4 or 6 cars. The V stands for Verlengd or Extended. The original 3 and 4 car sets were DD-IRM. And yes, as far as I know they have all been extended by now but I no longer live in Holland so can't be entirely sure. Share this post Link to post Share on other sites
Rijkvv Posted May 31, 2015 Yes, they are. :) On a sidenote: not all VIRM's are rebuilds. The first three series were rebuilt and lengthened but the fourth was constructed brand new after the extension of the previous series. Share this post Link to post Share on other sites
zephyr1934 Posted June 2, 2015 Gravity is certainly one option, but I think I would prefer the roof section to be held on (or at least located) somehow, even if it's not conventionally joined. Another possibility would be to use friction between vertical pieces on the frame and the underside of the roof, although by the strict rules of LEGO construction this might render the build "illegal". Unfortunately this is something that I can't try with LDD first because it doesn't seem to recognise either of these otherwise well-known forces. Ha ha!! Yeah, gravity does kind of suck when you pick things up (in this case for dusting) and a new orientation sends your roof smashing to the ground in a hundred pieces (but after all, there is no such thing as gravity, the earth sucks). There are some work arounds that do not require precise LDU matching though. One of my favorites is to simply wedge parts together in such a way that they can't get out (e.g., the exhaust stack on step 30 of the powered unit in my gp40 instructions)... though I guess that is still LDU matching. Then there is clip snot or using technic beams to get that "off spacing". If you want to blow your mind, just dig through the building techniques here. Share this post Link to post Share on other sites
Hod Carrier Posted June 2, 2015 (edited) Thanks for the interesting link. I think my brain has just melted. Ha ha!! The problem with gravity alone is that the top edges of the sides are a shallow vee with a gap just under two studs wide. I've had a play with the model and the existing roof just won't sit right. Adding a plate to the underside doesn't help because it slips into the vee on one side of the other. What I've come up with is a 90 degree bracket attached to the frame that carries a 1x2 technic brick with two holes. Through these holes I'll slide a couple of technic axles with studs on the top that attach to the underside of the roof. This should locate the roof section into one position even though it will still be held on my gravity. LDD is happy with it but it's not an exact match with the studs, however it's close enough. When the parts arrive it may work out better. ...or worse. Edited June 2, 2015 by Hod Carrier Share this post Link to post Share on other sites
Hod Carrier Posted July 9, 2015 (edited) Good Evening, After a lot of faffing, a holiday, a few changes of direction and a dash of procrastination, I've finally got around to finishing my 4-wide DD-VIRM EMU. Drum roll please. Apologies for the quality of the photos. I don't have a lot of space in my flat to lay out the model in it's full extent and the floor really is the only space I have. Consequently the lighting is far from ideal. The markings, including the passenger door seals, are simply homemade stickers knocked up on my desktop inkjet printer using Avery address labels. All very straightforward. I did finally solve the roof attachment problem in a satisfactory manner. The roof sections simply sit on top of the cars but are located in the required positions inside the car bodies. I hope you like the finished article as much as I do. The close-up view is still a little unforgiving, but stand back from it a bit and I think it looks quite good. Edited July 14, 2015 by Hod Carrier Share this post Link to post Share on other sites
Redimus Posted July 9, 2015 That looks really good. Share this post Link to post Share on other sites
Hod Carrier Posted July 9, 2015 Thank you, Redimus. That's very kind. Share this post Link to post Share on other sites
JopieK Posted July 9, 2015 Difficult train, but you captured it very well. I ride this one a few times a week (more often the revised NS-DDZ though). Share this post Link to post Share on other sites
Hod Carrier Posted July 9, 2015 Thanks JopieK. There were a few NS-DDZs working into Leiden Centraal during my visit and I found them a very interesting train. I wasn't sure precisely what service they were working but they seemed to terminate there before returning in the direction they came. The Bo-Bo-Bo (three 4-wheel bogies) motor coaches clearly replace the locomotives that would have previously provided the motive power when these trains were push-pull sets prior to rebuilding. There aren't many locos with this wheel arrangement but I can't think of any other multiple unit train that has it. I've been working on a Sprinter Light Train in 4-wide on LDD and had considered adding a DDZ too. Lets see what happens. Share this post Link to post Share on other sites