Search the Community
Showing results for tags 'trains'.
Found 157 results
-
Happy 2024 everyone. I figured that as it's now three days into the New Year it's time for a new discussion thread! So here goes with the same old history of the past few years: Standardised Train Sets 2024 ? 60423 Tram & Station ? 2023 21344 Orient Express 76423 Hogwarts Express & Hogsmeade Station 2022 60335 Train Station 60336 Freight Train 60337 High Speed Passenger Train 76405 Hogwarts Express Collector's Edition* 10308 Holiday Main Street (trolley/tram) 2021 N/A 2020 10277 Crocodile Locomotive 40370 Trains 40th Anniversary Set (GWP) 60271 Main Square (tram) 2019 70424 Ghost Train Express 71044 Disney Train 2018 75955 Hogwarts Express 60197 Passenger Train 60198 Cargo Train** 60205 Tracks 60238 Switch Tracks *not L-gauge **except Europe Sets with a strikethrough are retired. Italicised sets are ones with expected imminent retirement. No actual rumours or information yet on any 'standard' 2024 trains, though this should be the place to discuss them. Fingers crossed it won't be another empty year like 2021 but I guess we wait and see! I was expecting 60198 Cargo Train to be retired back in 2022, but it seems it has replaced the 3677/60098 slot as a second available cargo train to complement 60336. Bricklink Designer Program Separately, several trains-related BL Designer Program sets have been chosen for crowdfunding, some which I'm certainly looking forward to: Series 1 (Crowdfunding February 2024, Production and Shipping July 2024): Old Train Engine Shed by Mind_the_Brick Series 2 (Refining Finalist Details September 1st 2023 - May 1st 2024, Crowdfunding June 2024, Production and Shipping November 2024): Brick Cross Train Station by brickester Logging Railway by ties25 All require 3,000 preorders to be made and have a maximum of 20,000. I can't remember how successful preorders for Studgate were bur that can probably lead to some kind of predictions for this. Series 5 (2025) has another train set in it. I'm interested to see how these play out and how popular they are. I think it could be quite an interesting year. Discuss below, and @JopieK maybe pin the topic at the top?
-
Good news train fans - The Brick Train Awards are back for its fourth year this September. An annual virtual event for LEGO train fans around the world, the awards showcase what the LEGO train fan community has been building in the last two years and is a great opportunity to see the variety prevalent in the hobby. The awards are split in to 15 categories including awards for best steam, diesel and electric locomotive, best freight, passenger and special wagons, group or individual display, and 3 categories for TFOLs (Teenage Fans of LEGO). There are also 3 categories reserved specifically for digital models created in Bricklink Studio, Mecabricks or LDD! Each category is judged at a regional level in one of three regions - Americas (including both North and South America), Europe and the Middle East, and Asia & Australasia. The winners of the categories at this level are then discussed by a panel of judges to nominate one global winner in each category. Each winner will receive a Brick Train Awards 2023 winners brick, and the 15 global winners will receive a $100 voucher from global sponsor Trixbrix.eu. The event is also supported by HA Bricks and Brick.is. You can enter for free at bricktrainawards.com, and follow all entries on the Facebook, Twitter and Instagram accounts for the awards. can’t wait to see what people have been building this year!
-
I'm happy to present my most recent build, a midwestern grain train from the late 1970's in the US. I've been working on it for most of this year, though the inspiration and some parts purchases date back to 2006. Towards the end of last winter I had been train watching and after about a half dozen trains, each led by a couple of black locomotives pulling a mile long monochromatic string of cars, it got me thinking about an underappreciated heyday. Between 1960 and 1990 American freight cars were a burst of color, and even had a few hints of the old school railroad pride shining through, e.g., Milwaukee Road spending the extra dollar to weld a plate on the side of their covered hoppers declaring themselves "America's Resourceful Railroad." The freight cars were 100% utilitarian in design, but in the bright colors they went a little further and said, "look at me," with each car taking a different hue. Since then, freight cars have drifted back to browns and grays only flashing a random graffiti tag for flare after a night of hanging around with the wrong crowds. I wanted to capture that era in the days just after KarTrak Automatic Car Identification's failure showed how dirty railroading in America can be. But how and what? I've always had a soft spot for covered hopper cars, in particular those based on the Pullman Standard 3 bay design. I had a go at these cars in 2006 Shortly thereafter, I started collecting 1x2 door rail plates and double convex inverted slopes in yellow to build a Milwaukee Road version. Those parts sat in a box and I hadn't returned to that prototype until now. On the flip side, I had most of the parts in hand that I needed to start testing this build. Happy with the prototype, I expanded to 5 different liveries. These covered hoppers are 6 wide, featuring custom decals. With their weight they need roller bearing trucks, to ensure the trucks match the width of the car they use custom truck sides from TrainedBricks.com. At this scale it is impossible to get all of the details, so in this design I focused on capturing the essence, e.g., a continuous slope for the bins from the end of the car to the bottom of the chute, using thin vertical and horizontal members on the ends of the cars. Several of the cars have prototypical placards 1/2 plate out from the ribbing. A couple of the cars consumed almost all of the double convex inverted slopes available on bricklink in the given color. As with most of my designs, these cars are designed to negotiate R40 curves, and in turn, replicating the form of the prototype gave me a true appreciation of the design of the actual cars. Of course, once you start down the rabbit hole of looking at covered hopper cars, you wind up seeing lots of other cool cars... and the potential to build in colors that do not have door rails (dark green). Well, next thing I knew, I also had a design for the ACF center flow covered hopper cars. Once more the covered hoppers are 6 wide. These cars were designed as a complement to the Pullman Standard cars to fill out the fleet and bring in a few more colors/liveries. Why stop at 8 cars? Good question, of course you need a Canadian cylindrical covered hopper, who doesn't need a cylindrical hopper car? So I built one too. Now I know you've all been there, you build a MOC and then discover you need a second MOC to support the first MOC (or in this case, a 10th MOC to support the first 9). When I started out I did not worry too much about what would pull these cars. I have a few period appropriate 9v locomotives, most recent of which are from 2014, a pair of SW1200's. While there was one major solution (FX Track) two problems remained, (1) my old 9v locomotives were not powerful enough to pull the full train, and (2) it has been over a decade since I've run 9v trains in public. I originally thought that I would eventually address #2 at some later point in time, but #1 escalated the need. So off I went to build a period appropriate PF locomotive. I returned to MNS, the same road as the SW1200's. Minneapolis Northfield and Southern was a spunky shortline with a long history and a large fan club for a railroad with just over 80 miles of track. They had a history of unusual locomotives starting with their predecessor, the never electrified Dan Patch Electric Lines and the first successful gas-electric locomotive that was the predecessor to diesel electric locomotives, to a fleet of massive Baldwin center cab locomotives built in the late 40's (nicknamed the "blue dragons"), and their last purchased locomotives the SD39's in 1968. These were essentially SD40's with smaller prime movers (and thus, lower horsepower). They were painted in a distinct dark blue with a single white stripe running the length of the locomotive. The SD39's served until the MNS was purchased by Soo Line in 1982 and one has returned to the shortline (Progressive Rail) that now operates a portion of the old MNS route. My 6 wide SD39 has a lot packed inside, including 2 PF train motors, 1 rechargeable PF battery pack, an IR receiver, a pole reverser, and four weight bricks. Fitting it all in required some compromises, like filling the cab with the IR receiver, and my desire to make the white stripe brick built as much as possible made fitting the battery a lot more complicated. One obvious tradeoff is that the long hood is 5 studs wide to hide the battery, I would have preferred to keep it 4 studs wide. But also a little ingenuity to plow through some of the challenges. If you look closely at the side views, just above the fuel tank you can seek a small patch of dark gray from the battery. I used an old school 4.5v motor plate with 4x8 cutout to drop the battery down below the white stripe and snotted studs to hold the tiles on that cover the side of the battery. The build uses custom stickers, 3-axle motor covers and fan housings from trainedbricks.com, and custom railings to keep them closer to proportional than the brick built alternatives. But I did have to use the classic train wagon ends as a nod to the fact that this is a Lego train after all. Okay... just one more problem, I didn't have a respectable MNS caboose. So now I needed an 11th MOC to support the 10th. The MNS purchased 3 new bay window cabooses in 1972 and like the SD39's, these served until the MNS was purchased by Soo Line in 1982 and one has returned to the shortline (Progressive Rail) that now operates a portion of the old MNS route. The caboose is 6 wide (8 at the bays), featuring custom decals, roller bearing trucks to match the hopper cars. The net result is my all new MNS grain train, with 5 Pullman Standard 3 bay covered hopper cars, 3 ACF 3 bay covered hopper cars, 1 Canadian cylindrical covered hopper car, an MNS SD39 and MNS bay window caboose. All in liveries that would have been seen in the late 1970's or early 1980's. The total length is about 11 ft. All of the cars are 6 wide. Click here for a mediocre video of the train in action I hope you enjoy the train. Questions, comments and constructive suggestions are always welcome The full album is here
-
After spending lots of time playing LEGO Duplo (mostly trains) with my kids and also building some larger layouts myself I got few questions regarding (mostly) design of Duplo tracks. I asked them at Polish LUGPol forum but some were not answered (it seems LEGO Duplo is not popular enough) so I’m reposting them here hoping for larger audience and thus better answers. I believe that LEGO parts (which includes Duplo tracks...) are done carefully and decisions are unlikely taken without evaluating many issues. So the radius used for curved tracks must have some reasons behind it. I don’t know which and I would very much like to know. Since I already know much of troubles caused by that choice. Read further. (1) Curved Tracks Radius A single Duplo curved track spans on a 30° angle. Three such tracks make a right angle. But the simple staff ends here. Ever tried to connect the ends of such right angle with Duplo bricks? It failed, didn’t it? You could actually make it but that would require to strain those tracks a bit (they are significantly flexible so it doesn’t require any strength nor does it seem to make any breaking risks). If you would do that with a hole circle of 12 curved tracks you would not get a circle but an ellipse with short radius of 17 Duplo studs and long radius of 18 Duplo studs. The actual radius of a circle is somewhere around 17.5 Duplo studs. It might be aligned with LEGO studs, I haven’t checked that but I doubt it. This might seem insignificant especially that the tracks are strained so little that it is not visible to someone who “doesn’t know”. But still this is some disadvantage that shows when you try to build something bigger or mount everything on a single solid base (possibly done with plates). Since the strains add up and things start to fall apart easily. (2) Curved Tracks Alignment to Straight Tracks So I looked further wondering to what the curved tracks align well. Sadly without success. Another failed example is when you connect two curved tracks in opposite direction. That way the lines entering and leaving the two tracks are parallel. Its tempting to see if you can mount it on a plate. But as it shows again it is not possible. Such a connection of tracks does not align well with Duplo studs (and thus also straight tracks...). (3) Long Trains In my experience a train having two or three railcars significantly slows down on longer curves. The cars are long and wheels don’t turn around in no way which means that the do no align well with curved track and cause some friction. With more railcars you can see how the train slows down and sometimes even hear that. With four or more railcars its nearly sure the train will stop on a longer curve. Would the curve track have a larger radius this issue would be (somewhat) smaller. Now knowing the drawbacks of current curved track design we might wonder what are its advantages so that the trade off goes well. Anyone? And this is still not end to the questions. (4) Move Direction Why current locomotives do move in only one direction? Would changing the button to a three state switch (forward, stop, backward) make it much more expensive? Or would it be much more difficult for kids? Current sets with locomotives are from 2 years. How it was with the old “smart locomotive”? As I think it was far more “difficult” and “complex”. (5) Locomotive Anchors I find it rather odd that (current) Duplo locomotives don’t have anchors on both sides as all railcars do. This way making the locomotive push the train rather than pull is rather difficult and likely to cause derailment when using more complex layouts (like ups and downs or junctions). (6) Corrugation (I’m not sure if this is the correct word for it) Tracks and the engine wheels of the locomotive are corrugated. Why is this needed? As it seems LEGO trains don’t use it. So why Duplo trains need it? Any “rational” for those? And as a final question. (7) Does LEGO provide precise specification of their “bricks”? Like exact dimensions and sizes or power of motors and so on?
-
This topic was my second large topic about my Lego room after Lego Trains 9V Extreme - ready! which was published on June 6th 2017 A lot of things have happened since then. Attached are pictures and links about additions: New Lego Trains 9V since june 2017: Two Swedish Passenger Trains with Rc- and Da-locomotives (built by Selander) Additions to My Own Lego World since June 2020: Tivoli: Loop Coaster Space: NASA Apollo Saturn V International Space Station (ISS) (together with Space Shuttle Discovery) Famous Attractions: Colosseum Eiffel Tower Famous Historic Aircrafts: Orville and Wilbur Wrights Flyer (Kitty Hawk) WW1: Sopwith Camel and Red Barons Fokker Dr.1 147/11 Triplane Other Lego Sets: Motorized Lighthouse Piano Piano Typewriter Chess Brick Moulding Machine MOCs: Bistro chez Daniel (with mini loudspeaker) Waldenburg Castle
-
(this announcment is written in german. the english version will be uploaded as soon as possible). Liebe LEGO®-Eisenbahn-Fans, liebe BSBT-Fangemeinde,wir freuen uns, euch zum erneut zum einladen zu können.Zum nunmehr fünften Mal treffen sich LEGO-Eisenbahnfans aus Deutschland und anderen Ländern, um gemeinsam eine große Gemeinschaftsanlage zu bauen. Daneben wollen wir aber auch Einzelanlagen oder -modelle ihren Platz geben.Wie in den vergangenen Jahren steht uns dafür das "Alte Straßenbahndepot Schkeuditz" (Rathausplatz 5, 04435 Schkeuditz) mit einer Gesamtfläche von rund 700qm zur Verfügung.Wir, die Leipziger LEN-Eisenbahner, erarbeiten im Vorfeld einen möglichst abwechslungsreichen Gleisplan und stellen für euch die Grundkonstruktion. Aufbau im letzten JahrWir suchen daher LEGO – Eisenbahner...... die Lust auf Netzwerken haben und sich auf einen regen Austausch untereinander freuen.... die eine Landschaft zur Gemeinschaftsanlage beisteuern. Das kann ein Bahnhof, ein Stück freie Strecke (Schiene durch Landschaft), eine Fabrik, eine Brücke oder ein Tunnel usw. sein. Wichtig ist, dass es so gebaut ist, dass man andere Teilnehmerlandschaften oder freie Gleise daran anschließen kann.... die Lust darauf haben, ihren Loks freien Lauf zu lassen.... die schöne, möglichst realistische Fahrzeuge gebaut haben und diese gern ausstellen oder fahren lassen möchten.... die Gebäude, Zubehör oder passende urbane Eigenbauten mitbringen können.... mit Funktionsmodellen oder Ausstellungsstücken mit Licht, Motoren, usw.Interessante Einzelanlagen sind auch willkommen. große Loks in kleinem Maßstab von ChristophWir freuen uns auf eure Bewerbung unter Voraussetzungen für eure Bewerbung sind folgende Punkte:- Eure Modelle bestehen aus LEGO Steinen! (Wir sind eine RLUG, daher sind ausschließlich LEGO Steine zugelassen. Wir bitten davon abzusehen Module mit Klemmbausteinen von Fremdherstellern anzumelden.)- Bei Gleismaterial, Motoren, Licht und sonstigen Antriebskonzepten sind wir offen für Produkte von Zubehörherstellern (trixbrix, fx tracks, sBrick, buwizz, usw.)- 3D-gedrucktes ist möglich, sofern es eine Nische bedient. (Schienenstücke, Pleuelstangen, Räder, …)- Um eine breite Masse der Baumöglichkeiten mit LEGO abzubilden, bitten wir darum, keine Module oder Rollmaterial aus gekauften Sets, sondern ausschließlich Eigenbauten anzumelden!- Eine gute Gemeinschaftsanlage braucht Bahnhöfe, Industrieanlagen und freie Strecke. Letzteres kann man nie genug haben.- MOCs ohne Gleis, Stadtbebauung und Infrastruktur beleben die Anlage.- Bewerbung mit detaillierter Beschreibung, aussagekräftigen Fotos und ggf. BBM-Datei (Bluebrick – Planungsprogram: https://bluebrick.lswproject.com )- Der Teilnehmerbeitrag beträgt 30,- Euro.- Das Mindestalter für Teilnehmer beträgt 14 Jahre. Organisatorischer Ablauf: Die diejährige Bewerbungsfrist endet am 28. Februar 2023 Schreibt uns einfach eine Mail und wir senden euch unseren Planungsbogen zu.Nach Eingang eurer ausgefüllten Planungsbögen als Bewerbung wählen wir die Modelle aus, die für die Gemeinschaftsanlage dieses Jahr in Frage kommen. Wir melden uns bis 31.3.2023 bei euch zurück.voraussichtlicher Ablauf des Treffens:Mittwoch: Anreise und Aufbau der GemeinschaftsanlageDonnerstag: Aufbau der eigenständigen Anlagen, Testfahrten, ModulvorstellungFreitag: Besuchertag (16-18 Uhr), AFOL-AbendSamstag: Besuchertag (12-22 Uhr), danach Nachtfahrten (open end)Sonntag: Besuchertag (10-16 Uhr),16 Uhr: Siegerehrungen, Verabschiedungdanach Abbau und HeimreiseWir selbst werden von Montag bis Montag vor Ort sein. Helfer für den Auf- und Abbau sind herzlich willkommen. Publikum:An folgenden Zeiten wird das Treffen für Publikum geöffnet sein:Freitag: 16-18 Uhr, Samstag 12-22 Uhr, Sonntag: 10-16 UhrEintritt für Besucher:5,- Euro / Kinder bis 14 Jahren: 3,- Euroweitere Infos:Es gibt nicht allzu viele Unterkünfte in der Umgebung. Eine Liste findet ihr anbei.Übernachtungen im Zelt und Wohnmobil sind von der Stadt Schkeuditz nicht gestattet.Für Teilnehmer gibt es keine Hallenöffnungszeiten: Wir dürfen rund um die Uhr in die Halle.Auch in diesem Jahr wird es am Abend die Möglichkeit geben, bei abgedunkeltem Licht oder im Dunklen zu fahren. / Samstag ist Nachtfahraktion mit Publikumsverkehr.Die Planungssoftware "BlueBrick" findet ihr unter oben genannten Link. Eine Einbindung der Trixbrix-Gleisbibliothek findet ihr hier: https://trixbrix.eu/en_US/i/Track-Planning/22 Gastfahrer:Wie auch in den vergangenen Jahren wird die Gemeinschaftsanlage aus vielen kleinen persönlichen Landschaftsteilen entstehen, die viele Leute in ihrer Freizeit teilweise sehr detailliert gebaut haben.Für die Nutzung der Anlage gibt es einige Regeln, an die sich alle Teilnehmer halten müssen und die im Vorfeld kommuniziert werden.Wir können es daher nicht organisieren, dass Gastfahrer spontan auf der Anlage fahren können. (also: Als Besucher, die mal eben die eigene Lok mitbringen und über die Anlage düsen.)Rückblick zum BSBT 2022: Wir freuen uns auf ein wunderbares Eisenbahn-Erlebnis mit euch! Bei Fragen stehen wir euch hier im Thread oder per Mail gern zur Verfügung.(Besuchertermine, das BSBT beginnt schon einen Tag eher, Aufbauhelfer sind ab Montag gern gesehen!, mehr Infos unter https://lbrick.de/bsbt.html !euer BAUSPIELBAHN-TREFFEN 2023 Orga-Team!Florian, Ken, Kevin, Micha, Pelle, Rik, Rio und StefanAlle Bilder (mit Ausnahme des ersten) wurden uns von Thomas zur verfügung gestellt:
-
I had a whole stack of broken 12v light bricks where the bulb had gone. In particular they don't last that long when set in lamp posts. Sick of buying more so needed a way of replacing the bulb with a longer lasting LED. The first difficultly was finding the right LED with a built in resistor so they can run straight off the 12v power supply. I hadn't found 3mm white/clear LEDs before, just coloured ones, but found a supplier here for what I needed. These should also work fine for 9v. Then the other tricky bit was to open up the light brick without breaking it. This wasn't as difficult as I first thought, so here is the guide - no soldering and no glue! The tools used (almost common household items!) excluding the light brick and LED are : 1. A micro-screwdriver. 2. A bent curtain hook. 3. Some sharp nail scissors. Step 1. Using the screwdriver scrape off the plastic tab that helps hold into place the inner part of the light brick : Step 2. Using the holes for the plug as an anchor lever out the inner part of the light brick with the sharp end of the bent curtain hook until you can get under it : Step 3. If the inner part is still not loose rotate the other end of the curtain hook in the space made at the bottom : Step 4. Take out the inner part : Step 5. Use the micro srewdriver to remove the old bulb and contacts until the inner part is clear : Step 6. Throw away the old bulb and wiring and Insert the LED : Step 7. Bend the LED wires around the light brick making sure the LED is centred : Step 8. With the screwdriver continue to bend the LED wires into the plug contact holes : Step 9. Re-insert the metal contacts. This may take some force, but it will be this additional friction which means the removal of the plastic tab earlier doesn't matter : Step 10. Trim off the excess LED wires with the scissors : Step 11. Re-join the central part of the light brick with the cover (remember which way is up!) : Complete! Remember as it's an LED it won't work plugged in either way to the power supply, but that doesn't bother me in the slightest as you just turn the plug around / swap the pins if it doesn't work For train lights where the power will be reversed when you reverse the train I can recommend Janco's light bricks which are superb
-
LEGO IDEAS - Casey Jr. Circus Train (Dumbo, 1941) WP_20220103_17_29_48_Pro by Modeltrainman, on Flickr WP_20220111_15_29_09_Pro by Modeltrainman, on Flickr
-
The Glacier Express with Panorama Carriages (Stadler Rail) - one of the world`s most beautiful and mopst famous trains - is now part of my train collection! The GEX has been on my wish list for many, many years. And now, this train dream has come true - what a great feeling! This train evokes so many memories, not the least our GEX journey from St. Moritz to Zermatt in First class some years ago, a fabulous experience with breathtaking sceneries and a superb service onboard. My Glacier Express is built 7-wide and consists of: a Matterhorn Gotthard Bahn (MGB) locomotive type HGe 4/4 II with two 9V engines and a length of 40 studs, four Panorama Carriages First class (Rhätische Bahn) with a length of 46 studs each, a Dining Carriage (RhB) with two 9V engines and a length of 46 studs. The total train length is approx. 2,3 meters and the total weight amounts to approx. 3,8 kg. All beams are strengthened with supermagnets. To build this train has been a journey with multiple challenges, not the least all the decals. Special thanks to Knivsta Tryckeri, our local printing house, for their superb support! And thank you also to Selander for his inspiring advice during this project. And this is what my Glacier Express looks like: And this is what the Glacier Express looks like in reality: PS: The Glacier Express is a registered trademark.
-
G'day all! My name is Moz77 and I'm from Australia. Long term lurker on this fantastic site, but a new member as of last weekend! I've been collecting Lego really since I was born (in '77), but back out of some long dark years about 5 years ago. I collect mainly classic town (combined with the modulars and the odd other modern city and creator sets that fit into town layouts) and vintage trains, but will soon expand to pirates. A small preview of my current city: Treehouse by Moz, on Flickr Wishing you all the best. cheers Moz
-
So this is gonna be like my default thread for posting lego trains. Anyways, lemme start off by posting this double pacific Garratt, complete with railings, fully modeled valve gear, number plates, and full articulation Here's a side view with light effects
-
Hi! This is my first post in the Trains sub-forum (comments aside). I'm here to share my latest MOC: the Epic Subway Saxophone Battle! One warning, though: this was built as a lively interior first, and a train second. I'll go further into the specifics of that later, but first let's see the build. At times, pretty weird and amazing things happen on the subway. With many different people on the move for many different reasons, briefly sharing the same space, it's a game of chance until the next encounter between strangers leading to an unexpected scene! I was inspired to build this after watching the 2013 viral video "Two Total Strangers Have Saxophone Battle On NYC Subway Train". I built it as an entry to the IDEAS LEGO House contest, category "Minifigure". The premise of this category was to create a fun or whacky minifigure vignette, no larger than 64x32 studs. I built two subway cars with minus one wall and the roof, to show the interior. The base of the build measures 62x10 studs, the cars are built on a 29x10 studs platform wide. Since the 8x16 straight train tracks have a slight overhang, I couldn't use four of them for this entry (maybe diagonal). Three, on the other hand, would be too short. Another issue I had with these is that they were a bit warped, making the cars look a bit wonky. I solved both problems by using 15 8x4 flexible rail pieces. As for the proportions and lay-out... I have taken a lot of uneducated decisions here.😬 The cockpit and exterior were built 'freestyle'. And though I am quite sure that a standard passenger car has doors both front and back, I didn't have parts to make four sets of doors. The doors open and look pretty good from the inside in my opinion, though they don't follow the curved profile of the exterior. For the interior, I looked at the NYC subway for inspiration: And here is the video: Final shot: That's it, let me know what you think of it! Do you like what you see, or does it pain your eyes as a train fan? Feel free to call me out on bad or inaccurate design choices... Thanks for viewing!
-
For a while now I've been working on creating replacement axel holders for lego train wheels. It all started when I got back into the hobby and ran out of train wheels. Looking around my local area (Australia, Queensland) the 1 or 2 clubs that used to be around disappeared so there wasn't anyone I could trade or buy them off. I then remembered brick link but I couldn't get the cost down to below $5-8 pre-unit shipped. When you want 100 or 50 or 24 of the $8-5 a peace starts getting really expensive. I then tried to order them from lego but they weren't shipping bricks and peace due to the outbreak. Shortly after trying to order directly from lego, they also discontinued the part I wanted. So a few months of design later, I now have a number of wheel axle configurations. I printed the last prototypes this week and I was a little surprised that they felt smoother than the official ones. Although having said that my existing lego wheels are all 9V or RC so they are really old. I have a version with no sides, a version that is designed to imitate the existing one from lego and one that has studs on the side that is primarily for snot builds (8/9/10 wide). I'm now moving into a phase where I'd be sending them out to an ABS plastic print farm because they take between an hour and 1hr+45min to print. Initially, I wasn't going to sell them but I was wondering if there might be a demand? If there was a demand what colours other than back people might be interested in? Other Questions Welcome.
-
This is my MOC of a Transperth B series Electrical Multiple Units using Bricklink Studio Lego designer. This train MOC is of the same name based of the real version that is currently in operation in Perth, Western Australia. I'm still creating it's instructions. I will eventually buy the bricks from online (Bricklink), Pfx bricks for realism and showcase it. I hope you will like it.
-
Hello, I'm a huge train fan and have a section in my city where I have e a narrow gauge. Does anyone have a File or instruction file for a chassis? I really need one as I am very bad with the technic system. also, If you want, just send me a pic of the underside. I will figure it out from there.
-
Just out of curiosity... What do you think are the most iconic train sets? And, what are your favorite sets? I think we will see a lot of the same answers, hah. For me, I think the most iconic trains are: 1. 7740 2. Metroliner and my favorite is my far the 7740, I think the 12v system was the best system there is so far.
-
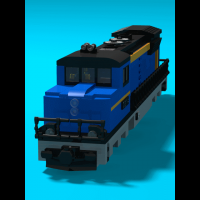
Two great trains are dueling on 12v gray track: the British Railways HST 125 vs the Deutsche Bahn BR403 "Donald Duck"! Two big countries with high expertise on trains,two different power sources (Diesel vs Electric), same speed (above 200km/h or 125mph). Who will win this Lego contest? None of them, since they both are built on the same Lego platform and shape - I created first the "Donald Duck" in Lufthansa colors and then I modified it a little to recall the HST125. So same power cars ,and same wagons, only with a different paint scheme . I've always focused on standard trains, and this is my first experiment with fast ones. After all , during "gray Era" we've seen a lot of steamers, diesels, electric trains...but only one example of fast train. So here's a shot of the DB403, with an applied sticker on front "window" to simulate double windscreens... ...and one of the "Screaming Valenta" - here the sticker is a bit different, but you can easily tell it is only a bigger one! Both are using parts available in the last years of "Gray Era" (so they could have been made starting from 1987). The HST could be a bit older than the 403 - since it's using the old style blue window in the cabin. I could also recreate a yellow sticker to cover the outer part of the trans-clear headlight, but I preferred to keep it as it is (just imagine the sticker detaching when the glue is old...I HATE that sensation ) Both could have working headlights, the DB403 can use a 12v light brick on top headlight. For the HST125 the problem is how to diffuse light from light brick to transparent slopes. But both trains could also leverage on 9V lights, which were already available at the time. The 9v Battery box fits easily in both bodies. Finally the 7745 has some internal competition!!! Hope you like these two! Ciao! Davide
-
Hello everybody, I'm starting this topic because I want to start automating my Lego Train layout. I am new to this so I have questions you might have the answer to and with that I hope this topic will help other newbies in the future. For starting off I'm thinking of buying: 1 arduino mega 2560. To control everything. 2 L298n modules to control 4 pf motors, for as many track switches. 6 (or more) lm393 lightsensetive optical sensors for train detection. 1 HC05 bluetooth module for communication with bluetooth devices. I think I am all set for hardware. Maybe a 12v powerline to power the L298n's. I have two powered up trains, which I hope to be able to control with the arduino too, didn't find anything about it yet (didn't look hard either though). Is this the right way to go Or do I miss something? Thank for you help.
-
There were 738(I think) entries into the Brick Train Awards but we only saw about 50 of them. There have been questions on Facebook weather they were going to post all of the entries and the answer was sadly no. So here I would like to see the entries you the reader submitted into the brick train awards. So please post some of your entries here so we can see them in all of their glory. You can post as many entries of your you would like. 6 or less photos of the model and one video are allowed and one photo of the prototype if you want(this is what was done for the BTA's) and please if you decide to post don't go on rambling about why you didn't win and be a sore loser but don't brag if you won. Lastly please say kind thing about other entries if you want to. Here is my entity.
-
I think it's high time we started a 2018 Lego Trains thread after a pretty disappointing 2017. 2018 has to be an improvement right? Quite a few people seem to believe that there is a "pattern" to the City train releases and according to this pattern we should expect a new Passenger Train, Cargo Train and Train Station in 2018. @Duq explained the pattern very well on the 2017 Trains thread. In addition to these expected releases, there is also a rumour that the next modular building could be a central train station. Personally I find that a bit hard to believe but you never know!
-
Hi all, It’s been quite a while since I contributed to the forum, nice to see it’s still so active! Ambridge & Paxley (few more photos, a track plan, and a video of the layout on this page) was a new type of display for me - an 18ft long end-to-end railway, with a station at either end, and connected by a single line. We usually run looped track which requires less effort to run during shows. It is also only 48 studs deep - I wanted to see what I could achieve with a much narrow scenery depth than I’d usually start with. The layout is based on a fictional rural branch line, with Ambridge being the terminus station and Paxley a through station (in future - it was a terminus for the purpose of its first show earlier this year). All of my station/display names are taken from villages and towns in the BBC’s “The Archers”, a long-running radio serial here in the UK. Between the station sits a small valley, home to the River Am and Ambridge Cricket Club.
-
Using part 87058 in black as a base, I built two sets of 2 articulated TTX well cars. Loaded them with a custom container design I published on Rebrickable last month, which uses the profile brick (1x2 and 1x4) as the base for the walls - seems to give the right corrugated steel look. Decals are from OKBrickWorks. Looking at the pictures I might need to raise the end trucks/bogies by a plate - did notice this all the time I ran them on my tracks, but on the pictures it seems the cars are not fully level. TTX Well Car with Containers by Phil B, on Flickr
-
Hey there, I wonder if anyone is interested in seeing smaller and or bigger Lego engine pieces. You know those light bluish grey engine block pieces, connecting rods and yellow piston pieces? Smaller and bigger versions of those. Smaller versions can be used to put inside a moc built locomotive, boat or possibly a semi or even pneumatic engines. Bigger ones could be used for huge ships or pneumatic engines. So what do you guys think about this? I could design these things and open a bricklink store for you to buy. Let me know, I think it's a useful idea...
-
Here is a WIP of my LGMS Module I been working on ...
-
Last train show I came unprepared and didn't have AAA batteries, I used instead 8881 battery box (that use 6 AA batteries) The train managed to run on the same 6 normal Duracell batteries for 2 days (75% of the time each day) Has anyone used the big battery box 8881 with PF trains? if so what are your thoughts about it? I kinda liked how well the train lasted and I am considering keeping this setup.


.thumb.jpeg.bf849dde081326724141a48f3f7b3ad2.jpeg)