Search the Community
Showing results for tags 'rail'.
Found 19 results
-
Warning: long post ahead! Go and get your cuppa first... This thread was supposed to be my 3-stage WIP-story and entry for the BMR OcTRAINber 2019 Technic Challenge. I was ecstatic when the theme was announced, trains+technic is exactly what I like building. Unfortunately, life conspired against me, and I have no access to my bricks this month. I can still enter the contest, but with an unpublished 3.5-year-old version of the model, rather than a new one as I would have liked. This also means the pictures and videos are far from ideal, since they were only taken for a personal record rather than a contest entry. Nevertheless, here we go. My subject: the British Railways Plasser Theurer "General Purpose Crane" GPC72. A fairly simple, robust and versatile self-propelled maintenance crane, they were often used for track laying. They could be coupled up and work in tandem to replace large track panels on double track lines, or work over one end lifting individual rails and components. For a whole host of prototype photos, visit Paul Bartlett's amazing site: https://paulbartlett.zenfolio.com/plassercrane My model V1 was built in March 2015. I had only recently acquired Power Functions components, and decided to have a go at building a decent, functioning rail crane. The result looks a bit of a mess, but worked rather well and proved the concept worked in LEGO. The two switches were used to operate the two m-motors, mounted side-by-side under the chassis. The nearest one is clearly connected directly to the winch spool, whilst the far one operated a gear train to slew the superstructure. The boom was raised and lowered manually, using the mini linear actuator - I'd ran out of motors and space by this point, and the switches meant this was never going to be a fully remote-controlled model anyway. Of course, it was a bit of a cheat. Power, propulsion, and speed control of the functions was provided by a "PF wagon". I could have built it into a Class 08... but I didn't. Overall, the crane worked surprisingly well and was great to play simulate operations with, but it just looked a bit... odd. I wasn't really satisfied with messy cables and the PF wagon either. Therefore, a year later, V2 was built. The functionality and controls remained exactly the same, but everything from the mechanism to the aesthetics was rebuilt from the ground up. And she looks much better for it! Slightly longer buffer-to-buffer and adhering to my now-standard 7w (perfect for British models), there's more space to fit everything in. The battery box is mounted sideways under the front bonnet, which makes it slightly too blocky for the prototype but it looks good enough. The motors are in similar positions to before, and the switches have moved to the rear bonnet. The IR receiver was the one component I didn't bother to hide, but the real thing has a fair amount of clutter above deck too so I wasn't too bothered. The boom is only red because I didn't have a yellow one when I took these photos! Use of this part over standard bricks allowed me to include boom extension as a manual function. Eventually I got a yellow boom, and replaced the over-sized pulleys with twice as many smaller ones. Note that the battery box had also been stolen for something else by this point! Annoyingly, these sub-standard photos and unpolished model must be my entry for "OcTRAINber - The Technic Challenge", since it's the latest model I've built and filmed. So here it is. But that doesn't mean this model doesn't stop there! I've been building several digital versions since 2016, culminating in V3 - the ultimate. This was what I'd hoped to get home, build and enter for the contest, but it's not going to happen until at least Christmas now. With cleaner (if blockier) lines, stronger motor mountings and another complete redesign for the superstructure, she's better than ever. I pondered fitting in a micro motor to control the boom remotely, but it didn't sit well, would prevent unlimited 360-degree rotation, and I can't find many sold in the UK. I did make sure this design allows easy replacement of the switches with an IR receiver though, and vice-versa. If some of the part choices seem a little odd, it's because I'm planning to build it from my existing collection of bricks - I hope to build this latest model, if there's time over Christmas. Until then, more photos and V3's LDD file are available at https://bricksafe.com/pages/Collet22/general-purpose-crane. Happy building!
-
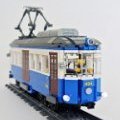
As a tram enthusiast living in Melbourne, I am currently trying to replicate each of the city's trams with lego. Deciding to experiment with low floor models, I built this 5 sectioned melbourne D2 class tram (PF operated: two powered trucks, one on the first section and one on the fifth). The second and fourth sections are suspended (no wheels), and the short middle section has an unpowered truck. Does anyone know of a coupling system that will minimize the gap between the sections of the tram? Also, if anyone else has experimented with low floor trams like this, don't hesitate to post pictures - I would like to see! Hope you enjoy!
-
Hello, I build lego Trains (Virtual and real bricks) since 2008, and recently i though to myself, what a hell i don't have a odd maintenance machine. I'm honest, i don't know what are the name or some of these and what they are for, I just saw some images on google and try to make the most detail as possible.
-
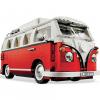
This is render of a commissioned model I am working on. 90% of the bricks are already ordered so building can soon start. The model has about 50k bricks and is 2m75 x 1 m in size
-

[MOC] Locomotive DR E 94 - Bricks-on-Rails of iron pigs and crocodiles
Bricks-on-Rails posted a topic in LEGO Train Tech
Dear Community, The week has passed very fast once again and like promised I would like to present a model for the start of the weekend. But first a little text. Some of you may have already seen it while browsing through my Flickr channel. It's the "German Crocodile", the DR E 94. It was built from 1940 and was mainly used in heavy goods traffic in Germany and Austria. 200 units were built. The nickname "German crocodile" was given to the locomotive because of the optical similarity to the "Swiss crocodile, the SBB Ce 6/8", which comes much closer to a crocodile. But the real nickname is not "crocodile" but "iron pig". They were designed for freight trains with up to 2000 tons. This heavy electric locomotive fascinated me already as a child on our domestic model railway layout. Apparently effortlessly she pulled the at that time seemingly endless coal train over our 4m² plate. The model is approx. 43cm long, 8.5cm wide and approx. 12.5cm high, with extended pantographs even higher. The locomotive can be motorized with two Power-Functions M motors, one of which is housed in each "crocodile snout". The IR receiver and battery box fit easily into the spacious cab. Inside, it was even possible to design both cabs. The detailed roof can be removed for easy access to the interior details and electronics. The two chassis, each with three axles (all driven) are pivoted and also very detailed. Here were not the "standard railway wheels" used, but the large spoke wheels of the Emerald Night, as these fit much better to the scale. By the way, the size of the model fits perfectly to the already introduced "SBB De 4/4". What has always bothered me with this locomotive, as well as with the "sister" from Switzerland and other locomotives of similar design, is the relatively large gap, which is between the driver's cab and the two " mouths " (also to be seen with the crocodile from LEGO set 10183). This gap is usually quite large with LEGO models, as the available curve radius is very small compared to the scale. In the real model, however, the gap is hardly noticeable. My goal was to "develop" a system that allows cornering but keeps the gap as small as possible. The solution is relatively simple. Below the cab there is a kind of rail system which is attached to both " mouths " and thus enables the three elements to be pulled apart if necessary, e.g. in curves. On a straight line, the elements are pulled together again by means of an attached rubber band. The assembly attempts have left a good impression on me. Unfortunately also a long, heavy train causes, that the elements can pull each other a little bit apart when driving straight out. As with the "SBB De 4/4" it is possible to build the locomotive in three different colours: - dark green (still my favourite) - grey - blue (DB colouring) And now have fun looking at the pictures. Criticism welcome. The example (Source: Wikipedia) More pictures in the flickr album With kind regards Martin | Bricks-on-Rails -

1950's Rust-eze modular factory with boxcars and semi-truck - real life MOC's
Murdoch17 posted a topic in LEGO Train Tech
Introducing the Rust-eze factory, which is where they make the rust remover / chrome restorer product Inspired by / not quite the same as the one seen in the CARS & PLANES shared universe from Disney / Pixar . I have set this building in my transition-era layout, which means the 40's through the mid-1980's, as the steam / diesel mix era continued longer on my alt-timeline. Their is a small 0-6-0ST switcher that services the factory as seen above and here in it's own topic. The factory without the train in front. The rear of the factory, with the ladder to the top of the chimney flue. The detachable roof can be removed, however I never really finished the inside part, and probably never will as I haven't a clue what to put in there machinery-wise. The loading doors do open, and were modified from the original arched doors as they couldn't fit a forklift... then again, these doors might not either! I was inspired by this photo by JB Lego to build these boxcars as seen here. They are made to haul pallets of cargo, specifically Rust-eze chrome restorer in 55-gallon drum containers for commercial packaging at another facility into smaller containers. This model was heavily inspired by set 8486, (Mack's Team Truck) from 2011. I changed the model to seat one mini figure at the wheel, added new headlights and license plate plus revised the fenders and enlarged the cab. The rear of the semi features a opening door and fold-down trailer stand, while the cab has two moving driver's doors. The trailer no longer has opening sides, but it does have two opening rear doors and folding stand for when the cab pulls away. Speaking of the cab, the roof of the driver's compartment comes off and both doors open. I hoped this factory would be of some use for some people, as the original always has been gathering dust in the basement since it was built, as seen below: This is the original factory that was by my Dad around the years 2000 - 2004. it was built with parts from several Sand Red supplemental packs available at that time. It does not feature any interior, nor does it have a removable roof. But this thing is built STRONG: you have to really put your weight on it to press the roof together. Here is the rear of his model. Comments, questions, suggestions, and complaints are always welcome! EDIT 4/9/19: added real life photos of the factory. -
For my first post I'd like to share something I built a few months back. This is my first actual post so please do be gentle :P I decided to design a much more fleshed out version of the 60051 High Speed Passenger Train by adding various types of new custom passenger cars and locomotives. I implemented some ideas from the 10233 Horizon Express, which is quite noticeable from the pictures below (such as the all-black 10233 inter-car bogey). Firstly I wanted the design to be much more detailed and to use more advanced building techniques such as those seen in 10233 than what is standard for a City set. For instance, I wanted my passenger cars to be intermodal articulated (cheers Duq :P) to really catch that high speed train vibe. Additionally, it had to have functioning doors and fairly detailed interiors. However, common limitations prevented me from doing particular designs such as a restaurant car as an interior four studs wide simply would not be enough for me to create a bar/lounge that didn't look like it was being choked by the walls of the car. If anyone wishes to build/use the designs, I'm more than happy to upload relevant .lxf files for you all :) just be sure to credit me properly. So without further ado, have at it! 1. Inter-car bogey (10233 design in all-black) Express2 - Bogey by Bartybum, on Flickr 2. Short end coach Express2 - Coach End Short by Bartybum, on Flickr 3. Short coach middle Express2 - Coach Short by Bartybum, on Flickr 4. Short locomotive Express2 - Engine by Bartybum, on Flickr 5. Long coach middle (No end coach as of yet, as I'm yet to design one) Express2 - Coach Long by Bartybum, on Flickr 6. Long locomotive Express2 - Engine Long by Bartybum, on Flickr 7. Super locomotive (uses inter-car bogey and is therefore inseparable from the rest of the consist) Express2 - Super Engine by Bartybum, on Flickr At this point I asked myself, why stop at one storey? Why not follow the footsteps of the Metroliner and go double decker? Naturally I did :) 8. Two storey coach Express2 - Two Storey Coach by Bartybum, on Flickr 9. Two storey transition coach Express2 - Two Storey Transition Coach by Bartybum, on Flickr Obviously since this is Lego, you can switch around cars if need be, so you can make whatever configuration you want. Two examples: Express2 by Bartybum, on Flickr Express2.1 by Bartybum, on Flickr Since LDD doesn't do stickers the abrupt disappearance of red and dark grey from the nose looks just a bit jarring. Keep in mind that these designs are built with the implication of the stickers on the nose already being there. Now that all's said and done, just hit me up in the replies if you'd like .lxf files, more than happy to give them out :) EDIT: .zip files in reply section
-

Can anything clip onto 'Roller Coaster Track' cross-members?
BrickWild posted a topic in General LEGO Discussion
I have just came up with the idea of building a stage lighting gantry out of straight/curved roller coaster track (as seen on 70922 Joker Manor for example) https://brickset.com/parts/6210815/rail-13x13-1-4-circle-w-3-2-shaft I wonder if anything with a 'clip holder' (e.g. 4085 https://brickset.com/parts/design-4085) can attach to the central cross-members between the rails? -
No Lego without plastic and plastics are created by the chemistry industry. The model has several processing machinery and a laboratory. The products can be loaded to either rail and road vehicles with the loading station. Should you like the model, please consider voting for it Lego Ideas. The goal is 10.000 votes and voting is free: https://ideas.lego.com/projects/95fff097-fcaf-4aa4-a8e8-6efebce91ed1
-
Suburban commuter train (4885 style) motorized with Power Functions
Murdoch17 posted a topic in LEGO Train Tech
Inspired by set 4885, (Spider-Man's Train Rescue) this four-car subway train features a removable roof on each car for access to the inside seating. The two black tiles on either end of the train are for the identification numbers / letters, such as the "A" train, or "01", for example. The studs just below the roof are for destination boards, on which you could put "LEGO", "CITY", or any other four (or less!) letter word as a destination for the train. The model is now motorized with power functions in the leads car, and each sections now has pantograph's on each unit which can be raised or lowered as desired. The front one also hides the RC receiver on the motorized unit, but this pantograph cannot be lowered, due to to being too close to the receiver to fully shut down. The four train car's roof sections are removable, and the train is supposed to be made up of two "set units" of four cars total, broken down into two groups of two. Each unit of two could operate individually of the other two if this were a real train, but they can not be broken down any further as they are supposed to be hard-coupled together. (As this is LEGO, however, you can do what you want!) The motor unit lacks seats, but features the battery box and receiver. The roof is removable for battery removal / replacement access. These three trailing cars have 18 seats total (six per car) facing in the relative direction of the "front" of the car. The roof sections are removable for easily placing mini-figures inside the cars. the LDD file is available at brick safe here. As usual, any and all comments, questions and complaints are welcome! -
7997 - inspired railroad station - expanded and improved
Murdoch17 posted a topic in LEGO Train Tech
I built this station with set the 2007 CITY set 7997 in mind. I got the original set in 2007, along with a double rail crossover for my Birthday that year. I wanted to make it a full building but didn't have the parts. By 2008, I had discovered Bricklink, but the station was in pieces by then and was not re-created until early 2012. The station was a stock set, while I searched for ideas. Eventually, I came across a build by a fellow Eurobricks user named Lazarus that incorporated a modular basis, a full building (street & track-sides) & a appealing design. I saved a picture of it and made my own design based on his. I included really neat features, (such as the arched lattice windows made with a fence) but I went too far and made it impossible to transport to train shows and LUG meetings. The platforms were very flimsy om the XL baseplates, and during the move to my families current house, it shattered into small chunks. So, I went back to the drawing board, scrapping everything but the building itself. Here is the end result, which is strangely near where I started with set 7997. It has one platform, plentiful outside seating on the platform, and is red instead of yellow. There are many changes from the set, (no stairs on the platform, for example.) but the heart and soul of that 2007 set is still there. The row of studs on both track and street sides should say the station name in printed 1 x 1 tiles. This sign currently says "IRONWOOD", as that's the name of my city layout. The model is now 8 studs deeper, allowing for more room for my hands when being worked on. Here we can see the street side of the station with it's new wheelchair access ramp. Here we can see the interior of the station, with blue ticket machines, seating, and snack bar on the first floor. The train tracking / switching controls are located on the second floor along with the employees - only coffee machine with paper cups.. This printed part here provides the computer display screen. Here you can see the modular breakdown of the model, which includes the following: -Station building (lower floor) -Station roof and Tower control room (upper floor) -Tower roof -left platform section -right platform section The LDD file is here, in case anyone wants to built their own version. (I will be building this version soon, most likely before Christmas.) Comments, Questions & Complaints welcome! -
This is the "historic version" of my previous moc:
-
This RTG crane was built to give me a second intermodal option, one not tied to a specific location. In this case, I have it with the current rail yard setup, but it can be used anywhere. As seen in the rail yard pictures, it can load double stack containers, yet is still wide enough for two 6 wide trucks to pass underneath. It's based on the Kalmar RTG crane, but scaled to fit LEGO landscapes better. More information is available here: https://en.wikipedia.org/wiki/Rubber_tyred_gantry_crane
-
Hi! I'm a new train LEGO fan, my new passion started last spring... But I think that a LEGO tram is missing, so I created in LEGO the tram of my little city. This is my MOC: Tram of Opicina #DSC_1058 by Prison Brick, on Flickr Tram of Opicina #IMG_2473 by Prison Brick, on Flickr Tram of Opicina #IMG_2496 by Prison Brick, on Flickr Tram of Opicina #DSC_1061 by Prison Brick, on Flickr Now I submit it on LEGO Ideas: https://ideas.lego.com/projects/158520 Please, support & share if you like it! Thanks! Every comment helps me to improve!
-
Hi guys, Here's my latest MOC - Grand Central Terminal! Hope you enjoy the detail jam-packed into this MOC. It's up on Ideas. Dozens of photos and a time lapse video here Grand Central Terminal on IDEAS. PS - Why is the max total size for an image upload set at 100KB??? At that limit, I can barely get one thumbnail in.
-
Several years ago I posted about my project to build the Windhoff MPV. I updated the post last month with a few pics of the almost completed models. The models depict the electrification of existing train track for running of electric trains. The whole build project has been inspired by the electrification of the Great Western Trail Line in the UK using the Windhoff MPV. Last weekend I attended the Brick Event on the Gold Coast (Queensland, Australia). The table was a bit cramped but by talking to the public they were able to see the design and function of the machines. By the end of the first day talking to my table neighbour he convinced me that the 2 tables wasn’t enough for the display so to the floor I went. Originally I was going to build two MPV’s, but during the process I increased the build to three with the third having a container style build with some nice snot construction techniques for the drivers cabin. I was quite happy how this turned out. The Windhoff MPV’s were fun (even if it took me a while) to build, especially since I went 8-wide therefore creating the scale of 1 stud = 1 foot. This gives the models great detail and sense of scale. I coupled the MPV’s with a wagon using the same scale. The MPV’s feature ISO locking points at 10’ intervals and a small knuckle boom crane at the trailing end. The substructure detailing was fun to create, trying to get the detail right balance between ease of build (using the parts I had), Lego geometry and accuracy. I was able to get during the build a couple of 1x4 light grey tiles with a text on them looking like a serial number or build plate. At 70 studs long (buffer to buffer) I was unable to get the bogie set to rotate as it is fixed to the sub-frame structure, so running it around the track is a no go for me. The coupled wagons are 70’ (buffer to buffer) long at have ISO coupling points for 3x 20’ or 2x 30’ containers/pallets. I’m not 100% on the real world bogie spacing but again they are fixed and offer no rotation. As part of the display I had previous built MOW equipment (trucks and the work wagons created by other talented individuals) showing the electrification process. I designed my own catenary system and while I’m happy it has room for improvement. Stage 1 – footings The Robel Bullok and trucks prepare the site and the footings. Stage 2 - mast MPV #1 is configured for mast installation with a stylized cab, 10’ tool room, a frame for mast storage and a long reach crane. Stage 3 – minor structures MPV #2 is configured for minor structure installation with a stylized cab, 10’ tool room, a 30’ pallet with an elevated work platform, and knuckle boom crane. Coupled to this is a wagon which holds plenty of catenary structures and a knuckle boom crane. Stage 4 - Wiring MPV #3 is configured for wire installation with a snot container style cab, a 30’ pallet with an wire dispenser spindles and a knuckle boom crane, a 10’ section for more spindles and again a knuckle boom crane. Coupled to this is a wagon which has a 30’ pallet with an elevated work platform, and a 30’ pallet with a 24’ scissor platform. Stage 5 – testing The Plasser & Theurer MTW100 measure test and adjusts. As can be seen in the pics I used twisted wire. It was a great idea that didn’t pan out as I expected with too much twist and rigidity and the real stuff is held under tension which isn’t possible with my display. I have brought some other wire which will stay straight thanks to the youtube video hack.. There are plenty of small improvements to be made, but then no one is ever 100% happy….LOL None the less please enjoy the pics and let me know what you think. Video: <iframe width="560" height="315" src="https://www.youtube.com/embed/vU1z_H10LF0" frameborder="0" allowfullscreen></iframe> 2016 Brick Event Gold Coast by Aaron Coghill, on Flickr 2016 Brick Event Gold Coast by Aaron Coghill, on Flickr 2016 Brick Event Gold Coast by Aaron Coghill, on Flickr 2016 Brick Event Gold Coast by Aaron Coghill, on Flickr 2016 Brick Event Gold Coast by Aaron Coghill, on Flickr 2016 Brick Event Gold Coast by Aaron Coghill, on Flickr 2016 Brick Event Gold Coast by Aaron Coghill, on Flickr 2016 Brick Event Gold Coast by Aaron Coghill, on Flickr
-
I made a MOW rail grinding LEGO CITY styled truck. It has one Power Functions M-motor driving the "grinding" wheel in the trailer. The trailer also has a foam sponge to clean the tracks. Rail Grinder Truck and Track Cleaner by dr_spock_888, on Flickr
-
[ full gallery] As everyone knows, lego curves are very tight, so one has to build short rolling stock to make it around the curves without problems. Unfortunately, even at 6 wide many passenger train cars built to scale should be 50+ studs long, e.g., my Superliner cars were built with accurate length to width proportions and they are 52 studs long. They look HORRIBLE in the curves, with a single car spanning a quarter turn- notice that the ends swing out almost six studs (a full car width) past the adjacent car in the pictures below. These long cars on the short curves also have so much drag that it is hard to find a good speed that the engine can pull through one curve that will not send the train speeding away on the straight track to derail at the next curve. <<regular lego curves Over the past few years several folks have promised wide radius curves and I've grown weary of waiting for someone to actually produce a viable curve. So I set out to build my own. I contemplated 3D printing, but it would be way too expensive. After several initial attempts, I settled on using third party ABS rail stock glued to lego tiles (yes, "glue" is a four letter word, but so is "lego," grin... in any event, this exercise is definitely not for the purist). The tricky issues are the fact that the lego gauge does not split well into LDU, and worse, making nice smooth curves. <<new custom curves My solution was to make a rail gauge to ensure that the rails have the correct spacing. I am still revising the design, but once I've finalized it, I plan to offer the rail gauges for sale. For my prototype there were several things I had to decide upon. I personally like the look of one stud ties, but they do not provide a good opportunity for a rail joint on a curve. So I decided to use two stud ties for now, mimicking the look of the old 4.5v rails. I also had to choose the curve radius. I wanted to go wide. Until I prove this works, I want to do only two track segments per quarter turn. So with these constraints and my rail stock the widest I could go was twice the radius of regular lego curves, and so that is what I chose for my prototypes. After I finish one loop of track, I'll experiment with other radii. In fact one could even do variable radius curves, but it would be more work to figure out the transitions, so that is something to play with in the future. The rails are darker than lego dark gray, that shouldn't be a problem if the entire loop is the same color. The straight track went fairly easy, with a single segment coming in at 76 studs (4 studs short of 5 regular lego track segments). The curves took a lot more time to get right, but I think I've got the process figured out now (I'll need to make another quarter turn before I know for sure). This shot shows one segment of the new curve next to four segments of lego curve. My 52 stud long cars work so much better on these wide radius curves. Aesthetically, I think the 52 stud long cars would look better on even larger radii curves (perhaps my next project). Meanwhile, I think the curves look about right for my 42 stud long cars, as shown below. before after More to come, but for now, you can find a few more examples of my progress thus far here (including a transition piece to adapt to conventional PF track- primarily for switches- which I have no intention of making... at least not any time soon). Oh, and if you scroll back up to the top image in this post, you'll see the middle tie on the curve sticks out one stud. That's because I grabbed a 2x2 plate instead of a 1x2 to connect the rails. Also, my carpet has a little give, so I had to put a plate underneath the joints too to keep the weight of the train from popping the rail joints. I hope that will not be the case when I set it up on a hard floor, and I'll keep you posted when I test it. Worst case is that I'll need to add a layer of plates below, in which case I'll disguise it like ballast and then I can go to single stud ties. [ full gallery]
-
Ever thought that the price for the 'stop' rails was a little too high? I did, so I thought to modify a stock straight rail. As you can see from the picture below, I have made a good approximation in my first attempt. I used a Mk I rail, but you can see in the picture on the left there is a Mk II rail. Belatedly I found that these come with two plug contact points, so making them easier to convert:-)! Differences to note: The square plastic piece that sits in between the break in the rail. And the extra plastic directly underneath the plug socket to accommodate the hole. The rail was cut using a dremel, and the plug contact was formed by making small cuts and then folding with pliers. The hole was drilled with my dremel mounted horizontally on a piece of board in lathe like fashion. A piece of plastic was temporarily MEK'd to the top to minimize burring. The plastic pieces were measured and cut from a doner piece of track, and then welded in place with MEK mixed with a small amount of plastic shaving from the cutting. The end result is not bad. Next time I will seek out the Mk II's with plug holes, as these already have the two plug contacts formed! You could use this technique to replace your original stop rails that have gone rusty. Take care not to mix Mk I and Mk II rails as they are slightly different, the male connecting pin on a Mk II has plastic reinforcement. see pictures above. And make sure you use the plug holed variety, ogeL did make rails without connection points!
.thumb.jpg.19742e89790e473128572b8d3969c36d.jpg)