Search the Community
Showing results for tags 'minifig scale'.
Found 52 results
-

[MOC] Darth Maul's Scimitar (aka the Sith Infiltrator) Minifig scale with full interior
Evilkirk posted a topic in LEGO Star Wars
I'm absolutely delighted to present Darth Maul's Scimitar, or Sith Infiltrator - 100% minifig scale with a fully detailed interior! Build features: Semi-circular opening rear doors with a retractable boarding ramp lead into the lower floor of the main hull, where you'll find a fold-down bunk, a laser-gated holding cell and various storage compartments. A 'repulsor-lift elevator' takes you to the upper floor which is the flight deck, with passenger seating and Darth Maul's control console. From the lower floor a corridor narrows down into a maintenance crawl-space and leads through to various engineering access chambers - and eventually takes you out into the cargo hold, where the Bloodfin speeder and Dark Eye probe droids are stored. An access ramp lowers from the cargo hold (under the very front of the ship) + 2 panels under the ship's hull open for retractable landing gear with a fold-out landing pad under the main hull. The roof of the rear section is removable + the flight deck can also be lifted out to allow access to the lower floor + the whole roof of the front section is hinged to open fully, revealing some of the cloaking shield, hyperdrive and other engine components. I've designed a 306-piece tilted stand to display the ship in 'wings open' flight mode - the front of the display stand is fitted with a black 8 x 16 tile, for those who like to have custom UCS plaques on their ships. The display stand + Bloodfin Speeder + Dark Eye probe droids are all FREE downloads on my Rebrickable page :) During 18 months of it's building and design, I've spent hours studying source material for this ship, especially the floorplans - and I've put a lot of effort into keeping it as close to the original as possible without the whole ship becoming overly large. Having the correct proportions with its incredibly unbalanced front and rear sections + those large folding solar panels on the sides was very challenging - and keeping it all sturdy without any sag was quite a task, but it's turned out to be a solid build - you can swoosh this ship around until your arm hurts (I have!) and it'll be fine :) Specifications: This build uses 4244 pieces (not including the display stand, speeder or droids), is 63.4cm (25") long and 48cm (18.9") wide at the wing panels. Height is 18cm (7.1") standing on its landing gear + 42cm (16.6") high at the tip of the highest wing panel whilst in flight mode on the display stand. Weight is approximately 3.3kg (7.28 lb). TL,DR... I totally geeked out and went nuts on the details and here are a million pics of the results: -
My first ever true Minifig-scale ship is finally here, and what better model to start with than the sleek BTL-B Y-Wing from The Clone Wars series. Being 23 meters long in universe, this accurately Minifig-scaled MOC is quite a unit: 57 cm long, 1,6 kg, 2,954 pieces. It can accommodate two clone pilots - one in the cockpit, the other in the turret. The model is available in three versions: classic (yellow), Rex's (blue), and red. With a spaceship of this kind, the main challenge is to achieve a level of smoothness and fluidity that gets as close to the original as possible. Using the Battlefront II model as a reference, my goal here was to closely match all key features of the ship: the subtle downwards angle on each side of the body, the curvy and tapered front section, the continuous yellow stripes that run across the entire fuselage, the intricate middle-section... and for such a smooth ship, going full SNOT (from top to bottom!) goes without saying. The T-shaped body of Y-Wings usually allow for simplistic structures, but in this case, figuring out the internals was one of the truly head-scratching parts of the build, since I had to properly incorporate angled fuselage assemblies and make a proper interior for Minifigs. Even so, the model is very swhooshable and can be grabbed from the underside, from the rear or even from both wings. Each color variant is accompanied by its specific set of instructions and parts list, giving you the freedom to build the one you prefer. The ship has two display modes, "in-flight" with its fully removable stand, and "landed" with retractable and easy-to-connect landing gear. The swooshing can begin. ► Instructions for the BTL-B Y-Wing are available at BrickVault! More pictures on my Flickr page.
-
[MOC] [LXF] Minifig-scale Phantom from Star Wars Rebels
ScottishDave posted a topic in LEGO Star Wars
This is a minifig-scale model of "The Phantom", the shuttle from the TV series "Star Wars Rebels". It's about a foot long and has a full interior, with working hatches at the rear and on the underside. I re-used the cockpit and nose from goatman461's excellent design, along with elements of the sides, roof and underside hatch: and I'm grateful for his kind permission to post this model. As usual, I've documented the build as an LXF file for my own reference, and I am linking the LXF file here in case anyone else feels like building this model. The LXF is nearly-but-not-quite correct. I can't place the roof (the angled pillars at the back prevent it from attaching) and the tyre with tread at the front of the engine should be an old smooth tyre (part no. 132) - something which does not appear to exist in LDD. Update: Many, many thanks to @monkypaws for making the instrctions available for free on rebrickable - link here. This page contains both a step-by-step set of instructions and a parts list. The details section contains a list of rare parts to check before attempting a build. Before someone asks: yes, I am pondering building the Ghost in scale with this shuttle. I estimate it would be quite large - 138 studs long, 1.1 metres, or the length of a stay in a local psychiatric hospital. Here are a couple of pictures. More can be found on the flickr album: Here are some photos of the Interior. First a shot from the front of the cockpit, showing Hera and Kanan, with the rest of the crew in the background (minus Chopper, who is in his droid socket on top of the ship). The belly hatch works, i.e. it opens and closes: There are eight seats in the back (realistically, seating for six, given the width of Lego figures): Once again, more photos can be found on the flickr album There is always room for improvement: If you have any suggestions, comments or criticisms, please feel free to leave them below. Edited 16th May: added interior photos. -
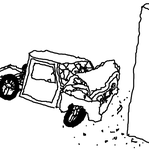
My attempt at making a minifig scaled Volkswagen Beetle, couldn't do it all in red like I Initially wanted, but I think this colour combo makes it looks sporty. One minifigure can be seated inside although I did not provide proof of that. Lego Volkswagen Beetle by legomanijak, on Flickr Lego Volkswagen Beetle by legomanijak, on Flickr Lego Volkswagen Beetle by legomanijak, on Flickr
-
[MOC] Lego minifig scale Gligorije Vozarović library, Sremska Mitrovica, Serbia
legomanijak posted a topic in LEGO Town
A minifig scale replica of the Sremska Mitrovica library. Around 5000 bricks were used to build this MOC. First a picture of the real thing for comparison. Lego minifig scale Gligorije Vozarović library, Sremska Mitrovica, Serbia by legomanijak, on Flickr Lego minifig scale Gligorije Vozarović library, Sremska Mitrovica, Serbia by legomanijak, on Flickr Lego minifig scale Gligorije Vozarović library, Sremska Mitrovica, Serbia by legomanijak, on Flickr Lego minifig scale Gligorije Vozarović library, Sremska Mitrovica, Serbia by legomanijak, on Flickr -
Disclaimer: There are some spoilers from The Book of Boba Fett Episode 5. Hello There! Episode 5 of BOBF brought back a BD Droid, as well as some other beloved droids. So I decided to make my MOC of it, and I come up with a very small one, using only 4 pieces! Here it is, next to an unrelated survivor of Order 66: Next to other types of droids: I hope you enjoy it! Thanks!
-
I’ve finally finished my first real MOC! My goal was simply to make a minifig-scale TIE Fighter that is as accurate as possible in its proportions and details. (Note: if any of my terminology confuses you, feel free to consult the glossary.) I started working on this in March, after completing my mod of @Jerac’s TIE Fighter (working from his first version). My mod changed a lot of the details, but kept the internal structure of the cockpit and spars. It also kept the wings mostly unchanged—not because I was satisfied with them, but because as a novice, reworking them felt daunting. Wing Hubs I knew that the technic 6-blade rotor had potential for a wing hub (thanks to Koen Zwanenburg) but it doesn’t come in LBG. I found a way to skin it that closely mimics the ship’s greebling, and isn’t too thick. Once I made these wing hubs, I knew I wanted to make a whole new TIE Fighter to match them. Wings I built a rim with the correct size and shape, and filled in the wing panels with my stacked 1x1 technique that suggests ridges running perpendicular to the wing edges. Coincidentally, 1 stud is very close to the right spacing for these ridges, so the overall look is quite accurate. I wanted to minimize gaps around the spokes, which meant using a lot of 1x1 plates (almost 150 per wing). I placed pairs of plates together where possible, to give a suggestion of the subtler parallel ridges. For the spokes I wanted smoothly tapered tiles rather than the standard steps and exposed studs. The spokes are less sturdy this way, but the wings overall are reasonably solid. The angles are a perfect 60 degrees. It’s annoying that TLG printed a tile for the central wheel with quite accurate details, but shifted the angles to 45/90. Spars Once I had the wings I moved inward to the spars, which present a trilemma: ideally you’d want your TIE spars to be cylindrical, sturdy, and free of non-Lego parts. You can have two of the three. My cylindrical, axle-based construction looks far better than stacked plates, but makes for wobbly, droopy wings. With standard Lego axles, this model is for display only. Following Cereal Eating Builder’s lead, I caved and bought metal axles. The hardest detail in the whole model to render was the “shoulder plate” on either side of the cockpit. I made a couple dozen prototypes (some early ones here) before finding one that represented all the angles (so many angles!) and wasn’t too chunky and distracting. I don’t love the gaps and exposed studs, but this is the best solution I could find. Cockpit Exterior I still prefer quarter domes for the cockpit. They really limit interior space but the smoothly rounded shape can’t be beat, and the greebles I wanted to include fit nicely in between them. The main inaccuracy in this model is the size of the canopy and top hatch, which should be 5 studs in diameter at this scale. The only solution would be to scale the ship up to match the 6-stud canopy, or down to the 4-stud version. Maybe someday. The canopy hinge and the quarter domes also push the cannons too low and wide, but I was able to get them just a bit closer than my previous version. I’m convinced that space binoculars are the best piece for the “bowties” beside the canopy, but they seemed impossible to attach. I struggled for a long time to make even an asymmetric connection with a clip or minifig hand, and I almost gave up before hitting on a sneaky solution. Can you guess how I did it? There’s a hint in the interior shots below. Rear The rear cone was a challenge. My previous TIE had a crude version with handlebars and 1x1 clips. I wanted something cleaner, and posing stands (now in LBG!) seemed promising. The trick was filling in the gaps between them. Purists may feel that I’ve cut my pneumatic hoses too short, but I’m pretty pleased with the result. The main issue again is that it’s a little oversized—6 studs wide rather than 5—but I’m ok with it because it’s in scale with the hatch and canopy. I was able to include the cone hump at the top—another oft-overlooked greeble. To me the dark bowties around the engines are an essential detail, and I was determined to include the red engines, which I couldn't fit in my previous TIE. I considered cutting a red hose, but I was ultimately able to work in a nipple tile. Cockpit Structure It was challenging to attach the spars securely to the cockpit. 1x2 bricks with axle holes are the obvious choice, but I couldn’t handle the asymmetry. There aren't many other options, so I ended up using 2x2 bricks with pins, reinforced by 2x4 technic plates and brackets. With metal axles they're almost solid—in spite of the reinforcements, with swooshing the spars can pull free and rotate forward slightly on the pin bricks. The quarter ellipse liftarms are structural, and not only do they make for a smoothly rounded exterior, but their half-stud width is ideal because the details around the edge of the cockpit—the hatch side greebles and the shoulder slopes—are 1 stud wide. TIE builders who prioritize smoothness and disapprove of my wanton greebling might still be interested in this technique. Cockpit Interior I wanted to include the shape of the dark grey “dashboard” and the triangle at the top of the canopy, since these are visible on the exterior model (although missing from the cockpit set). The interior is very constrained by the quarter domes and the structure holding them together. I was less concerned with modelling the interior accurately, but I did want to make sure that it fit a TIE Pilot (with oversized helmet) and that it looked reasonably cool. The pilot sits quite centred in the cockpit. There’s no space for a seat, but the movie set didn’t have one either. I was tempted to add a bunch of interior details with stickers, but once you start with that it’s hard to know where to stop. In the end I restrained myself to just 2: the iconic targeting display, and a tongue-in-cheek tribute to the rear “window”. Other designers have included transparent rear windows in their designs, but I haven’t seen any that put the interior window the correct position—high up behind the pilot’s head. Struggles with Scale This is my first attempt at scale modelling, and in the end I found the proportions are not as precise as I’d hoped. Part of the problem is that the hubs, although reasonably flat, are much thicker than the “real thing”. I wanted to define the overall width by the centre of the wings from the front view, meaning that the chubby hubs encroach into the spars’ space, and the T-shaped end plate gets squashed. But beyond that, my spars ended up being a bit shorter than the reference, for reasons I don't fully understand. I may try to fix this at some point, but I’d probably need to learn digital design to really nail it down. The side view, however, fits like Cinderella's slipper. Acknowledgements & References I’ve enjoyed discussing TIE Fighter building with Jerac, Cereal Eating Builder, and others. (If anyone else would like some feedback about a TIE in progress, get in touch! In building this I’ve gained a lot of knowledge that is really only useful to a freelance TIE MOC consultant.) My primary reference (the white overlay above) was the blueprint from the TIE Fighter Owners’ Workshop Manual. Unfortunately, I’ve recently noticed some inaccuracies compared to physical models. The EFX prop replica seems more reliable, and you can find some pictures of the original props here. Glossary I tried to keep this introduction short and sweet (seriously) but I am prepared to discuss every detail of this model at length if anyone cares to ask. In anticipation, I’ve created a visual glossary of all the greebles I tried to include, so we have some shared vocabulary. What do you think?
-
Here’s my minfig scale MOC of the Charlemagne. (Charles The Great) I’m posting my MOC on this great Pirate MOC forum so this can also inspire other builders in the future. It’s a 3rd rate Téméraire class 74 gun ship of the line of the French Navy. It’s big brother was launched in 1807 in Antwerp under the Napoleonic rule in Belgium. It had a length of 54m (177ft) and a beam of 14,3m (47 ft). This MOC at about minifig scale counts 150 studs long from stern to the bow at it’s longest point and 42 studs at its widest point at the lower gundek near the main mast. Don’t know the brick count (never made it in digital form) but it took about 2-3 years to finish of which several months were spent on the rigging. I want to pay a small hommage to the builders of these lego ships who inspired me to build this lego ship which gave me hours of fun: Achille Gallus HMS Bulwark HMS Lively HMS Prince of Wales/Minerve HMS Victory Le Fleuron/Prins Willim Le Fourageux Phantom Pinnacle Rapscallion Revenge VOC De Ruyter USS Poseidon (And I’m sure I forget to mention quite a few superb ships on this forum, sorry guys) And a special thanks to the builders of : HMS Agamemnon for it’s colour sceme and stern technique HMS Enterprize for it’s hull technique and steering mechanism HMS Persephone for it’s modular build thechnique and it’s perfect composure at a it’s own (smaller) scale. Here's the link to my Flickr page for some pics: Here's the link to the big brother info: https://en.wikipedia.org/wiki/French_ship_Charlemagne_(1809)#/media/File:Lancement-du-charlemagne.jpg
-
There are many AT-AT mocs. Many with great interiors. Many with great exteriors. This is my attempt at integrating both into one model. The model is minifig scale, has at least 6000 thousand pieces and stands two feet tall. It is stable enough to be picked up and moved. Another rebuild(plus head redesign) in the books by Jhaelon Edwards, on Flickr Features -Articulated head area -Removable panels to reveal interior -Lights throughout inside -Motorized deployment cables -Speeder bike garage for 4 speeders -Two floors with seeting areas -Gun/backpack racks -Cockpit area with seating for two pilots -Sliding Side Doors Side View: The complete scene has been reconstructed. by Jhaelon Edwards, on Flickr Rear View: IMAG1033 by Jhaelon Edwards, on Flickr Head: IMAG1037 by Jhaelon Edwards, on Flickr Full Interior: IMAG1019 by Jhaelon Edwards, on Flickr Speeder Garage: IMAG1021 by Jhaelon Edwards, on Flickr Top Floor Seating Area: IMAG1023 by Jhaelon Edwards, on Flickr Bottom Floor Front Area: IMAG1026 by Jhaelon Edwards, on Flickr Bottom Floor Deployment Area: IMAG1028 by Jhaelon Edwards, on Flickr Top Floor Access Ladder: 2016-08-07_10-36-53 by Jhaelon Edwards, on Flickr Troop Deploying: 2016-08-07_10-27-42 by Jhaelon Edwards, on Flickr Cockpit Area IMAG1030 by Jhaelon Edwards, on Flickr Assault on Hoth!: Assault on Hoth by Jhaelon Edwards, on Flickr The AT-AT at Brickfiesta: Another brickfiesta in the books! by Jhaelon Edwards, on Flickr is a youtube video detailing all the features of the model, including the motorized deployment cable. Check my flickr for progress photos starting from the first LDD files. Special thanks to Cavegod and LILmeFromDaFuture. I got a lot of inspiration from their models/techniques. Let me know what you guys think. Sorry for the cell phone quality pictures. Would buy new camera but can't stop spending money on lego parts ;). I'm considering distributing/selling the LDD files for this model if there's interest. They do need some refinements, however.
-
Minifig scale, I wish I had more chrome but it is what it is. The piece it all stemmed from is 85940 and then the rest of the car just sort of worked itself out. I actually started making a random car stemming from this piece and then by accident discovered that there was one that had the exact same headlight configuration so I continued on with the 1961 Chrysler New Yorker. Lego 1961 Chrysler New Yorker by legomanijak, on Flickr Lego 1961 Chrysler New Yorker by legomanijak, on Flickr Lego 1961 Chrysler New Yorker by legomanijak, on Flickr Lego 1961 Chrysler New Yorker by legomanijak, on Flickr
-
Martin, Aston Martin. Kind of a tribute to the late Sir Sean Connery, the car he made famous or was it the other way around. Minifig scale, the colour is not the best but even Lego won't do it properly. Lego Aston Martin DB5 by legomanijak, on Flickr Lego Aston Martin DB5 by legomanijak, on Flickr Lego Aston Martin DB5 by legomanijak, on Flickr
-
A car I made about 4 years ago and was patiently waiting for all the necessary parts to be produced in Dark green. That time has not yet arrived unfortunately so here it is in red. Lego Jaguar XKSS by legomanijak, on Flickr Lego Jaguar XKSS by legomanijak, on Flickr Lego Jaguar XKSS by legomanijak, on Flickr
-
This is a quick little truck i made, based off of the looks of 70s town sets. Feedback and suggestions are greatly appreciated ? PXL_20201024_161412947 by Gregdabrat Nunya, on Flickr PXL_20201024_161430620 by Gregdabrat Nunya, on Flickr
-
This is a MOC i made, it is a fictional 10 by 10 tatra truck. Im newer to MOCs, feedback and suggestions would be greatly appreciated! Images: https://www.flickr.com/photos/190338533@N07/shares/pR8z8S PXL_20201024_012536946 by Gregdabrat Nunya, on Flickr PXL_20201024_012621510 by Gregdabrat Nunya, on Flickr PXL_20201024_012652938 by Gregdabrat Nunya, on Flickr Youtube video on how to build:
-
The colour combination was obviously decided by the black fender piece 6255875 which will probably never exist in any other colour. Thankfully I had the necessary dark red parts to recreate the iconic colour scheme of the car. Lego Citroën 2CV Charleston by legomanijak, on Flickr Lego Citroën 2CV Charleston by legomanijak, on Flickr Lego Citroën 2CV Charleston by legomanijak, on Flickr
-
Hi Everyone, This is my first post on here but I have been following some of the amazing minifig scale Star Wars MOCs' on here. I have been fascinated with them and decided to give them a bash. So far the rebel fleet includes UCS Slave 1, UCS Falcon (2017), Most recent A-Wing, I have made Intherts' X-Wing, U-Wing, as well as created a Y-wing using his cockpit and reverse engineered the main body of the ship form images. SO, to add to the fleet the Rebel scum have stolen the plans for a Lambda Shuttle.(I) They have gotten pretty far with the rebuild/reverse engineering of the design from the images on Marshal Bananas' Flickr but I have gotten stuck with the landing gear and how to connect the cockpit at those angles! I have started ordering parts for the real build. I'm about 50% delivered and will be starting on the cockpit first to try work it out in actual bricks. Would welcome your comments as well as any advice you guys may have about the build. https://www.flickr.com/photos/150280550@N02/ MB Lambda Shuttle by Hamish Dobbie, on Flickr MB Lambda Shuttle #1 by Hamish Dobbie, on Flickr Capture4 by Hamish Dobbie, on Flickr Capture5 by Hamish Dobbie, on Flickr Capture6 by Hamish Dobbie, on Flickr Capture3 by Hamish Dobbie, on Flickr Capture1 by Hamish Dobbie, on Flickr Thanks! Hamish
-
Hey guys, I decided to create this topic and the main idea came from this and this post (so special thanks to @danth and @Digger of Bricks!). I would like to highlight three things before I start to post inspirational MOCs: I’ll post three staff picks everyday! Please feel free to post your favorite MOCs! Have fun admiring and taking inspiration from those great MOCs Top three MOC’s IMO in Baroque architecture: 1. This incredible Baroque Church by @Jellyeater! 2. This amazingly detailed MOC by @pj_bosman! 3. This greatly shaped modular by @cimddwc! Here are the three best Baroque MOC’s IMO! What do you think about them? Would you buy modulars like those if TLG made? Here are the Steampunk ones: 1. This incredible layout made together by @castor-troy and @domino39 (they also made one MOD of the PR and the MS and two MOD’s of the CC included in this layout. But they look so different that they are more MOC then MOD). EB topic here and Flickr albums with more photos here, here, here and here. 2. These great Steampunk modulars by @adde51! 3. These very interesting modulars by @Zilmrud who as well made great MOD’s of the PC and the BB! Here are the three most gorgeous Steampunk MOC’s IMO! What do you think of them? Would you buy modulars like those if TLG ever made?
-
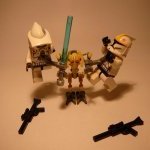
Hello everyone ! It is my pleasure to finally show you a model that has been in the making for a while now, My take on the Delta 7 Starfighter. The Delta 7 has been one of my favorite starchips in Star Wars for a while, in fact it was the first major set i got, so it was very important to me to make justice to this craft. Befor anything, huge shoutout to: M G, Atlas & Maelven for being the main inspiration for this model. This particular model was made to be as close to minifig scale as i could get it to be, this being 11 studs width, 23 studs in lenght and 4.5 studs in height. (taking in acount a minifig being 6 foot-ish) my model comes slightly larger than that being 25 studs in lenght & 6 studs in height, but this is due to the parts i used and to make it quite swooshable. I'll admit that some of the proportions are a bit off, but considering the size this is made on, i think that's a fair trade off. One of the most intuitive features of this model is it's ability to sport all the colors and variations seen in canon (from Mace Windu's to Ashoka's), which just shows how customizable the model is. Here are some renders of Obi Wan's along with the rest of the crew's: As with most of my models i did in fact make instructions for these, which you can buy over here !: https://ebay.us/4EBNjp Besides you also get some original artwork i made for it: Really hope you like it ! As always any feedback is more than welcome. May the force be with you -Prime
-
Hi, I would like to show you a MOC of a Liebherr TA 240 articulated dumper. The dumper is in 1:38 (or 1:37,5) so it nearly fits the minifig-scale. The cabin offers enough space for a driver and the rear axles are built with some kind of suspension. I really hope you like this MOC even the TA 240 isn't everyones favourite in terms of design :D You will find a few more images here Have a nice evening Chris
-
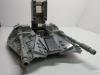
A few days ago,i bought the DC Super Heroes set "76110-Batman: The Attack of the Talons" mainly for the cool minifigures and less for the actual build. Of course,it´s a brand new set and so i build it....to be honest,i wasn´t really impressed with the finished trike.It was massivly oversized,not really sleek and just didn´t look right.Honestly,i´ve seen sets in the same price range that were much better. IMG_20180827_204245 IMG_20180827_203554 To change that,i started scavenging my parts collection and had a loose idea of how what i want to build. The Inspiration was the Lazareth Wazuma V12,a bad megablocks crazy Trike,powered by a BMW V12 engine....that was exactly what Batman should drive. IMG_20180827_203610 IMG_20180827_204318 IMG_20180827_204354 IMG_20180827_204111 IMG_20180827_204134 So i designed a vehicle closer to the scale of a minifigure and later used many parts of the set to build a simple landscape for the trike to stand on,as well as for the Talon assasins to ambush Batman. How do you guys like my version of the set?
-
I mainly build Technic C-Models, but I also enjoy Creator alternatives, so here's what I built out of set 5763. In the photo, hot-rodder sigfig is added for scale and reference). Features: ► minifig scale (with adjustable steering wheel) ► openable and adjustable canopy-cage with roll bar ► rear suspension (individual for each wheel) ► details such as engine with radiator and twin turbo, lights, steering wheel, twin exhaust and rear view mirrors Browsing through OLX (online marketplace fo classified ads) I found old (2011), used 5763 for a price of a new small, ~50 piece set. I liked how the set contained big wheels and offered possibility to build suspension, so I bought it right away. Only one super-cheap plate was missing, so it was a nice deal. The MOC Alternative uses almost every part from the set. As you can see, the build came out quite clean:
-
Full Flickr Album contains many more images, all with descriptions.
-
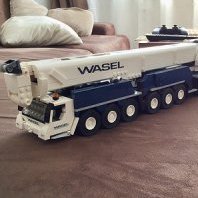
Hi I would like to show you my Liebherr L586 wheel loader. The scale is about 1:42 or 1:43. So far I have used about 600 bricks. Maybe a few more will come later. I built the wheel loader in white because I liked this color scheme best. You can play with it, too. A minifigure fits in the cabin, you can steer and the shovel can be moved up and down and dump. I hope you like the L586. Looking forward to your comments. :) More pics here: https://www.flickr.com/photos/138111247@N07/with/39052677940 Regards, Chris
-
I finally found a way to build the one car i always wanted to make out of lego. The Tyrrell P34 6 wheeler. it is not 100% accurate because i wanted to be minifigscale and fit a minifig. So some compromises had to be made but i am very pleased with te result. Once i finished it i was inspired to also make a Ferrari 312T as this is also one of the most iconic Formula 1 cars. although these cars have never raced together (the P34 in this livery raced in 1977 and this version of the 312T raced one year earlier in 1976) i like these versions the most. btw. the 312T should be number 12 i hope you like them, and please leave any comment down here.
-
Greetings! LEGO Research Labs 62000-brick commercial complex featuring offices & laboratories, various function, service & utility areas, stairwells, elevators, gardens, and parking for 106 cars plus additional spaces for motorbikes and bicycles. More pictures: https://www.flickr.com/photos/71148741@N05/sets/72157691350419425 Slideshow / Zooms: