Search the Community
Showing results for tags 'big rig'.
Found 14 results
-
 Hi guys and gals, first post here, been following the forum for about 3 years now. Got bitten by the Technic bug with 42046 and here I am today. Recently bought a 42106 for cheap in Bulgaria and after building 42070 earlier the sloped panels got me thinking - there is a truck hood in this. Sooooo, let's make a truck C-model out of 42106! Full size pictures are located here:https://imgur.com/a/wOlijkp The aim of the C model is to be able to tow trailers like the MACK Anthem's one. M Longer inspired me by his 42075 terminal truck. We'll see if I manage to implement it somehow. The chassis is the same from 42106's pickup truck, then reversed a bit. Track has been widened by 2 studs, fenders made wider as well. The rear has dual tires which for the contest will be swapped with a single one just as the front axle. Currently they are a placeholder and proportions tool... I've seen how long the rules topic is so I had to put this text here... Initially it began as the chassis above, trying to figure where to stick the cab: Then after I figured out its placement came time to adjust where the doors would be. Which happen to be the ramps from the trailer. After some further shaping of the fenders and color swaps until it felt right - I got this below. The blue pins protrude for now as everything was just in sketch phase. Makes it easier to disassemble... Final shot of this for now is this: Further will come soon. I hope this qualifies for the contest as it is almost 17 studs high, please let me know if I can enter. If I can't - I'll continue working on the C model aspect of it. Cheers from Bulgaria! p.s. I am entering this C model in the https://thelegocarblog.com/2020/04/30/tlcb-lock-down-b-model-competition/ The finishing touches and updates were made in May, so I hope it qualifies.
 -

[MOC] Compact RC Semi-trailer truck
Hogwartus posted a topic in LEGO Technic, Mindstorms, Model Team and Scale Modeling
I' ve made a scale model of semi-trailer truck with a trailer. It's in 1:60 scale, so wouldn't look out of place in a minifigure scale Lego City. But it is remotely controlled. Video: Functions: drive (truck RWD) - L motor steering (with right geometry) - Servo motor remotely openable trailer's cargo door - M motor Everything is controlled remotely using SBrick, powered by standard 8881 battery box. Internals of the trailer, door opening mechanism, battery box and sbrick were packed here: Please watch the video to see this machine in action and for more details. __________________________ Feel free to share your thoughts. I hope you liked this model. -
[MOC] Mercedes Actros 4x2 Semi Truck
motomatt posted a topic in LEGO Technic, Mindstorms, Model Team and Scale Modeling
Having made some U.S. style semi trucks in 1:17 scale I wanted to add a European style truck to the mix. Here is my version of an Actros 4x2 powered by one XL motor, steering with servo, with 3 sets of PF lights, and controlled by sbrick. I modeled it after an Actros 4x2 you find in the game Euro Truck Simulator. A shot of the driver's side cabin. I took apart my U.S. spec of a 53' 1:17 scale box trailer to shorten it to European dimensions and add an extra axle. Next to an extended frame Peterbilt, the Actros looks quite short. And here it is with its cousins This is what it looked like gathering dust for the better part of a year until I finally got myself to finish it. Some more pics are on bricksafe http://bricksafe.com/pages/motomatt/actros4x2 Instructions and parts list are on rebrickable http://rebrickable.com/mocs/motomatt/mercedes-actros-4-x-2-semi-truck -
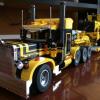
Volvo Truck - The Iron Knight
Lox Lego posted a topic in LEGO Technic, Mindstorms, Model Team and Scale Modeling
"Volvo Trucks reset its own two year-old record for heavy trucks with shockingly fast speed runs by its latest track-focused creation, the "Iron Knight." This big rig blasted to 60 mph in just 4.6 seconds thanks to its unbelievable 2,400 horsepower." iron knight by lachlan cameron, on Flickr Flicker: https://www.flickr.com/gp/139930963@N04/8xb6HX Video: Dugald has created a custom Iron Knight out of Technic Lego to pull my Ferrari FXX. (Unfortunately this MOC did not blast from 0-60mph in 4.6 seconds ) IMG_9090 by lachlan cameron, on Flickr This build is massive, 31 stud wide x 72 long x 35 tall. IMG_9127 by lachlan cameron, on Flickr The trailer can load and unload the 6 pound Ferrari with a winch and a clever sliding mechanism that slowly lowers the car down. IMG_9096 by lachlan cameron, on Flickr The trailer can switch from the winch to the lowering mechanism with a single switch powered by 1 XL motor. IMG_9100 by lachlan cameron, on Flickr The side panels flip up to reveal the battery packs. The Inline6 is located just behind the cabin. I've got to say, this truck has curves never seen before in Technic Lego truck. IMG_9092 by lachlan cameron, on Flickr This build took a month to create, some of the more difficult aspects to build was the tilt cabin with the working steering wheel and the 2wd - 4wd switch. IMG_9204 by lachlan cameron, on Flickr IMG_9206 by lachlan cameron, on Flickr IMG_9082 by lachlan cameron, on Flickr -

Truck T12 MkII Mack Granite with instructions
2LegoOrNot2Lego... posted a topic in LEGO Technic, Mindstorms, Model Team and Scale Modeling
In the last couple of months I have, amongst other projects, been working on the rerelease of Truck T12. Because the detachable gooseneck lowboy "Trailer Tr4 MkII" can be combined with my previously released trucks and with Technic set 8258 it is why I released it first. Instructions for this lowboy have been asked so many times that I thought it would make sense to start with it. Normally I start with a truck followed by a trailer to join it. Model "Truck T12 MkII" and is build after the Mack Granite with LEGO® in scale 1:17,5 and motorized using LEGO® Power Functions. It is a model of a Mack Granite 6x4 day cab truck. Both the looks and specifications are adjusted to match lowboy ”Trailer Tr4 MkII” and the optional jeep and booster ”Trailer Tr4 MkII Add1”. This rather heavy lowboy trailer combination, which might include a load, requires some extra power.Even though this truck is designed to go with ”Trailer Tr4 MkII” plus ”Trailer Tr4 MkII Add1” lowboy combination in the first place, it doesn’t necessarily mean it can't be used with other available trailers as well. If you prefer to give it a flat bed or log trailer, you are free to do so! If a different trailer is used it might be useful to give this truck's drivetrain a various gear setup. For this a separate PDF file is available that tells you what gear reductions to use with which trailer. It also shows you how to do so. Evidently the torque will be reduced, but with lighter weight trailers that is no problem at all. This Mack Granite model is powered by a Mack MP8 engine which is visible with the hood opened. This power source is an inline 6 cylinder engine with a displacement of 13.0 L. The horsepower range is from 425 up to 505 HP and this engine has a torque range from 1570 to 1760. You could build it yourself, building instructions and inventory/parts list are available. You will be very excited from the moment you start the build of "Truck T12 MkII" till you finish it with about 360 different parts totaling 1900 pieces. -
US Truck T1 MkII with instructions (US Truck T1 revised)
2LegoOrNot2Lego... posted a topic in LEGO Technic, Mindstorms, Model Team and Scale Modeling
Here is my latest project/MOC. Again it is a re-release and also with instructions. Check mocplans for the instructions and rebrickable for the parts list! Cheers, Ingmar Spijkhoven Introduction: Model US Truck T1 MkII with LEGO® Power Functions® which is a rebuild and revised version of US Truck T1 I finished back in 2009. This model represents the more aerodynamic US truck models like for example the Freightliner Cascadia. Like with all my models this is build in scale 1:17,5. This specific model comes with building instructions available at mocplans.com plus the inventory list available at rebrickable.com. This model features: solid axle suspension on all axles, PF powered driving with power transmitted independently to both rear axles, Ackerman geometry on steering axle, Servo powered steering, fully functional fifth wheel, modeled engine, detailed cabin interior and 3 light units. History of this build To start with a little history on how this model was designed and developed in the first place and how US Truck T1 evolved into US Truck T1 MkII. Back in 2009 I started building US Truck T1 and I really wanted it to have this more aerodynamic looks. From the very beginning of building MOCs I always tried to implement as many realistic features as possible. For example both version I and II of US Truck T1 features full solid axle suspension, Ackerman steering, realistic and working fifth wheel, openable hood, PF drive, PF steering and 3 light units. Design & development process Like with all builds, first a couple of design decisions had to be made: A) First of all I choose not to build this model after a specific brand or type. What I knew is that it had to be a typical US style truck with aerodynamic looks. Inspired by all the amazing US truck brands I just started designing my own truck. Because of my love for work and heavy duty trucks, specifically the Kenworth C500, this will always influence my builds. B) What scale to build in is another obvious quest when building models in general and also for building models using LEGO®. Since most work trucks have a little bigger and heavier wheels my favorite scale for building models became 1:17,5 because this suites me best. Also did I decide to build all my creations in this specific scale. To me it works great when models can be combined. C) I had to figure out what color scheme would work best for model US Truck T1. To start with I do not like building with Black colored items what is the obvious color for the chassis. Never the less this trucks chassis was build in black. With the color of the chassis set I could move on to the colors of the body work. D) Solid Red it became for the body work and I decided not to add any others. Basically because back those days I was very limited in how to add colors to models because of the way I build. Developing as a builder the abilities to add more color increased. I have been told the color of this first edition was a little boring and I agree on this. Why US Truck T1 MkII? In time my building skills develop and so did many solutions I could apply to any build. This specific model could be so much better if I would have build it these days. Because of so many improvements I thought it would be so nice to rebuild this creation. Rebuilding this MOC made me decide to name this updated version US Truck T1 MkII (it is based on US Truck T1, but revised in so many ways). Also did I decide to make building instructions available for it as well! Since 2009 the year in which I finished my first build ever I have been asked for instructions so many times. The process of creating instructions basically forced me to completely revise and rebuild it. Because of this process this new version is way much better and therefore very nice to build. This all together gave birth to US Truck T1 MkII and I am happy with both products: The revised truck itself and the instructions I sell for you to build this model too. Solid axle suspension This truck, US Truck T1 MkII, is build with full solid axle suspension on all three axles, so including the front steered axle. For this suspension to work I did a lot of research, trial and error and engineering. One major problem I noticed was the quite large size of LEGO® Technic Shock Absorber 6.5L. There was no way I could jam six of these into a chassis that is only four studs in between both chassis beams together with everything else that should be in there. Quite rapidly I came up with the idea of using Rubber Belts instead. To achieve this the movement needed to be converted so I came up with a lever constructions. Normally a spring is pushed in and comes back, but a rubber belt is stretched and comes back. Color scheme As I mentioned before I have been told the color of this first edition was a little boring and again I agree on this. Developing as a builder the abilities to add more color increased as did the urge to actually do so. So I started to combine different color combination with this solid Red body work of the model. Always keep in mind to check the availability of parts in a specific color. This forced me to change the color scheme a couple of times. Some key parts in a design may not be available in a specific color or some others might be very hard to get. With the instructions in order to make others build this model as well in mind hard to get parts is an unwanted side effect. Finally I ended up with the addition of both Dark Red and Dark Bluish Gray. These colors really brighten up the Red and give US Truck T1 MkII a classic feel to it. Steering system with Servo A part that I have been looking out to for so many many years is finally available. The LEGO® Power Functions® Servo (part #99498c01) has been release since August 2012. This amazing new electric motor enables the opportunity to create a much more realistic steering system that is also less space consuming. Aligned with the trucks chassis the Servo is sitting inside of the cabin right behind the modeled engine in between both seats. With a 90 degrees conversion the motion of the Servo is transferred to the steering axle. One other improvement to avoid the use of hard to get parts was applied. In order to give the steering axle the Ackerman geometry I initially used Gear Rack 1 x 12 with Holes (part #32132). This has been replaced to make building US Truck T1 MkII with the instructions I sell more attractive to others. Modeled engine inside As mentioned above the Servo requires less space and is sitting inside the drivers cabin. Because of this US Truck T1 MkII is provided with a modeled engine. This truck model is powered by a CAT® CT15 with this very appealing yellow color to it. With the hood opened it really catches the eye. External air cleaners would decrease this model's aerodynamics and with it the full efficiency so these are not mounted. On top of the CAT® CT15 engine there is this internal air cleaner system. The modeled engine is a small object that really improve the realism of this truck model. The engine is very nice to build and to give it those realistic looks a total number of about 120 parts is used. Engine is detailed with for example engine oil dipstick, fan, fan belt, pulleys, hoses, oil filters including by-pass oil filter, turbo, exhaust manifold and so on. Together with much more engine bay details which are added the looks are phenomenal. Openable hood Even though my models are not entirely smooth, so LEGO® studs are allowed to be visible, the hood does not show any studs at all. This really makes the hood elegant. With hinges the hood is openable and not without a reason. What is the use of a modeled engine siting inside if it is invisible. Like with the original version US Truck T1 MkII has an openable hood to give access to both engine bay and engine. With the hood opened one can clearly see the inline 6 cylinder engine with a displacement of 15.21L. With a horsepower range from 450 up to 550 HP and this engine has a torque range from 1550 to 1850 lb-ft. (1202 - 2508 Nm) at 1200 rpm peak torque. Together with the engine a lot more engine bay details are visible. These include break fluid reservoir, windshield washer container, internal air cleaner system and steering shaft. Easy battery box access One key feature that is important when building models with electric features is how to access the battery box as well as the on/off switch located on top of it. In order to make this build achievable for as many builders as possible I sticked with the battery box with 6x AA batteries, LEGO® Power Functions® Battery Box with Orange switch (part #59510c01). Easy to get, used in many sets and a part with a nice price tag to it. The battery box is sitting inside the sleeper. Easy to access by removing a hatch on top of the sleeper. It basically is a part of the roof that can be removed and the battery box is in sight as well as the on/off switch. For those who rather use the LEGO® Power Functions® Rechargeable Battery Box (part #84599) the model can easily be modified. Final improvements One of the noticeable improvement is the windshields window frame. First build used Bar 4L (part #30374) which are basically to small for the job. The new approach looks solid and is therefore more realistic. When TLC released LEGO® Power Functions® IR Speed Remote Control Unit (part #64227) back in 2009 I was really excited about it. First builds also used a XL Motor like this model to drive but with the use of Power Functions Remote Control Unit (part #58122c01) one has to be very careful. Because of the enormous strength of the XL Motor the drive line could be damaged easily. For this very reason the drive line was geared down quite a lot. US Truck T1 MkII has less gear reduction and is therefore quite a bid faster then its predecessor. With the use of the Speed Remote Control Unit both driving and steering became very realistic and therefore the playability of this model is extremely increased! Building instructions To give you an idea of how the instructions for this model will look like here is a preview. Creating these instructions both quick progress on your build and being easy to understand were the main goals. Early in the building process you will see what it is that you are building. You will be very excited from the moment you start the build of T US Truck T1 MkII till you finish it with a total number of parts of about 2250 pieces. To achieve this a lot of floating items are used, with added arrows to show where these items are suppose to be. Together with a lot of so called call outs (the smaller windows within a step that shows the assembling of a smaller sub part of the build) together with multi part steps (not only one part at a time) the build will be in a flow. Check mocplans for the instructions and rebrickable for the parts list! -
Scania 143M Torpedo 6x4 Australian truck
2LegoOrNot2Lego... posted a topic in LEGO Technic, Mindstorms, Model Team and Scale Modeling
Hello Everybody! My latest creation of which I am very keen! Loved to build it, including the design, color scheme and it's functions/features. Initially build for this amazing book "The Art of LEGO Scale Modeling" in which is fully "shiny". Yes, a lot of chrome parts are used to make it even more impressive. For a guy who lives in the Netherlands for whole of his live it took quite a while to get started with a "Euro" truck Well, here it is! Well, I am curious what it is that you think of this MOC, please share it... Would you be interested to build it yourself? Well that's possible. I have building instructions and inventory/parts list are available . Early in the building process you will see what it is that you are building. You will be very excited from the moment you start the build of "Truck T13" till you finish it with about 420 different parts totaling 2790 pieces. The truck features: solid axle suspension on all axles of which the rear axle uses tandem bogie suspension, PF powered driving with power transmitted independently to both rear axles, Ackerman geometry on steering axle, Servo powered steering, fully functional fifth wheel, fifth wheel slider, detailed engine bay, modeled Scania V8 engine, detailed cabin interior and 3 light units. Scale: 1:17,5 Length: 444 mm Weight: 2,21kg Parts: 2790 The Scania 3 series is the third generation truck model range introduced by Scania, which we all know is Swedish truck manufacturer. Obviously it is the successor of the 2 series and was introduced back in 1987. With the release of the 4 series in 1997 production of the 3 series stopped after being produced for roughly a decade. Given the fact it has a hood or bonnet, so it is not a COE (cab over engine) truck, it is referred to as a torpedo. For this the manufacturer gave it a prefix as well, a T. At that time the 3 series T came in a range of different engine sizes and horsepower. Starting with a 9.0 liter engine with 230 horsepower all the way up to a massive 14 liter V8 engine with 500 horsepower. Being available with either a 9, 11, or 14 liter engine truck models were denoted 93, 113, or 143. To indicate the rating of the frame and suspension stiffness a letter suffix is used. Rated with an M indicates this model has a „medium” frame and suspension setup. Other suffices used by Scania are H for „heavy” and E for „extra-heavy”. -
Close to a year ago I built a rocky mountain double flat-bed trailer with an attached forklift. To tow it I built a model of a lego Kenworth T-680 in red, blue, and white, with a ginormous cab. Since the model mostly sits on a shelf, I always wanted to build a fully enclosed trailer to match the truck's high cabin design for a better side profile look. Well, finally after a long time accumulating 8x16 tiles, I finished it, so thought I would share it here. This is a model of a 53 foot trailer with a built in reefer. It is about 114 studs long, 18 studs wide, and 28 studs high. The trailer contains three PF M-motors operated via remote control. 1. Raise and lower liftgate. 2. Extend and retract liftgate. 3. Raise and lower trailer legs. An electrical tail light connection comes from the main tractor and is operated by remote control on/off. This trailer is shown being pulled by my 1:18 model of a Kenworth T680 semi truck. Together the semi-truck and red reefer trailer are about 4 feet long. Overall, the trailer enclosure is pretty stable and not as fragile as I thought it would end up being. There's minimal flex in the frame and it looks pretty realistic. To make a boring trailer a bit unique I wanted to add a retractable liftgate similar to the one in Madoca's wing body truck. I took the same liftgate design from my earlier B-train flat-bed trailer and mounted it on a pair of steering racks to hide and extend it. But the up/down operation is not always as smooth as the original one because it sometimes tends to catch a bit against the edges of the rear fender. I think the way to fix this would end up detracting a bit from the aesthetics of the rear, so I left it as-is. Originally I was thinking to put the battery underneath the frame, but that would make it hard to turn it on or off while lifting up the trailer. So the battery sits as cargo inside the enclosed compartment and is easily reachable without moving the trailer off the ground. After making the video from a vantage point at ground level, I noticed that the wheels of both the trailer and truck were quite cambered due to all the weight. I later improved on this by changing the way the axles are attached to the frame in both the truck and the trailer. The instructions and parts list includes a better design than what was used in the video. More pics and full instructions are up on rebrickable http://rebrickable.c...i-truck-trailer and mocpages http://www.moc-pages.com/moc.php/423789
-
YAPT (Yet Another Peterbilt Truck :) After recently catching the AFOL bug I found myself spending alot of time admiring Bricksonwheels' creations and Sariel's road train. Then after building one of Ingmar's trucks, I felt compelled to build my own. So here it is. Since I already build a lowboy trailer very similar to Ingmar's detachable gooseneck design in yellow and black, I went with a yellow and black color scheme for the truck. The truck has 5 PF motors. 2 XL motors for drive. Servo for gear rack steering. M-motor attached to a PF switch allowing remote control on/off of all the lights. This design is very similiar to the one found in Madoca's wing-body truck. The truck has head lights, tail lights, roof lights, as well as a PF connector in the back allowing the trailer's lights to use the same remotely controlled switch. An M-motor is used to lift and lower the third axle. Originally I made the truck with a two speed gearbox very similar to the one Madoca used in his SUV Mk II. Since the gearing allowed the truck to be rather fast and zippy in the faster of the two gears I decided to use dual XL motors for the drive. But after finding a few too many false neutrals with the torque of dual XL motors, I've since removed the gearbox. Now it seems that two drive motors are a bit overkill unless you're pulling a heavy trailer uphill. To make it a bit unique I set out to give it a third axle which can be remotely lifted and lowered. All wheels utilize technic shock absorbers. The cabin can fit a full size battery or the smaller rechargable one. From the top, it's 59 studs long. The two PF connector's just ahead of the fifth wheel are or for continuous power to the trailer and remotely controlled trailer lights. Here it is pulling a heavy 42030 Volvo wheel loader. Yellow overload. So originally I had no plans to make instructions, but once I started playing around with LDraw and Bricksmith, I just couldn't stop :-) The full instructions are available on rebrickable http://rebrickable.c...ellow-and-black The truck is up on MOCpages http://www.mocpages.com/moc.php/411142 More pics are available on bricksafe http://bricksafe.com...o Peterbilt 379 Many thanks to Aurimax https://www.bricklin...e.asp?p=Aurimax for the Chrome pieces.
-
US style three axle log trailer "Trailer Tr3 MkII"
2LegoOrNot2Lego... posted a topic in LEGO Technic, Mindstorms, Model Team and Scale Modeling
My latest release, a log trailer with three axles of which the last one is liftable. It comes in two color schemes to match both "US Truck T1 MkII" and "US Truck T2 MkII". Model "Trailer Tr3 MkII” is build with LEGO® in scale 1:17,5 and motorized using LEGO® Power Functions. It is not build after a specific brand or type of trailer. This build represents a three axle log trailer with liftable third axle. The trailer features: solid axle suspension on all axles, one set of lights, kingpin, remotely controlled landing gear and parking break, remotely controlled liftable third axle that simultaneously extends or retracts the rear impact guard and this model has many details. This newly designed and engineered trailer utilizes the same suspension as US Truck T2 MkII which uses LEGO® rubber belts and LEGO® rubber axle connectors. This model is another custom design by Ingmar Spijkhoven AKA 2LegoOrNot2Lego that comes with building instructions and inventory/parts list! You can build it yourself! To do so you can buy the Building Instructions. Early in the building process you will see what it is that you are building. You will be very excited from the moment you start the build of "Trailer Tr3 MkII" till you finish it with a total number of parts of about 1000 pieces. Simultaneously with lifting the third axle the rear impact guard is retracted. So with the third axle down the rear impact guard is fully extended, this to increase safety when hauling loads. Unloaded the total length of the combination is reduced with the third axle lifted and the rear impact guard in. As with most log trailers this model has so called bolsters or bunks. Those are the U shaped frames on top of the trailers chassis. Bolsters are obviously necessary to keep the logs in place. Even though the bolsters on this specific model are fixed they can easily be re-located if wanted. The number of six can also be altered to your own needs. Give this trailer the setup you want it to have. Cheers, Ingmar Spijkhoven -
US Truck T2 MkII with instructions (US Truck T2 revised)
2LegoOrNot2Lego... posted a topic in LEGO Technic, Mindstorms, Model Team and Scale Modeling
It has been a while since I have been on this forum. To be honest forums are not really my thing, I loose track... Never the less do I like to share my latest creation. It is an older model completely revised. Because I really felt doing so, but also to create instructions. So I did, please have fun reading this. Share you thoughts on it and when you feel like doing so please build it yourself some day!!! Cheers, Ingmar Spijkhoven To start with a little history on how this model was designed and developed in the first place and how US Truck T2 evolved into US Truck T2 MkII. Back in 2008 I started building US Truck T2 after I had finally managed to build a very sufficient and realistic suspension system. From the very beginning of building MOCs I always tried to implement as many realistic features as possible. For example both version I and II of US Truck T2 features full solid axle suspension, Ackerman steering, realistic and working fifth wheel, openable hood, PF drive, PF steering and PF lights. With the chassis still evolving, but good enough to start building the model itself a couple of decisions had to be made: A) First of all I choose not to build a specific brand or type of truck. What I knew is that it had to be a typical US style truck. Because of my love for work trucks brochures available at Kenworth.com became my main inspiration source. B) What scale to build in is another obvious quest when building models in general and also for building LEGO® models. Since most work trucks have a little bigger and heavier wheels my favorite scale for building models became scale of 1:17,5 because this suites me best. C) I had to figure out what color scheme would work best for model US Truck T2. Why exactly I can't recall but the chassis ended up Red and I still love it. With the color of the chassis pointed to Red I could move on to the colors of the body work. D) Searching the Internet for inspiration on this build I noticed that Red and White is a nice color combination. Trying a couple of colors to combine with this evolving color scheme I ended up with Blue. Since not all parts I needed were available in Blue back then I came up with the use of Dark Blue. Because of so many improvements I thought it would be so nice to rebuild this creation. Rebuilding this MOC made me decide to name this updated version US Truck T2 MkII (it is based on US Truck T2, but revised in so many ways). Thinking about the rebuild, not yet started, made me realize that it would also be amazing to make building instructions available for it as well! The process of creating instructions basically forced me to completely revise and rebuild it. So in the looks it is not even changed that much but to get the build going with the instructions as guideline I had to change so many things. Because of this process this new version is way much better and therefore very nice to build. The finished build of US Truck T2 back in March 2009 was basically a result of all the effort I had put in this realistic suspension system. For this suspension to work I did a lot of research, trial and error and engineering. One major problem I noticed was the quite large size of Technic® Shock Absorber 6.5L. There was no way I could jam six of these into a chassis that is only four studs wide together everything else that should be in there. Quite rapidly I came up with the idea of using Rubber Belts instead. So I came up with a lever constructions. Normally a spring is pushed in and comes back, but a rubber belt is stretched and comes back. In the build of US Truck T2 MkII I replaced the hard to get Sand Blue colored parts by Dark Blue ones. Back in 2009 part 30357 Plate Round Corner 3 x 3 wasn't available in either Blue or Dark Blue. These colors I did prefer back then with the build of US Truck T2. This forced me to use this part in the less common color Sand Blue. Even though this was a switch that worked out very well I prefer not to use this color. Mainly because parts in this color are hard to get. So now that these parts are available I had the chance to give US Truck T2 MkII the initial color scheme I came up with for the first build. A part that I have been looking out to for so many many years is finally available. The LEGO® Power Functions® Servo enables the opportunity to create a much more realistic steering system for US Truck T2 MkII. Aligned with the trucks chassis the Servo is sitting inside of the cabin right behind the modeled engine. Since the movement of the Servo needs to be converted 90 degrees a challenge occurred. Luckily we still have this older LEGO® part 4143 Technic Gear 14 Tooth Bevel. Because the Servo requires less space US Truck T2 MkII is equipped with a modeled engine. Because of some parts I needed to build this engine that are only available in Light Bluish Gray this became the engines color. Searching the web for inspiration I noticed Detroit Diesel has some very nice power sources available. Doing some research made me choose to build the DD15. Modeling this engine was very satisfying. A small object to build but to give a realistic look still a lot of parts are used to build it. What is the use of a modeled engine if it is invisible. Like with the early version this revised model has an openable hood. For inspiration I used the Kenworth C500 PDF brochure. One picture shows a truck with a opened hood and shows really nice how a part of the fenders is attached to the cabin. So this part of the fenders stays in place when the bonnet is opened, I really love this concept. One other major improvement is the battery box accessibility as well as the location of the on/off switch. To make this achievable for as many builders as possible I sticked to the battery box with 6x AA batteries. With the original US Truck T2 to replace the batteries the entire roof had to be removed together with the sleepers back side. For the on/off switch I installed a complex mechanism that needed small doors to operate the switch. As complex as it sounds it really was and I was never happy with this solution. The roof of US Truck T2 MkII now has a hatch to access the battery box and the on/off switch. Besides decorative purposes these bars are supposed to support the roof, which they didn't! Thanks to digitalizing my model with BrickSmith I noticed/discovered a much better solution. Besides that it looks less fragile this new window frame really became supportive. When TLC released LEGO® Power Functions® IR Speed Remote Control Unit item number 64227 I was really excited about it. First build also used a XL Motor to drive but with the use of Power Functions Remote Control Unit item #58122c01 one has to be very careful. US Truck T2 MkII has less gear reduction and is therefore quite a bid faster then its predecessor. To give you an idea how the instructions look like here is a preview. Creating these instructions both quick progress on your build as well as each step being easy to understand the same time were very important. Early in the building process you will see what is happening, what it is that you are building. You will be very excited from the moment you start this build till you finish the build of US Truck T2 MkII with a total number of parts of about 1800 pieces. To achieve this a lot of floating items are used, with added arrows to show where these items are suppose to be. Together with a lot of so called call outs (the smaller windows within a step that shows the assembling of a smaller sub part of the build) together with multi part steps the build will be in a flow. Check mocplans for the instructions and rebrickable for the parts list! -
Trailer Tr2 MkII with instructions (Trailer T2 revised)
2LegoOrNot2Lego... posted a topic in LEGO Technic, Mindstorms, Model Team and Scale Modeling
As mentioned with the release of US Truck MkII instructions for a trailer to go with this truck would be available. I am happy and proud to present them to you. Here is my latest creation: Trailer Tr2 MkII (with instructions). What was true for the revised version of the truck might even be more true for this trailer. Believe me when I say this revised version and the original design are poles apart. In the looks it may not even be changed that much, but don't be fooled by its appearance! This all together brings forth Trailer Tr2 MkII and I am happy with both achievements: The revised trailer itself and the instructions for anyone else to build this trailer. Check mocplans for the instructions and rebrickable for the parts list! Cheers, Ingmar Spijkhoven LEGO® model Trailer Tr2 MkII with LEGO® Power Functions® which is a rebuild and revised version of Trailer 2 I finished back in 2009. Like with all my models this is build in scale 1:17,5, which makes them to be combined!!! This specific model comes with building instructions available at mocplans.com plus the inventory list available at rebrickable.com. This model features: full solid axle suspension, LEGO® Power Functions® remotely controlled landing gear and parking brake and three sets of Power Functions® lights. As with the rebuild of US Truck T2 this writing starts with a little history on how this trailer came in to existence. Because of so many improvements and changes this trailer evolved into Trailer Tr2 MkII and suites absolutely excellent with US Truck T2 MkII. After finishing US Truck T2 back in 2009 I started working on a trailer to go with it. I have always been intrigued by those big American trucks out in the open with all kind of loads on those very easy to use flatbed and drop deck trailers. One other very important concern to me is the playability of the truck and trailer combination so less weight would increase this. From day one of building truck and trailer models I always go for implementing as many realistic features as possible. So this build features full solid axle suspension, LEGO® Power Functions® remotely controlled landing gear and parking brake and finally three sets of PF lights. After finishing the build of the semi-truck or tractor the build of the semi-trailer that goes with it could be launched. Like I do with all builds, first a couple of design decisions had to be made: A) Like with US Truck T2 (and MkII) I choose not to build this trailer after a specific brand or type. What I knew is that it had to be a typical US style trailer. Because of the way I was building back those days I had to give this trailer a drop in the deck. B) Since the scale was set because of the build of US Truck T2 the scale was not an issue. What was an issue is what wheels to use. Even though most trailers used in the Netherlands (Europe) have so called super singles, I prefer to use the same tires as with the truck itself. C) Setting these parameters was a nice start, but more quests had to be conquered. For example what color scheme would work best for this model especially because it had to fit US Truck T2's color scheme. The color of the frame would undoubtedly be Red. Bringing back the Blue would be obvious too. D) One detail that really caught my eye is the alternating Red and White retroreflective strips. Its role is evident and it really breaks the color and the looks of the trailer in a very positive way. E) The final call would be what to use as deck, the floor itself. Most straightforward would be the use of plates in any suitable size. I ended up using modified plates 8 x 8 with grille and hole in center. Describing US Truck T2 MkII did unfold why it was rebuild, allow me to do the same for this trailer rebuild: Since the build of the original version of this trailer my building skills develop and so did many solutions used. Likewise the truck this trailer model could be so much better if I would have build it these days. So I did! Rebuilding this MOC made me decide to name this updated version Trailer Tr2 MkII (it is based on Trailer T2, but revised in so many ways). The process of creating instructions for this trailer as well essentially forced me to rebuild it in total. Not just implementing some improvements. No, there is not much left of the original design. Besides all this the perspective has changed totally because I wanted to create instructions for this build too. So in the looks it may not even be changed that much, but believe me when I say this revised version and the original design are poles apart. My first attempt back in 2009 was to build a flatbed, so a trailer with a one level deck without a drop in it. Because of a lot of decisions I made while building the truck itself with its frame, suspension and fifth wheel, the fifth wheel ended up quite high. To give the flatbed good looks too, it should not be to high on its wheels. It would have been if I would have build it with a leveled deck. So I had to change my mind from building a flatbed to this drop deck. All of this mainly because of limitations I experienced back in 2008/2009 because of my lack of knowledge. I had to learn how to build with LEGO® all over again because of so many great new parts. Even though I am able to build a flatbed these days I sticked with the original drop deck. Since there is quite a lot of it I wanted the floor of the deck to be nice to look at. Functionality is important to me simultaneously as you might know right now, so that counts too. The overall width of the trailer is 18 studs, minus two tiles one on both sides leaves me 16 studs for the floor itself. Divid this by two makes eight studs on each side which gave me a range of opportunities. Quickly it was narrowed down to only two: The most obvious would have been to use plates with a length of 8 and a width of any needed size. Not bad to start with, but not really appealing to me so I continued the search. I ended up with the use of modified plates 8 x 8 "with grille and hole in center". These are available in very nice colors, it has great looks, light in weight and not that expensive. These plates suites the job just perfect, the studs make them what I call "sticky" this to prevent the load from sliding and it could further more be used to attach loads. The trailer's total length and both main and upper deck had to be adjusted to the use of these 8 x 8 plates. Still can't figure why, let me tell you: For the truck I came up with a very nice and realistic functional suspension system. Which I still use in all current projects and I will use in future ones. For some reason I had to use a rather simple suspension system for the trailer. Not that it wasn't sufficient, no it was, but not realistic for this type of trailer. The system itself is not as impressive as how it is referred to: longitudinal pendular axles! In the real world, I mean in the situation it is not a model, this type of suspension would cause a lot of damage. Damage to both trailer and load this because not enough stress is absorbed going over bumps or other obstacles. This rebuild trailer utilizes the same suspension as US Truck T2 MkII it uses LEGO® rubber belts and LEGO® rubber axle connectors. It occurred to me that it would be amazing to make this trailer what I call stand alone. With this I mean that it has a power source of its own. This results into the need of giving it a battery box. Please realize back in 2009 the much smaller battery box that holds 6 AAA batteries was not available. Both beams of the trailer's frame consist of two rows of Technic Bricks stacked with two layers of plates. The main reason to build it this strong was to avoid the trailer to bend under its own weight or load. Because of this approach it was very easy to hide all mechanical stuff and LEGO® Power Functions® in between both beams. Hiding the Battery Box on the other hand seemed almost impossible. So here is what I did: I knew that the part of the trailer from the kingpin to where the wheels are attached to needs to be sturdy, it transports stress caused by the weight of the trailer itself and its load to both king pin and rear axles. The tail part of the trailer could be weaker so I decided to lower the beams at this part. This allowed me to hide the Battery Box and by accident because of its location it could easily hold the rear impact guard. The super singles I referred to are a little larger which would force me to use the wheels as in the Black Cat LEGO® set 5571. These I don't have before all else and I don't want to invest in as well because of the excessive price. Further more I really love the impressiveness of how a semi-truck and semi-trailer combination might be referred to in the United States: An eighteen-wheeler. So four super singles is not an option at all, four dualies had to be mounted! Some following trailers I build after I finished the first version of this trailer in 2009 had smaller wheels mounted. The largest advantage of the use of these smaller wheels is that it reduces the trailer's total weight and frictions. All of this makes it easier to be towed by the tractor and therefore the playability is expanded. As suggested before the alternating Red and White retroreflective strips had to be on my model as well, but without the use of stickers or decals. It just had to be replicated by adding Red and White 1 x 2 plates, but without compromising the trailer's strength. In between every set of Red and White plates a Blue plate 1 x 2 "with handle on side" is located. Real live drop deck trailers are usually equipped with fixed or sliding winches to secure loads. These are used to tie down the load so that it won't move during transport. So there the Blue plate 1 x 2 "with handle on side" became very handy. These are used to tie down the load with the use of LEGO® Chains 5L or 21L or any kind of rubber band. In my judgement a model comes to live by adding details. The more the better, but don't over do this, it will finally work against it. Finally I installed running lights which are on both sides of this trailer. The purpose of course is to increase the trailer's visibility and its looks. The landing gear it self was not that hard to came up with and I started with a manual operated version. It didn't take that much to decide to make it remote controlled. The beams on the trailer do have this space in between of four studs, so hiding the M motor and the IR Receiver are not that hard. Even though the IR Receiver does have two connectors I forced my self to combine both parking break and landing gear. The first version of this trailer had a landing gear that swings up and down. Nice concept, but not flexible when it comes to connecting to trucks with different fifth wheel heights. The trailers front end can be raised or lowered to make it connect to the fifth wheel. Developing the truck's fifth wheel I used a 3L axle with stud as kingpin. The kingpin does not only keep the trailer attached to the truck horizontally, but vertically as well. This means going over a bump should not make the driver loosing the trailer. From the very beginning of building truck and trailer models I planned on being able to combine any truck and trailer I build. With my first approach of the landing gear as described in this topic it was harder. It had to be achieved by making sure that all trailers king pin, landing gear and suspension are all on the same height. As well as making sure the fifth wheel is at the same height. Now the trailer can just be aligned with the truck easily. To give you an idea of how the instructions for this model will look like here is a preview. Creating these instructions both quick progress on your build and being easy to understand were the main goals. Early in the building process you will see what it is that you are building. You will be very excited from the moment you start the build of Trailer Tr2 MkII till you finish it with a total number of parts of about 1100 pieces. To achieve this a lot of floating items are used, with added arrows to show where these items are suppose to be. Together with a lot of so called call outs (the smaller windows within a step that shows the assembling of a smaller sub part of the build) together with multi part steps (not only one part at a time) the build will be in a flow. Check mocplans for the instructions and rebrickable for the parts list! -
US style spread or split axle flatbed Trailer Tr10 with instructions
2LegoOrNot2Lego... posted a topic in LEGO Technic, Mindstorms, Model Team and Scale Modeling
I have been releasing a couple of rebuild in the last couple of months. This has been very satisfying also because of the building instructions I released with them. So many enthusiastic people all around the glove are building my MOCs. Never the less, here is a completely new build: Model "Trailer Tr10" is build with LEGO® in scale 1:17,5 and motorized using LEGO® Power Functions. It is not build after a specific brand or type of trailer. This build represents the well known typical US style spread or split axle flatbed trailer. Another custom design that comes with building instructions and inventory/parts list! Never did I hide my preference for flatbed and log trailers. Basically because this adds the most playability to a build. Once I build this refer and even though it was much fun building, there was no fun running around with it. The weight of this model exceeds the limits of what my semi-trucks are designed to haul. So that I why I build another flatbed, this time without a drop in its deck. Again does this build feature full solid axle suspension on both axles, three sets of lights, kingpin, remotely controlled landing gear and parking break and many details, but it also features toolboxes and a remotely controlled liftable rear axle. Even though it is not very common for this type of trailer to have a liftable rear axle I implemented it anyways. Mainly because of two reasons: A) One channel of the PF IR Receiver is used to operate the landing gear which engage/disengage the parking brake simultaneously. One channel was left to be used. Obviously the second one is used to raise and lower the liftable rear axle. B) The more tires means more rubber equals more friction. To reduce the drawback of it when it comes to playability the most rear axle is liftable. What basically happens is this mechanism forces the suspension to bottom out. Where normally weight would engage the suspension to act now there is this lever that does the work. For this reason this axle is sprung soft, but the the first axle is sprung hard. With the second axle lifted the first axles has to be stiff enough to bare the trailers empty weight. The axle setup of a spread axle trailer is not just randomly picked. It really has a purpose and it all is related to weight. Commonly this axle configuration is mostly found on flatbeds, car haulers and refrigerated trailers. As described this is a typical US style trailer. Cheers, Ingmar Spijkhoven -
Frame only instructions (US Truck T2 MkII)
2LegoOrNot2Lego... posted a topic in LEGO Technic, Mindstorms, Model Team and Scale Modeling
Presenting my latest MOC US Truck T2 MkII with instructions some people came with a question I did not expect. Never the less is this question fare enough: what about the frame. Some people are interested in the frame or chassis only and why not, I can imagine... :-) So here they are, the instructions for only the frame of my latest MOC: US Truck T2 MkII Hopefully this helps for some people to buy the instructions, without a lot of unwanted information. It may be obvious, but to make sure, you could easily build this frame in for example black. Black parts are much more common and a lot of Technic builders who have earlier sets have plenty of black parts... Cheers and enjoy building..., Ingmar Spijkhoven This is only the frame of an earlier released model. A model of a US truck with LEGO® Power Functions®. This truck is revered to as US Truck T2 MkII which is a rebuild and revised version of US Truck T2 I finished back in 2009. Like with all my models this truck's frame is build in scale 1:17,5. This model features: solid axle suspension on all axles, PF powered driving with power transmitted independently to both rear axles, Ackermann geometry on steering axle, Servo powered steering, fully functional fifth wheel and 1 set of PF lights. To give you an idea how these instructions look like here is a preview. Creating these instructions both quick progress on your build as well as each step being easy to understand the same time were very important. Early in the building process you will see what is happening, what it is that you are building. You will be very excited from the moment you start till you finish the build of this chassis with a total number of parts of about 800 pieces. To achieve this a lot of floating items are used, with added arrows to show where these items are suppose to be. Together with a lot of so called call outs (the smaller windows within a step that shows the assembling of a smaller sub part of the build) together with multi part steps the build will be in a flow. Included you'll find a parts overview. You rather want to use the parts list shown at rebrickable.com! Both building instructions and a parts list are available!