Search the Community
Showing results for tags '3D print'.
Found 7 results
-
For the 7 1/4 Garden Steamtrain I build this 125 Tipper in 5x Legosize. This first version have no ballbearings and dont run really at this tracks. Next year at the BSBT in Schkeuditz we hope to run a full LEGO 7 1/4 gauge train. Torsten 125 hinter 7 1,4 Zoll Lok by Torsten Wernecke, auf Flickr 125 gross1 by Torsten Wernecke, auf Flickr 125 gross2 by Torsten Wernecke, auf Flickr
-
Hi All, Just wanted to share my custom Bantha, It is 3D printed, sanded and painted to give a real LEGO look. It is based off the Original Trilogy game's version. I am hoping to model the new one here soon based on the newer games model. https://www.flickr.com/photos/113021024@N05/48955010108/in/dateposted-public/
-

Continuous Power for Mindstorm
dr_spock posted a topic in LEGO Technic, Mindstorms, Model Team and Scale Modeling
I wanted to power static Mindstorm builds at shows/events through wall power instead of rechargable AA batteries. I was going to design my own AA battery adapters then I found these on Thingiverse. They came in STL files that can be 3D printed. You only need to print two per Mindstorm unit. They have a nice opening to feed the wires through. AA Battery Eliminator by movotrab: https://www.thingiverse.com/thing:3160060 I had to make a small notch on the battery cover for the wires to come out. From here you connect to a 9V DC wall adapter. -
Since my son is about 1.5 years old now, I have a very good reason to start playing with LEGO(/Duplo) again. :) Okay, we are still in the Duplo-phase (can't wait for mindstorms/robotics), we like to play with some custom cars. So this is a remix of a Citröen 2CV. The idea is using an existing 2x4 car base (like 12591c02) in such a way, minifigs are placed upon this car base. This will ensure a good LEGO connection, without too much printing tolerances issue's. In this case, you may notice a 3d printed car base. Although in general, from quality/price perspective I would recommend to buy standard LEGO/Duplo parts when ever possible. ps1: If you like more LEGO - 3d print combinations, we are happy to show more :) ps2. @MODs: Since I don't known, where to place this 3d printed MOC, feel free to move it somewhere else. ps3. When printed at 50%, it does NOT fit LEGO. (Duplo wheel axis are blow studs, while LEGO wheel axis are in between studs.)
-
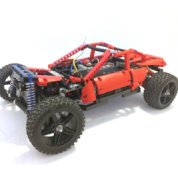
Hello people of EB, Let me share my drift machine with you. It is the result of a long experiment in which I've been trying to figure out the recipe for the ultimate drifting experience. But let's start at the beginning: My first attempt was a RWD car as we all picture a drift car should be. And however it was capable to make doughnuts I was missing the proper handling, where coming out from an arc can be predicted, or even intended. Sadly I did not make a video about the first version, but drove me to the conclusion that the handling can be improved by extending the wheelbase. So the next version I've built longer and it verified my assumption, the handling has improved, yet came nowhere close to the level I've aimed. Lucky for us I made a video at this stage: https://www.flickr.com/photos/141631433@N07/33446568771/in/album-72157678342432663/ This car had a fairly simple build, using only 1 Rc buggy motor coonected directly to the rear differential, and a servo for steering. As power souce I've been using RC LiPo's (500mAh 25C). I know that divides the community not being approved by the church, but since I discovered it's pro's I'm addicted to them. Small size, low weight, yet capable to feed the buggy motor(s) trough Sbrick. This version of the car was around 720 gramms and I think this is a very friendly number on the scale in therms of a fast and agile vehicle. The Rc wheels I'm using on it have rubber tyres, but thanks to the low weight it could spin them without any additional preparation. Using them though is my personal obsession due to their geometry and aesthetics, has nothing to do with drifting abilities. Still I was missing the elongated arcs and the predictible behaviour. The only bottleneck I had was the controll. Touchscreen controlers drive my mad, not giving any physical sense about what am I doing. Imurvai's application for game controllers was like an oasis in the touchscreen desert for me. (God bless him). But even the physical controller couldn't give me that smooth controll on throttle what I wanted to keep the wheelspin on the border of loosing or keeping the traction. (does this make sense to you?) God I was missing the throttlecurve from my heli controller. :-) So a different approach needed and the idea came that 4 wheel drive should give me the last piece of the puzzle. In my theory the driven front wheels are pulling the vehicle in the choosen direction, while I have to admit this changes the overall behaviour too. So I've built the 4x4 version of that estate car: And after a few modification and addition I've achived the controlled skiding I was looking for. All wheels being driven the traction had to be lowered as 1 buggy motor/axle wasn't enough to make the tyres spin. Instead of using plastic wheels I 've picked my favorite tool: insulation tape. And here is why: Plastic wheels have so low friction on wood like driving on ice. I was gonna loose all the handling I was working for. The tape in the other hand gives considerably more friction/traction even if all the tyre is covered. But it isn't. By carefully choosing the right width of the tape let us fine tune the traction giving the ability to change between oversteer and understeer on demand, or deciding how "happy" the tail of the car we want it to be. On more benefit of the tape on the front wheels: If ther is a caster on the front, when it turns to any direction the wheels are tilting too, touching the floor only with their edge. As the edge is not covered by tape, so the rubber comes to contact, giving more traction when changing direction. And when the steering goes straight the traction lowered to the amount we set up by the tape so the wheels can skid and spin. And there is a subjective reason as well: plastic wheels are noise too. To improve agility I needed a handbrake too. The video gives a straight-forward explanation about it, I think it is qiute self explanatory stuff. The setup has enough power to stall the buggy motor. While I admit it's not "healty for the all parts, we have to accept: Every magic comes with a price. 4 motors and 4 LED's required 2 Sbrick to controll them. I think that is it so far. If I forgot to cover something, please feel free to ask about it, but let me point out I can't do much about being non purist. This is about engineering for me, not about religion. So anything regarding this subject will be answered by 1 minute of silence There are more pics in the Flickr gallery: https://www.flickr.com/photos/141631433@N07/albums/72157678342432663 Hope it was usefull for future drift projects Your comments are wellcome Attika Ps: Part of this subject I've posted the other day in an old topic started by rm8 in 2012. It what was digged up by a new member and finding that topic on first page made me share my fresh experiences without checking the date on the question. Hereby I apologise doing silly things like that.
-
JJ2's Custom part designs
JJ2 posted a topic in LEGO Technic, Mindstorms, Model Team and Scale Modeling
I recently learned how to 3d model so I started making parts compatible with Lego (thanks efferman ) So far this is the only part I have made, it used on the portal axle piece to cover the gear to stop dirt from getting on the gears causing wear. -
My first piece of track. Here my first piece of embeded straight track project, it's printing!!!! :D Printed!!!
.thumb.JPG.e30703c69c2c7eb0c2bb70155ec6f87a.JPG)