Search the Community
Showing results for tags 'truck'.
Found 657 results
-
 Model of a Mack Granite truck equipped with a boom and flatbed. Features drive, steering, full suspension, motorized boom elevation, extension, and rotation, winch, and extending/lowering outriggers. Functions/features: Drive Steering Full suspension Boom elevation Boom extension Boom rotation Winch Outriggers Instructions available on Rebrickable: https://rebrickable.com/mocs/MOC-150955/JLiu15/mack-granite-boom-truck/#details After the 4-output distribution gearbox on my MCI D4500CT Commuter Coach model proved to be ineffective, I didn't want to simply abandon the gearbox design. I decided that I was going to tweak the gearbox a little to be used in a new MOC. I had wanted to use the same suspension setup for my MCI D4500CT model as a test bed for the suspension design, so I settled on incorporating the gearbox into a truck model. A boom truck like this is a MOC I had wanted to make for quite some time, as I see plenty of them in the US but not that many MOCs of them. Because the turntable for the boom is placed higher up, it leaves more room to route gears/axles from the gearbox to the 4 functions it controls. Because the gearbox sits in the heart of the chassis between the outriggers and rear axles, the chassis is built very densely. The gearbox makes use of two Control+ L motors: one for shifting and one for driving the output functions. The drive motor (a Control+ XL motor) sits directly behind the gearbox, and drive is transferred to the rear axles via an extendable CV joint. The drivetrain is geared down after the CV joint to reduce the amount of torque applied to it. Lastly, there is another Control+ L motor for steering which is built into the front axle. I designed the suspension (a simple live axle for all 3 axles) entirely in Stud.io before building it physically, so I had no idea how it would perform upon building it. However, the entire setup worked flawlessly, and there are no issues with drive transmission into the suspended rear axles. My initial plan for this MOC was to just build it as a generic US-style truck, but upon finishing the cab someone said it resembled a Mack Granite, so I modified the cab to actually make it based on the Mack Granite with the Mack Bulldog emblem from the 42078 Mack Anthem set in the front. A number of metallic silver elements are used in the front, although due to the relatively low number of pieces available in that color there is still plenty of gray in the front (such as the bumper). The Control+ hub is placed in the back of the cab and is removable for battery replacement by removing the roof, as the hub and roof are attached to each other. This means the sides of the cab must be sturdy to compensate for the relatively loosely attached roof, so the doors do not open on this model. I decided to build the cab in dark blue, a color I have not used much before, as I now have a sizeable collection of dark blue pieces from the 42083 and 42154 sets. I built the boom in yellow to contrast with the dark blue cab. The boom is built around 3x19 frames covered with tiles. Their abundance of pin holes makes them a good candidate for crane booms. It was difficult routing the two motorized functions through the turntable and into the boom, as two separate axle functions must pass through a small space. Because only two axle functions can be routed through a turntable, I had to make the winch manually operated with a ratchet mechanism. I was initially concerned about the weight of the boom, and while the boom does tend to lean forward during the elevation process, everything remains intact even at maximum elevation and extension and the range of the boom is quite impressive. There are no stoppers for the boom rotation, so the boom can theoretically rotate infinitely as there are no wires going through the turntable. The outriggers, however, were a weak point for the model as they are quite flimsy and are unable to lift the truck off the ground without substantial bending, so I limited the outriggers' legs extension to where they are able to make contact with the ground. Additionally, I should have geared down the mechanism substantially more, but a modification would require essentially rebuilding the chassis from scratch. As a result, I set the gearbox motor responsible for driving the gearbox functions slightly below maximum speed. I had wanted to be able to control the gearbox functions with a single touch (e.g. pressing one button shifts the gearbox then drives it in a given direction) but was not able to figure it out so I went with a much more straightforward (albeit more difficult to use) controller setup. A single slider is used to drive the gearbox functions, and three buttons are used to shift the gearbox (up 90 degrees, down 90 degrees, and return to one endpoint). I have to keep in mind the position of the gearbox while controlling the model, but the setup overall worked well. Overall, this was a MOC that had plenty of mechanical complexity, but certain functions could've been designed better. While all of the functions work as intended, the boom leans forward quite a bit when the boom elevates and the outriggers cannot lift the truck off the ground. The front axle could've also been reinforced better, as during the steering calibration process the steering pinion gear often skips a tooth. Despite the drawbacks of this MOC, it still largely met my expectations as the drivetrain and suspension worked flawlessly and the dark blue/yellow color scheme worked well. Video: Photos:
 -
 You REALY don't want to see this in your rearview mirror as this truck is killer! This 8-wide LEGO MOC is inspired by the villain vehicle (driven by an unseen psycho trucker) as featured in the TV production-turned-feature film "Duel", which was Steven Spielberg's first feature-length film by the way. It also uses parts of the truck in Jurassic World set 76948 (T. rex & Atrociraptor Dinosaur Breakout) as a general guide to the cab area, and CITY set 60357 (Stunt Truck and Ring of Fire Challenge) for the area forward of the actual driver's compartment. The 1955 Peterbuilt 281 'needlenose' semi truck, with tanker trailer attached, is what was used in the film originally. Later, as the film was extended for theatrical release, a 351 was used as a stand-in for more scenes due to the original truck being... unable to fulfill it's role. (watch the movie so you know what I mean!) I've tried to make it as accurate as possible to the original 251, with the AC unit behind the cab, sleek streamlined 1950's tanker design, and single exhaust pipe in black. There is a steering wheel in the cab, but no way to place a figure at the controls. This is because we never see the driver's face in the film. So putting a placeholder in there would be totally inaccurate. The tanker by itself, balanced upright by my finger on the back bumper. This is because I didn't add jacks / stands underneath the trailer that are used when the cab is separated from the trailer. The truck seen in most (some added scenes used a 351 model of the same truck maker) of the 1971 action-thriller film is a 1955 Peterbilt 281, which Steven Spielberg selected because of the long hood of the Peterbilt, its split windshield, and its round headlights gave it more of a "face", adding to its menacing personality. Additionally, Spielberg said that the multiple license plates on the front bumper of the Peterbilt subtly suggested that the truck driver is a serial killer, having "run down other drivers in other states". (The above paragraph is taken from Wikipedia article on the film) Any thoughts on this model or it's accuracy? Comments, questions and complaints always welcome! UPDATE 5/22/23: Real world photos added!
 -
Hello! I want ot share my car models. Previously designed trucks and cars 4pin wide, I thought that the truck should be wider than the car - whitch means 5pin, since 6pin - its too much :) 4pin trucks can be seen here p.s. If I made a mistake in the section - please forgive me and move the topic to the ride one. Thank you for the attention! Next trucks ( Which is betten - add new models in the first (main) post or in the following comments? ) My topics: micro city + micro village
-

[MOC] Scania P-series Fuel Tanker
damjan97PL posted a topic in LEGO Technic, Mindstorms, Model Team and Scale Modeling
Hi Guys. Today I want to show you my latest creation, a Scania P-series with fuel tanker. -Lenght: 38,5cm -Height: 15,5cm -Width: 14cm Parts count: 1864 Functions: -Drive -Steered front axle -3rd axle with lift system -Openable cabin and door -Fake 6 cylinders engine A truck is propeled by L motor and front axle is steered by servo motor. 3rd axle lifting mechanism is propeled by M motor and operated by 1 small linear acctuator. Cabin can be tilted and it has a openable door. Under the cabin is a fake 6 cylinders inline engine. A battery box with IR receivers and M motor are under the fuel tanker. On the right side is a openable storage. I'm waiting for your opinion :) GALLERY INSTRUCTIONS -

[MOC] Off-road truck Gaz 66[instructions available]
keymaker posted a topic in LEGO Technic, Mindstorms, Model Team and Scale Modeling
Hi, I would like to present my newest creation – off-road truck Gaz 66. It is my interpretation of small, old and very popular truck, which has a lot of off-road capability. Someone can ask why next similar small scale off road truck? I would say I like this type of vehicles, the scale and challenges they bring. And with every build I try to test something new, which I wasn't try before. Here the main goal was to go below standard for those wheels width of the model - 15 studs and prepare narrower axles than standard - 11 studs ones. Which I did. Gaz 66 has 13 studs width body with 9 studs (from rim to rim) front axle - stereed and driven. Thanks to that size of the body is more proportional to used wheels. And you can also use tractor tires provided with cargo for even better effect (you can see such modification in real Gaz 66 on one of polish off-road YT channel - LINK). I also tried to add as many details related to real truck as possible, in this scale, I hope there are here some fan of original Gaz 66 and they will recognise some elements I added. Below you can find video and list of features and details. Enjoy. Instructions: LINK General details scale: 1:20 dimensions LxWxH: 30x10,5x12,5cm weight: 946g Features: RC front axle steering (C+ L motor) RC 4x4 drive (C+ L motor) RC winch with place to lock the hook (C+ L motor) 4-link live axle suspension for all 4 wheels three studs ground clearance (with "KrAZ" tires) openable doors and easy access to spare tire working V8 engine with fan located in cabin, plus grill via which working engine can be watched detailed two seats cabin powered by Buwizz 3.0 but also prepared to be powered by standard C+ Hub can operate with "KrAZ" tires included in cargo Photos: LINK My Gaz 66 is powered by Buwizz 3.0, but there is no problem to use standard C+ Lego battery box: Internals of the MOC, so drivetrain connected with V8 engine, steering and the winch: -
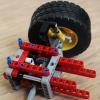
[WIP] Mack Granite Boom Truck
JLiu15 posted a topic in LEGO Technic, Mindstorms, Model Team and Scale Modeling
With the gearbox-controlled mechanisms on my MCI D4500CT model proving to be impractical, I did not want to just abandon the gearbox design. Because of this, I decided to incorporate it into a different vehicle. I decided that a boom truck like the following would be god for a four-output distribution gearbox: I have not seen many boom trucks in this style done in LEGO Technic. I've seen plenty of mobile cranes, knuckle boom cranes, etc, but I figured this would make for a unique build, especially as I see plenty of these here in the US. The turntable for the crane is also mounted higher up (at the same height as the roof of the cab), so that'll provide more space for mechanisms. As of right now, the chassis consists of essentially everything to the rear of the wheelchair ramp module on my MCI D4500CT model. A difference is that both rear axles are driven, as opposed to one driven axle and one tag axle. The gearbox outputs will control the outriggers, boom rotation, boom elevation, and either boom extension or winch. There can only be two functions routed through a turntable in order to allow for unlimited rotation, so one of the boom functions will have to be manual. Because the suspension design is identical to that of my MCI D4500CT model, this model will also serve as a test bed for the drivetrain and suspension on my MCI D4500CT model. If everything works well here, I can be pretty confident using this suspension design. Let me know if you have any suggestions for me! Photos: -
modular pizzeria restaurant and gangster hideout MOC - with pizza planet delivery truck
Murdoch17 posted a topic in LEGO Town
Here is the NYC-style modular building I designed for my dad's modular building collection, but I might end of building it myself if he doesn't want it. For the building I was partially inspired by half of set 76108, Sanctum Sanctorum Showdown. The delivery truck was heavily inspired by this build by @hachiroku of the classic Pixar vehicle Easter Egg. The pizza parlor is a front for a gang of nogoodniks who are led by the Brickster (who else?) from the LEGO Island theme. Chef Enzo (from the Hidden Side theme) runs the pizzeria as part of the front, although he secretly has been sending the police info on the Brickster's operations as undercover operative "Deep Dish". Pepper Roni (from the 2002 LEGO Island sets) is going to be the pizza delivery dude who eventually foils the Brickster's plot, as usual. The chimney on the rear of the building *looks* like it goes up in one piece, but it separates at the floors and actually isn't connected at all to the other levels. On the roof is a water tank, while on the ground floor is a window AC unit and back door. First floor: standard pizza restaurant fare, with menu piece on the wall, wood fired oven and cash register, plus four tables with at least two chairs each. The sign out front would have two pizza-box tiles for use as a "neon" sign. I also used a ramp to the front door because of ingredient deliveries and for wheelchair bound customers. Second floor gets a lot more... interesting, shall we say? Filing cabinets for records of "enterprises" of all kinds, a big ol' desk with a reclining chair and two smaller chairs for potential "clients". The gas heater / stove is for if the police raid the place... you get the idea on why! Third floor with the Brickster's home. A rabbit-eared television, a money-counting desk, bed, and safe for holding said dough are all up here. This model of the iconic Pixar Easter egg, better known as the Pizza Planet delivery truck. I changed around the rear camper section to be more stable, added a different 'rocket pod' to the roof, and placed printed placards on the side of the doors. Also, LEGO Island's famous delivery dude will be driving this vehicle when it's built in real life. Yep, you read that right: Pepper Roni has got his drivers license! The model seats one figure and the center section of the roof comes off to place a fig at the wheel. NOTES: I plan on building at least the truck with Pepper Roni. (Already found a bunch of parts for it from my collection) If the building gets built or not in real bricks remains to be seen. ...Thoughts? -
I finally did it, I've built a Volvo. It took me little more than a month to design, collect parts and build it, which is pretty short for my standards, I usually take (or loose) more time to fully complete a MOC of these proportions. The scale is, roughly, 1/20 and it has some functional features. Using LEGO power functions the vehicle can drive, steer, lift its 2nd drive axle, flash its beacon lights and operate the hooklift system. To be perfectly honest, not all of its features work the way I wanted them to work. The chassis was a bit small to incorporate all of these functions. I may design a new chassis at some point (more of that below) For me the highlight of this model is the cab really, getting the proportions of an FH right was a challenge, I had to make many compromises, choose the lesser of two evils. Of all truck brands, the Volvo just has the most complex design to replicate in the brick. But that is of course because a Volvo is the most pretty truck of them all after all. As I am employed at Volvo Trucks I simply had to build Volvo’s flagship. When Covid is over, I’ll drive it around the office landscape :). You may have noticed, the cab is not a square box, I spent a lot of time figuring out how to best approach the silhouette of the FH cab. It gets slightly more narrow higher up. The chassis is packed, I had to fit the battery box and two receivers in the cab, which is one of the reasons why there's no interior. Now, I'm sure some of you will most certainly have some suspicions about the feasibility of my hooklift system here... And they would be right! To be honest, the hooklift doesn't work all that well, lifting a container is a bit too much. It was only after I had completed the chassis that I learned about some sort of quality problem with those linear actuators I've used. But I think the fact that the very short leverage to rotate the hooklift may also have something to do with it. That of course was a consequence of the limited stroke of these actuators. This calls for the new longer actuators! ... However, that means I'll have to completely redesign the chassis... I have a couple of WIP pictures that I may share later. I hope you like it!
-

[MOC] Hybrid Garbage Truck
Thirdwigg posted a topic in LEGO Technic, Mindstorms, Model Team and Scale Modeling
One of my favorite Eurobricks builds over the past couple of years was the Garbage Truck @steph77 completed in 2017. It's been a while since I have made a Garbage Truck, so after Thirdwigg Jr. Jr. (6) asked if I could make one, I jumped at the opportunity. I asked if he would be willing to test it as I built it. He said yes, so we were off. First, I wanted to make the truck fully manual with the following functions: Three axle, two steering Fake engine Removable garbage container Opening compactor Extractor plate Two stage compaction cycle Bin lift/tip Everything had to work smooth enough for a child to process the smallest of LEGO parts, particularly the 1x1 plate round. Nothing could get stuck in any movement, as this would frustrate a child (and me, frankly). Back in March, I finally figured out a little design that would be the first step of the compaction function. It wasn't perfect, but it was enough to proceed. The arch part at the bottom will be where the trash is dumped into the compactor. Back of the truck is to the right. I decided to model the truck after the Dennis Olympus garbage truck/bin lorry/refuse truck, in the colors represented by this stunning little build by Jonathan Elliot. So after another build session, I created this simple bodywork. I built a draft of the compactor, and put the two parts together and came up with this. Test one with Thirdwigg Jr. Jr. identified some problems with the compaction. Currently the bottom plate does not pull up far enough, so I'll need to turn the gear mechanism around. Here you can see how it processes from one gear on the side. It's not perfect yet, but I think I may be able to get there. See the video here. We'll see where this goes, but I like what I have so far. It's been almost a year since my last large project, the Ionos Sedan, so it's time for something bigger again. Questions, Comments, Laments, and Insults always welcome... -
[MOC] Monster (but small) truck
Jurss posted a topic in LEGO Technic, Mindstorms, Model Team and Scale Modeling
Recently built 42005, so it inspired me to build some smaller monster truck. I don't want to call it smaller 42005, as then it should have been littlebit different. Here it is Fully compressed supension Somthing from build process Next to big brother -
Hello and welcome to the page! One of my favourite sets ever! It became a part of my collection in a veeery long and hard way several years ago. I was thinking to motorize it several times. Simply install several motors was easy deal, but I wanted a suspension also. This requires fully rebuild the chassis. So, initially I built a completely new scale RC chassis, then adapt it for 8285 outriggers, that adapt it for the 8285 crane then adapt it again for the 8285 cab. I tried to keep as much from original iconic 8285 as possible. None of the 8 PF motors is visible One BIG battery box + 2 sBricks OR two sbricks 2.0 can be used to manage al 8 channels. The only manual feature is a pneumatic polarity switcher, because it would be a 9th channel. Full suspension, rear based on 42043 Arocs set. Servo for steering 2 XL for drive M for outriggers L for pump M for winch L for crane raise L for boom extensionin Please enjoy! https://bricksafe.com/pages/Aleh/liebherr-lrb-355/rc-8285-rescue-tow-truck Truck now uses 6 soft shock abosorbers. To keep it higher it will be enough to replace first rear axle to yellow shock absorbers.
-

[MOC] Trial Unimog - Zetros (42129) alternate
gyenesvi posted a topic in LEGO Technic, Mindstorms, Model Team and Scale Modeling
Hi All, Although I have posted a few pictures previously, I wanted to make a proper writeup of my Trial Unimog alternate of the Zetros set (42129), because I think sharing the design process is valuable for people around here. Also, I am going to share my thoughts about the set itself as a parts pack. But for the curious ones, here's an action video of the end result and a short summary of the features: Features: - good actual outdoor performance :) - permanent AWD, no differentials - 2-speed gearbox, faster gearing than Zetros - relatively large increase in ground clearance - 4-link suspension on the back, large articulation, soft suspension - 3-link suspension with Panhard rod on the front, slightly larger and softer articulation than the Zetros - opening (and lockable) doors and trunk bed When building alternate models, I always try to build something different from the A model, both functionally and in its looks. So when considering what to build out of the Zetros, keeping the Mercedes brand but going for a different form factor, my first idea was a G-Wagon - quickly taken by Grohl himself. Then I though, let's fall back to a Jeep - also taken quickly by Tim.. Unimog was on my list of potential alternates, but I wasn't sure about it yet. But one thing was sure: I wanted to improve the actual off-road performance over the Zetros. So putting the form factor aside a bit, I started experimenting with chassis and suspension designs. One option I had in mind was to keep the live axle setup, but improve it to make it actually useful for off-roading: increase suspension travel, ground clearance and responsiveness. Furthermore, I wanted to see how lightweight the axles could be built, because the Zetros's axles are pretty bulky. I was okay with doing away with the diff-lock, since I wanted to use the M motor for a 2-speed gearbox anyway (just like others). During experimentation with axle designs and suspension travel, I have realized that the 3-link live axle setup of the Zetros is not only limited by the springs' short travel, but also by the 3rd link on the top. That link cannot rotate sideways on the chassis side and is mounted very high on the axles, and as the axle tilts, its top can move sideways significantly, and as the link cannot follow it sideways, it limits the axle's tilting movement; hence very limited articulation. The setup only works for a short range of movement as on the Zetros, which is limited anyway by the springs, but cannot work for a setup that aims for more articulation. One way out of this is to allow the 3rd link to rotate and follow the side movement of the tilting axle, but then the axle needs fixing sideways. There are two ways to fix that. Either a 4-link triangulated setup, or a 3-link setup with a Panhard rod. Although the Zetros does use a Panhard rod at the front, it is unrealistically mounted and too short, that would cause kind of bump-'steer' for larger axle articulation (not exactly bump steer, but more like shifting the whole axle sideways). So after taking the limited number of suspension parts into account (only 6 towball sockets left out of 10 since 4 must be used for mounting the front wheel hubs, and only 1 6L link available in the set), I opted for the following design: on the rear axle, I used 4 towball sockets for a 4-link triangulated setup with long links, allowing the upper links to rotate sideways and follow the movement of the axle. The springs are attached to the middle of the lower links. This allows for long upwards movement of the axle at the end of the links, and makes the suspension much softer even with the hard springs. Pretty solid and allows for large articulation, just what I wanted. Furthermore, the axle itself is quite slim and rigid, and has good ground clearance, especially in the middle where it's most needed (as proven by my off-road tests). The front axle was more challenging. First off, increasing the ground clearance is only possible with one trick: the towball socket liftarms must be built at an angle, going upwards in the middle, and that limits possibilities. Second, the steering motor and its mounting takes space on the axle, and is in the way for the suspension mounting points. I have experimented with two other options: steering through a driveshaft coming from the chassis, but the placement of the motor in the chassis was problematic do to space required by all other motors and the battery, along with the largely articulated suspension design; second I tried to put the steering motor above the front axle, actuating steering through a linkage system. Although, this worked quite well mechanically (verified with the Powered Up app), unfortunately, the Control+ app itself killed this direction: the app limits the steering motor angle to about a 25 degrees less than the calibrated range, which is normally 90 degrees or motor rotation, resulting in about 65 degrees in case of the Zetros (that's why it's steering is so bad by the way). Now in my alternative steering design, the max calibrated angle would have been 45 degrees, and the 25 degrees minus by the app resulted in about 20 degrees of movement, resulting in almost no actual steering at the axle. Pretty sad that you can build something mechanically sound and then not able to control it with the app :( So I fell back to mounting the motor on the axle, and used the remaining 2 towball sockets for two lower links, which again, I built longer to allow for a bit more articulation. Luckily, I was able to mount the motor in a way that it allowed to use the single 6L link as the 3rd link, allowing free sideways tilting movement of the axle, as it is attached to a towball pin on the chassis end as well. I also experimented with the spring mounting technique of the rear, but it was weak and wobbly on the front without the 4-link setup, so I went back to mounting the springs on the axle. However, I managed to move the springs closer to the center of the axle, resulting in both slightly larger articulation and softer suspension. Finally, the axle is fixed sideways by a long Panhard rod going from one end of the chassis to the other end of the axle, eliminating bump 'steer' quite well even at larger articulation. As a side note about parts, it would be really nice if the set had another 6L link somewhere, for example as a Panhard rod on the rear axle. It could be used to build another 4-link suspension to the front, and also as a steering link in an independent setup (which is problematic to build for other reasons as well). So after sorting out the two axles and the suspension, I though this could be used in a Unimog chassis. Though not too different in form from the Zetros, but at least it keeps the brand. Furthermore, I decided to make it different in its functions: the first step was focusing on a proper suspension. The second was the drivetrain. And that also caused some difficulties. Unimogs are short. You'd think that's not a big problem at this scale, as many RC Unimogs have been built before, but it is with the latest drivetrain parts. The new CV joint with a sliding axle hole is a whopping 8 studs long!! (Compare that to a 3L U-joint; sure, the CV joint has the axle built in on one side, but this construction limits builds quite a bit. Not sure why the new sliding variant needed to be 2 studs longer, I thought it would be just 1 longer, enough for the sliding, which is typically about half a stud, but 1 stud max). So two of those, plus, two non-sliding ones at 6 studs length, and your driveshaft is already 28 studs long. Add to that the amount of space required by the differentials (2 studs on each end until the axle center), and your axle distance cannot be less than 32 studs. Add one more to get a nice odd length middle section, and we are at 33 studs from axle to axle. It is quite long for a Unimog. (As a side note, I tried to split the driveshaft in two halves, shifted sideways in the opposite direction to let them overlap in length and hence make things shorter, but it did not work out due to the axle length limitation of the CV joint part and also space limitations from the motors). So because of this, and other considerations I decided to do away with the differentials altogether. It saves 2 studs in length. It allows for a slightly faster 12T / 20T gearing; the Zetros is just too slow. Furthermore, it allows for larger ground clearance, as the differential does not stick out from the axle. It even allows for a slimmer axle design, as there is more space in all directions, such as for mounting the steering motor. And last but not least: no differential - no need to lock them :) With unlocked differentials the off-road performance would be bad anyway. Once I settled for the length and the drivetrain, I needed to place the remaining motors and the gearbox. I was able to sandwich the gearbox between the drive motors, and put the gearbox's driveshaft motor on top, the flip-flop beams and the frames proved to be very useful for building a strong but lightweight chassis. The final challenge was the driveshaft from the gearbox motor. I am not sure why TLG used this motor here as it is super cumbersome to work with. It needs substantial down-gearing (and the right amount for your actual application, which is 180 degrees final turn for a gearbox, but 90 degrees for a diff-lock), a clutch mechanism for safety and physical end stops for calibration. These all take up space as they need to be routed somewhere. Things would have been much easier with another L motor.. (Maybe to make the set slightly cheaper? Or TLG is trying to get rid of these motors on stock? They don't seem to fit well into the PU system without positional control.) Anyway, finally the chassis of the Unimog was complete. I used the remaining CV joints to connect the drive to the spinning fan in the front :) The rest was just bodywork and placing that big hub somewhere. I opted for roughly the same position in the cab as the Zetros, but with the cables inside, to allow easy access to the batteries for replacement. For the design and styling, I took some inspiration from online sources like this one because of its color scheme, but I wanted to minimize the cab length as there weren't enough panels for a 4-door version. I built the cab with no opening hood to make it solid :) And also made the doors lockable to avoid them opening automatically when driving around.. Finally, the black panels were just the right size and amount to cleanly finish the bed, both the sides and the floor. The bed floor opens (but lockable) to see the gearbox, and to give room for accessing the batteries. I have also added fenders and the usual decoration like the rollbars, exhaust pipe, mirrors, ladders. Here are some renders of the whole build. As you can see, I did not use any green parts, as they would have only added clutter to the otherwise clean bodywork I think. Some more notes about the parts of the set apart from the ones mentioned above. The set has a good amount of paneling and beams and connectors, although the green parts are a bit less useful since they are limited in number and size. Another shortcoming of the set is the available gears. It has all sizes, but their number is lacking in some cases and hence high gearing ratios are hard to achieve. For example if you try to deviate from the default drivetrain, those gears will be missing for example for a simple down-gearing for the gearbox motor.. More images can be found on Bricksafe. Building instructions are available on Rebrickable. I did not know too much about Unimogs in the beginning, but during the research and designed process I actually came to like Unimogs quite a bit. I like that they are compact but seemingly efficient machines, and the trial versions actually look pretty cool. And I am actually quite happy with the end result. Let me know how you like it and your opinion on the set's parts! Cheers, Viktor -
According to Promobricks the rumored GWP matching this years Jazz Club modular building (10312) set will not be a pizza van but a furniture moving truck and included in the set some nice accessories: a brick-built handcart for transporting a piano, jukebox, painting of a saxophone and dressing table. A moving box labeled “To Jazz Club” is also included. The logos on the sides of the moving truck, the license plate and the lid of the moving box are stickers, so 6 in total, but the piano and jukebox have printed tiles too. The truck also has opening cabin and rear doors! Set number:40586 Name: Moving Truck Piece count: 301 Nr. of minifigures: 2 Release date: 21.02. till 03.03.2023 Availability: LEGO Price: free with purchase above 180 €/$ (not tied to 10312 Jazz Club purchase) Here is a quick and dirty build and rendering of the truck. It's dimensions are 5.6 x 15.7 x 9.1 cm (7.0 x 19.6 x 11.4 studs).
-
I recreated set 40586 (Moving Truck GWP) in blue, and changed the wheels, rear-view mirrors, front bumper, and a few other things. You may be asking why I chose blue for the truck. The answer is simple: I had two blue wheel arches lying around unused, and this neatly solves that! The rear of the truck. The roof comes off and the ramp slides out. Also in this picture you can see the cabin door opens. The roof of the cab section also comes off to seat a driver at the wheel. Thoughts?
-
[MOC] Unimog 4×4 Off-road RV
dls7223685 posted a topic in LEGO Technic, Mindstorms, Model Team and Scale Modeling
Hello everyone, this is the latest work from MTC: Unimog 4×4 Off-road RV Designed by Muen Function Description: ① 2×XL: providing power ②1× servo: steering.×M: 2-speed gearbox shift. -3×M - 3 differential locks for front, middle and rear. -2×SBrick. -1×Small battery box. -8×Yellow hard springs. -

Mercedes Zetros 1833 (42129 MOD)
CrazyKreations posted a topic in LEGO Technic, Mindstorms, Model Team and Scale Modeling
Hey everyone, for a couple of months I've been working on a lego technic camper module that fits on Lego 42129 easily! After a lot of designing, I have come up with a design. I've made a video for all to see and please let me know what you think of this model. This model doesn't affect the Zetros's ability to move in any way (however just to be safe please consider reinforcing the rear axle). It has the following features: Awning Interior with dedicated seating area, bedding and kitchen (kitchen has to be built with bricks haha) rear compartment storage along with a lock Openable windows for ventilation Flexible but sturdy structure for offroading openable door Additional step ladder that can be used to enter the unit Additional storage on the door side of the unit that has a separate compartment to the rear storage space for jerry cans Space for extra wheel -
 Hi guys! At least I has finished my next MOC and want to introduced the finished model to all of you! Welcome my International Lonestar truck! It's dimensions are: - Lengh: 101 stud or 80 cm - Width: 31 studs or 25 cm without mirrors - High: 37 studs or 30 cm excluding antennas and exhaust pipes. It consists of more than 5000 Lego parts, including 9 motors. It has: - Great Charbel's 8 speed gearbox, modified by me to the 16 speed one by adding high/low gear to the main output. It has a special shifter. It's all RC. - Independant powerfull pneumatic brakes on each wheel. Inspired by Sheepo's Peterbilt. - Pneumatically controlled fifth wheel. - Independant suspencion on front and dependant one on the rear axles. - Suspended driver's and passenger's seats, doors with locks and shock absorbers. - Detalized interior. - Inline 6 cylinder engine like the real truck. Power functions is described at the picture below, I think this is more interesting than just to read. Also I include pneumatics sheme. Enjoy the pictures please, I hope some video will apear nowadays. Unfortunately, rear differentials can't cope with such a huge torgue and truck cant drive fast on the floor, sorry. Please visit my Bricksafe page for more photo. Building instructions are available here: https://rebrickable.com/mocs/MOC-9788/OleJka/international-lonestar-truck/#comments VIDEO AVAILABLE NOW!!
 -
I present to your attention a model of one of the most recognizable trucks in the post-Soviet space. KAMAZ-5410 is a bolster-type tractor, mass-produced from 1976 until the 2000s. The three-axle truck, designed to work as part of a road train with a gross weight of up to 26 tons, was equipped with an eight-cylinder diesel engine with a volume of 10.9 liters and a power of 210 hp. It had a spring front and rear suspension. Now, directly to the model. The model is approximately made in 1:18 scale.It has a working suspension on all wheels: the front axle is attached to the frame with four trailing arms and 2 gray shock absorbers are used as a shock-absorbing element; the rear axles are equipped with balancers. The wheels consist of a native Lego disc and scale tires (outer diameter 60mm) from RC trucks. The model is driven by the XL motor of the Power Functions system. The motor is directly connected to the axles via 12:20 gears. The steering of the model is carried out using a servo motor of the same system. Almost the entire cockpit space is occupied by a small battery pack and a Sbrick pack.A container semi-trailer with a 20-foot container from Maersk was also made to the tractor. The semi-trailer is also equipped with all-wheel suspension and has manually lowered "legs". Thank you all for your attention! Subscribe on all platforms!
-

[MOC] Mining Dump Truck - Lego Technic 42114 Model B
eric trax posted a topic in LEGO Technic, Mindstorms, Model Team and Scale Modeling
Building B-models between major projects has become quite normal for me. Such a break and playing only with Technic bricks is a very good way to reset my mind 😊 This time it was the 42114 set and the Mining Dump Truck was created as an alternative model, for the excavator from the 42100 set. The plan to build this vehicle from the 42114 set appeared a few months ago. I put it off for later, because I thought I wouldn't have enough panels to build a nice dump box. Over the weekend, I sat down with bricks and in a few hours the first version of the tipper was created. I liked it so much that the final version differs from the prototype only with minor changes. The biggest difficulty in building this model was its size of frame. When planning, I insisted that the model must use the original app, because that could be easily configured and played with it immediately. The machine has double wheels on the rear axle, so the frame basically contains the engines, gearbox, and a rear axle. In addition, the set has only long actuators so placing them in the dumper was also not easy. At the end, everything was packed into a pretty nice model, which uses over 78% of the set elements. The tipper was supposed to look good with the R9800 excavator from the 42100 set. So I scaled the Liebherr T282 to 1:42 scale and built the model on it. The appearance of the dump truck is a combination of the previously mentioned Liebherr and CAT 793F. It is not an exact copy, but there are similarities. Building instructions: https://rebrickable.com/mocs/MOC-76959/M_longer/42114-mining-dump-truck/ Check out photos and a short video presenting the model's functions: Video: -

[MOC] MAN F2000 8x4
LegoV94 posted a topic in LEGO Technic, Mindstorms, Model Team and Scale Modeling
Hello everyone! I present to your attention the MAN F200 truck model. The model is made in 1:20 scale. XL motor is used for movement, servo motor is used to turn the front wheels. The truck has a working suspension on all wheels. The second axle of the truck can be lifted. Instagram:https://www.instagram.com/legov94/ Youtube: https://www.youtube.com/channel/UCZYK7_ZVxMqp85JoDGo85mw Thank you for watching! -
LEGO MOC#93 Ford F150 XL Pick-Up Truck One of my viewers requested me to create a single-cab version F150. So I modified my previous model and added some improvements. I also made a stop-motion animation for this MOC: More MOC on my homepage: https://www.bricksboy.com/moc
-
Hi, I present my newest creation – off-road truck KrAZ 255 version 2.0. This is successor of my first public MOC – KrAZ 255 to which free instruction are available here. The goal in version 2.0 was to improve basically every aspect of predecessor and to pay respect to this awesome off-road truck. And as usual, most of the features are based on truck Tayga 6455B available in game Snowrunner. This truck is also the next part of my Snowrunner series started with Chevrolet CK1500. On the video below you can check what details and functions I was able to put into this MOC and how KrAZ 255 v2.0 deals with off-road terrain and against obstacles. Extensive list of features, details and interesting facts about this creation you can find below the video. Enjoy! Instructions: LINK General details: scale: 1:23 dimensions LxWxH: 42,5x13x16,5cm weight: 1525g Features: 1. RC front axle steering (C+ L motor) positive caster (click) Ackermann geometry almost perfect pivot point (click) PF servo friendly - 180 degrees of movement for steering input 2. RC 6x6 drive (2 x C+ L motor) independent drive input for each front wheel (click) (for this idea I would like to thank @Fluwoeb and this topic, this is because of you! ) rear wheels driven by two independent inputs (one for 2 left wheels and one for 2 right wheels) (click) front wheels driven by one differential and rear wheels driven by second differential (click) both differentials coupled together to harness power of two C+ L motors both differentials coupled with lock mechanisms (click), controlled separately and manually from the cabin (click) and equipped with visual color indicator of diff lock on/off status located behind the cabin (click) power train equipped with new big CV joints - cardans and old CV joints limited in drive of the front axle and completely removed from drive of rear axles 3. RC winch with place to lock the hook (C+ L motor) 4. RC front and rear lights (Lego LEDs) 5. suspension for all 6 wheels (click) front wheels on live axle suspension with shock absorbers (click) and a big range of movement (click) rear wheels located on independently oscillating arms with rubber suppressors controlling the movement (click) rear suspension without shock absorbers - no side leaning and no bending under the load (click) 6. three studs ground clearance (click) 7. bottom of the truck armored with panels to secure crucial mechanisms and improve dealing with obstacles (click, click) 8. two hooks for connecting trailers, front and rear one, both equipped with lock/unlock mechanisms 9. openable doors, hood, tool box, first aid kit, sideboard bed with separately openable sides, each one with two locks 10. working V8 engine with fan which can be easily removed “for maintenance, repairment or for swap” located in detailed engine bay with a grill via which working engine can be watched (click) 11. detailed two seats cabin with openable and usable glove box (click) 12. working steering wheel 13. modular construction (axles, cabin, additions can be easily disconnected) 14. powered by Buwizz 3.0 but also prepared to be powered by standard C+ Hub (click) 15. prepared to be built also with PF motors and PF servo without significant changes and to be powered by Buwizz 2.0 (click) or even standard PF Battery box with IR receivers (click) 16. "disk brakes" in front (click) and rear wheels and many others small details (click, click, click) 17. equipped with many additions from the game Snowrunner, like bull guard, exterior roll cage, roof rack with fuel canisters and spare tire, double snorkel, sun protector (click) Interesting facts, designing decisions and details: driveshafts for front axle are connected in a way that the longer, more “smooth” CV joint part are connected closer to front axle, so lower to the ground, which corresponds with the idea to prepare bottom of the frame smooth and resistance to sticking out objects which can immobilize the truck (click) most of the motors are placed symmetrically at the center of the truck, which is good for weight distribution, but Buwizz unit is localized off centered, closer to the left side of vehicle. To balance that, motor from winch is placed also off centered, but closer to the right side of truck (click) all wheels can harness power from both C+ L motors, as they are coupled, but rear axles, which in general generate more load for motor, are connected closer to the right motor, that is why V8 engine is connected closer to the left motor, which is connected closer to front axle, as the front axle generates less load than rear ones (click) additionally output for V8 engine has the same speed as motor output - which is higher than rest of the drivetrain - for better visual and sound effect (click) there is a „biscuit connector” placed in rear wall of the cabin to increase ways of location and connection and types of power source which can be used to power up the truck (click) to avoid widening the whole truck, only hinges for sides of sideboard bed are located outside of the sideboard bed to allow opening sides to vertical position, which makes loading the cargo easier (click) positive caster present in front axle has (apart from being next feature adapted from real cars, apart from dealing with not very high tolerance of Lego parts, which causes negative caster and apart from being the force which steers front wheels strait when driving forward) a function of forcing front wheels to stay on axles when driving forward (I think this is the answer you were looking for @AutoBacon in this post ) and many more details you will discover, if you decide to build my truck I would also like to thank @nico71 for his great video series related to Western Star 6900 Twinsteer. It helped me to prepare more realistic grill, hood, roof elements and I believe overall better body of the KrAZ than in my first version of this truck. Thank you! Attention! Two C+ L motors with decreased speed 3 times, so with torque increased 3 times, generate a lot of force which needs to be handled by rather advanced drivetrain. That is why there is a risk for 12T gears to skip or even be destroyed if wheels come across too much resistance due to very rough terrain. Please keep this in mind and happy off-roading! Photos: (click) Here you can see the original KrAZ-255 (1211 parts, 991 grams), the new KrAZ-255 v2.0 in standard configuration (1632 parts, 1220 grams) and the fully equipped and ready for everything version of KrAZ-255 v2.0 (2091 parts, 1525 grams): Internals of the MOC, so drivetrain with differentials and diff locks connected with V8 engine, steering with working steering wheel and the winch I hope you like it, if you have some comments or question, please ask. I will happy to answer.
-

Technic ans Scale models at Bricking Bavaria 2022
functionalTechnic posted a topic in LEGO Technic, Mindstorms, Model Team and Scale Modeling
Hi everyone Last weekend the Bricking Bavaria 2022 took place in Fürth, Germany. LEGO builders from around Europe travelled to Fürth to show their models. This year large cranes, lang heavy load transporters and even a technic locomotive in scale 1:17 were shown. It was really inspiring to meet other builders and learn about their building techniques, concepts and how their model work. For all people who had not the possibility to come to BB22 I cut a video with as many models in action as possible. -
[MOC] MAN 8×8 Off-road RV
dls7223685 posted a topic in LEGO Technic, Mindstorms, Model Team and Scale Modeling
Hello everyone, this is the latest work from MTC: MAN 8×8 Off-road RV Designed by Lance Deng Special Notes: The cab of this MOC is mainly based on the MOC-2918 MAN dump truck, based on which the design was further developed Here is the video, hope you can enjoy it! Function Description: -2x XL motors for driving-1x Servo motor for steering-2x Sbrick for Bluetooth Control-1×M motor for Pneumatic device -1×M motor for Motorcycle bracket lift -4× Pneumatic Cylinder 1 x 11 for roof lifting Next, we will also share with you another off-road RV, which is based on a Mercedes-Benz Unimog chassis.And we will share the details through a new topic. -

[MOC] Unimog U400
MajklSpajkl posted a topic in LEGO Technic, Mindstorms, Model Team and Scale Modeling
Hello everyone! I can't believe it's been 18 months since my last MOC actually finished. Well, here is the latest to join the party: Unimog U400... and no, it isn't a MOD of 8110, that one is two times bigger ? Sadly, I don't have the 8110 to shoot them side by side, but I will try to borrow it so that the "daddy&son" bonding moment can be documented Maybe I'll be good enough to even finish the video until New Year... but then again, probably not so soon, not to mention the instructions...? Unfortunately, I move in a much slower time dimension ? Features: TRUCK: • Should be around 1:16ish, scale, tires as a starting point, • Buwizz powered, • XL for drive + fake 4in line engine with fan, • servo for steering with working steering wheel, • M motor for front and rear PTO, • L motor for compressor, pneumatic attachment front and rear, • M motor for bed (activated with PF switch), on the same buwizz output as the compressor, bed can be raised in all three directions, • cabin tilt (manually, a bit poor - two orange tiles below direction light must be removed), • detailed cabin with opening doors, • live portal axles, front with “floating” differencial • 3 differentials • trailer hitch with additional PTO, CRANE • Crane outriggers and rotation over a PTO, • 3 manual pneumatic valves for operating the crane, WINCH • manual clutch to cut off the PTO, • automatic brake against unwinding, PLOUGH • pneumatic valves for raising and switching sider, GRITTER • PTO powered double auger (two salt compartments) + rotating dispenser, • manually operated stands WINTER IS COMING! I hope you like it. Please be patient about the video...I will prepare it as soon as possible. Best regards, Miha P.S.: Some more photos of the axles and the under side can be found here.