Search the Community
Showing results for tags 'instructions'.
Found 251 results
-
I made this custom Walker for my nephew's 12th birthday (hence "M12"). It takes inspiration from the Power Miners theme (hence "Power"), set 8957. I released the .io model on Star Wars Day 2019 on Bricklink here. A backup is available on MediaFire here. Please let me know if you like it! I will post some pics of the real build soon.
-

Volvo Crane Truck - 42078 C-model
mpj posted a topic in LEGO Technic, Mindstorms, Model Team and Scale Modeling
Yes, another C-model of the 42078 set In the last 3 months I enjoyed my spare time in building a C-model of the 42078 Mack Anthem. My truck is an 8x4 flatbed version, with foldable crane behind the cab. I worked a lot on the cab shape, as already mentioned in @grego18f topic, who was building a Volvo FH too! It has opening doors but no tilting cab and no fake engine (I preferred a better looking cab than changing the shape to let the cab tilt). The crane is functional (all functions are manual), knobs are on both sides of the model. Main problem is the absence of the turntable. The crane is quite stable, but of course cannot load heavy loads. You can of course mod it adding a small turntable Outriggers control knob is on the back: I added 2 attachments: fake hook with chains, to move a small container, and forklift to move small pallets. Video: Model consists of around 1500 parts (so you have around 1000 leftover parts - mostly small parts and Lego System bricks). Instructions can be found on rebrickable: https://rebrickable.com/mocs/MOC-34643/technicprojects/volvo-crane-truck Stickers are custom made and could be available for purchase soon. I hope you like it! -
 Finally got the instructions finished and you can find them here: ( The instructions PDF will take a few seconds before it starts downloading. Be patient, it will get there. No need to click it multiple times. ) http://www.kanatta.com/GBC/CupToCup/ There is a single set of instructions (PDF), but it comes in two versions. The main version, which uses less common pieces, which are more aesthetically pleasing. Then part lists for a version which uses more common pieces and colours. I have included BSX part lists for both versions and BSX part lists which only contain the pieces needed to upgrade the previous version to this one. The previous version, BSX part list etc. can be found here: The instructions will allow you to create the Cup-to-Cup Type 1 module which you see in Akiyuki event videos from 2013 onwards. I don't think I would have been able to do it without the additional photo provided by Akiyuki and obviously, it builds on the work done by @djm and @Blakbird It is not a faithful copy of Akiyuki's module. The differences are: I changed the hopper so balls won't get stuck behind the spiral lift. I left the support used to get the balls from the lift to the first cup unchanged from the very first version. It works fine, so didn't see the need for a change. The offramp has been redesigned to work with this version. Akiyuki dispensed with the offramp in 2013, using a separate module to do it. The original offramp doesn't work with this version. I tried to keep it similar. Feel free to rework it though. There are some minor changes to the spiral lift to make it work better. It has been good to get this done, as I never liked the motion of original design. Having the motor so far from the cup-to-cup mechanism meant that it wasn't as smooth as you might like. Which is why I think Akiyuki changed it. It is called v1.2 since I class the original grey version as being v1.0 and the yellow version as being v1.1. v1.2 denotes the change in drive mechanism. This has not been event tested. I would advise testing/modifying as required before using at an event over a prolonged period of time.
 -
“She may not look like much but she’s got it where it counts, kid.” Instructions are available over at Rebrickable I’ve been working on this Micro Millennium Falcon for about three years now, in that time she’s evolved from a simple modified Microfighter into a chunky little micro build. I wanted to get the proportions as accurate as possible but couldn’t resist throwing in an interior. I tried to incorporate as many of the Falcon’s distinguishing features as I could, like the exterior holes, coloured panels and vents, interior layout and most importantly the Dejarik table (I always let that Wookiee win). I built it so that both halves are studs-out and there is as much detail on the underneath of the hull as there is on top. The upper and lower hull sections interlock in a complicated way and are held together by the side docking rings. The sandwiching adds a surprising amount of strength to the the weaker areas of the upper half as well as adding a fun challenge mid way through the build, there’s no room for mistakes or wonky 1x1 plates! This MOC is a final update to the Micro Falcon I posted earlier in the year, it still looks similar but has a much stronger structure and some improved cosmetic details in a ridiculous attempt at movie accuracy. My biggest sticking point over the year was coming up with of a better way to represent the tunnel. The 2x2 round-topped brick only ever fit at a 45 degree angle (not quite right for the ship) and because of this the cockpit was too far forward. In the end I just gave up and replaced it with some wedge plates which I think look good enough and if nothing else help to improve the strength in that corner. And this is one of the many dirty render and research collages I’ve stared at thoughtfully and scribble illegible notes on. So that’s my Micro Falcon done and dusted. It’s been a fun project and I’ve learned a lot about putting together Stud.io instructions along the way. I hope you get as much joy from this little Falcon as I have from working on it. Now, Chewie, punch it!
-
After some tweaks and revisions to the model, Cavegod's First Order Special Forces Tie Fighter is ready to be released to the public! The MOC itself contains 1,691 parts, and its manual is 91 pages long. The MOC is built to match the scale of the UCS Tie Fighter released by The Lego Group in 2015. One of the big changes is that the wing color has been switched from white to Light Bluish Gray to better represent the true color of the wings. In some of the photos attached to this post you will see white wings, those photos are from the original model. It should be noted that this MOC can easily be converted into a standard First Order Tie Fighter by switching the red pieces to black. Lots of interest has been generated for this MOC, and Cavegod and I are really glad to make its release to the community! If you would like to build this MOC, we are happy to share it with you in exchange for $20. Included is the pdf instruction manual, an xml part list, LDD files, and any help you need throughout the process of making the MOC. For more information please PM me or contact me at chrdvorak@hotmail.com A rebrickable page with a parts list will be live soon, and will be posted here: {filler} Here are some pictures of the MOC and of the pdf manual:
-

[INSTRUCTIONS] Arquitens-class Command Cruiser (MIDI Scale)
Kristof posted a topic in LEGO Star Wars
Several months ago @Brick-Wombat (Philip) completed my Venator Star Destroyer and decided to build a few more scaled ships to accompany it. When I saw his pictures, I knew the fleet deserves to be made into instructions. I reached out to Philip and we decided to first publish the Arquitens. After some back and forth design collab, aiming for increased sturdiness and better buildability of the model, I think the result is quite pleasing :) Obviously, the model is very small and simple and most of you would be likely able to build it just by looking at the picture, but I took it as a chance to try out some new features in Stud.io and hopefully get better in making some more substantial models in near future. You can check out the free instructions here! All feedback is appreciated! -
I made these three Christmas ornaments for my nephews and nieces as a small gift. Use a little rope or a hook to hang them in your Christmas tree. Maybe you can use these instructions to surprise someone next year! Please let me know if you like them.
-

[MOC] Micro Resistance and Rebel Starfighters + Micro U-Wing (with instructions)
mcphatty posted a topic in LEGO Star Wars
Hi everyone, About a year ago I was inspired by @obijon’s amazing and very extensive collection of micro builds to start working on my own micro versions of my favourite Star Wars ships. I think I have enough of them now to get all cocky (what’s that Han?) and start sharing instructions on Rebrickable so here’s the first wave, the Rebel Starfighters. Update: I’ve thrown together some Resistance variants too! The X-Wing, A-Wing and B-Wing are fairly solid little builds, at this scale one-stud connections are inevitable but luckily these are still kind of swooshable, as long as you’re careful! The A-Wing is my favourite, I went through so many real and Stud.io prototypes trying to get the shape, fins and connections right that I’m so pleased I finally ended up with a strong and recognisable build. The Y-Wing is the most fragile of the group, it’s almost all one-stud connections, particularly to the centre of the hull, so unfortunately it’s only suitable for display. I’m aiming to build several of each fighter as part of a micro Rebel hangar display and with that in mind I tried to stay away from rare/expensive parts. Having said that I couldn’t resist using the skate helmets on the Y-Wing and my liberal use of those little curved slopes with notches pushes the cost up a bit too. Oh well, you can’t build a rebellion on peanuts! Back in the spring my first attempt at making instructions in Stud.io was actually this U-Wing. I managed to build the rear of the ship so that the wings fold out but there are so many weak connections that it means the wings are very fragile. I also have to admit that I cheated when connecting the engines, to keep those wheel pieces in place I wrapped a layer of tape around the internal 3L bars and pushed the wheels on. I’m still on the hunt for a better (and legal) solution and I’m open to suggestions! Update: I’ve just finished a few Resistance variants of the Starfighters, almost in time for The Rise of Skywalker. The B-Wing involved a lot of guesswork as it’s only very briefly seen in the film and trailers, but it was the same with the old B-Wing and Return of The Jedi so I suppose it’s a Star Wars tradition that’s been upheld. Overall I’m really pleased with how all these little ships have turned out and especially how they look together as a group. I’ll share more micro starfighter instructions (the next is the Millennium Falcon) when I can and if we get a good look at the new B-Wing in TRoS I’ll be able to finish the Resistance version of the starfighter group too. All my MOC and MOD instructions so far are here, I’m always grateful for any comments and criticisms. Thanks for looking and down with the space nazis! -
Hello My new MOC is Terminator T-800 bust with LED eyes. It's remake of my old model (September 2006) INSTRUCTIONS are now available on BrickVault.toys Terminator T-800 Video review by Brickvault:
-

SBrick custom part for Stud.io
Tommy Styrvoky posted a topic in LEGO Technic, Mindstorms, Model Team and Scale Modeling
I thought a model of the SBrick would be useful for anyone who would want to use this model for creating instructions, as this part is used by many in the Technic community. One of the reasons I created this is I currently like using digital software to design the internal layout of some of my models to see how larger PF components fit within my desired scale constraints. So I created a model in Autodesk Fusion 360 from measurements of the SBrick, I then went through a couple steps to exporting from the STL file from Fusion 360 to an OBJ for Stud.io's Part Designer with Blender. This tool works well, and I definitely see it being useful for other custom 3D printed parts in the future. I will see about getting other Power functions parts into stud.io in the future, as there is an option to import ldraw parts. I could also see about getting this part published in Stud.io's part library, however since it isn't an offical Lego part, I am not sure how possible that would be, but Bricklink also supports selling of 3rd party parts, so maybe if there was enough of a demand for this it could happen. SBrick part file for Stud.io You will need Part Designer to add the part to your custom parts library in Stud.io Part recreated in CAD A quick render of the SBrick in Stud.io, unfortunately the part designer lacks the functionality to assign different materials to parts. Unless I wanted to use decals, but I originally thought I could UV map a material to it, however that didn't work. also there is some minor mesh artifacts that are visible in the view port, but don't appear to show up in the renders, these are flat surfaces, maybe converting to ngons would fix that issue. Showing the functionality of snapping parts to the SBrick. -

[MOC] [INSTRUCTIONS] – LAATi Republic Gunship – The Clone Wars
Chef posted a topic in LEGO Star Wars
********************************************************************** INSTRUCTIONS NOW AVAILABLE Given the number of techniques used from JBB_777’s design I have obtained his consent prior to making my instructions available (for a modest USD 10) 486 pages of detailed PDF instructions on Rebrickable ********************************************************************** It took the better part of the year but I present my rendition of a minfig scale LAATi Republic Gunship. It is based on the version from the The Clone Wars television series, which made a stronger impression on me than the one that appeared in Episode II AOTC. The TV show told the full story of the Clone Wars and the considerable extent of the gunship's deployment and impact in battle. I used both the studio model from AOTC and images from the show as reference materials to design this MOC. The MOC uses many of the building techniques seen in JBB_777’s 2017 gunship, which I liked very much, such as the Technic frame and the method to attach the wings to the body. The engine took inspiration from Caleb Ricks’ gunship from 2018. I designed this ship to be as accurate as I could to the source material. One main attribute of the ship I included but that is usually left out in other MOCs is the angled fuselage that widens from front to back. The stepped surface is a compromise to achieve this result given the choice of the internal supporting structure. Other MOCs based purely on the version from AOTC did not have to face this issue due to the omission of doors in the movie model, which left empty spaces on the ship’s lower body. My builds tend to be sturdy and this MOC is no different. However I made a little gaffe – the ship is slightly off balance. The engine and wings of the ship went through several redesigns and by the time I was satisfied with the look I did not realize how much additional parts and weight I had added. However the ships still sits fine on its own as long as no extra pressure is applied to the rear. Additional Facts: The MOC consists of 1917 parts and took 7 months to complete Measures 33cm long (excluding turret barrels) with 38cm wingspan Shares 50% of the parts with JBB_777's gunship The AT-RT from the final image is a moded version of one of JoeChu1980's AT-RTs Chef_LAATi_View1 by Chef Aslopert, on Flickr Chef_LAATi_View2 by Chef Aslopert, on Flickr Chef_LAATi_View3 by Chef Aslopert, on Flickr Chef_LAATi_View4 by Chef Aslopert, on Flickr Chef_LAATi_View5 by Chef Aslopert, on Flickr Chef_LAATi_View6 by Chef Aslopert, on Flickr Chef_LAATi_View7 by Chef Aslopert, on Flickr Chef_LAATi_View8 by Chef Aslopert, on Flickr Chef_LAATi_View9 by Chef Aslopert, on Flickr Chef_LAATi_Geonosis by Chef Aslopert, on Flickr Thanks for reading! -
I hope this is the right forum to post this :) Recently I got challenged by my friend Felix to build a micro-scale steam locomotive. I have never tried building anything like this but I gotta say I was surprised how much fun it can be. The new pieces definitely open the whole another world of possibilities when it comes to tiny builds like this. And I am really quite pleased with the result :) If you want to build your own, I put together building instructions which you can get for free on Rebrickable!
-

[MOC]Lego Transformer Razorkatty From Set 70287 Ultrakatty And Warrior Lucy
alanyuppie posted a topic in LEGO Sci-Fi
Every beginning of the year, I look forward to new LEGO sets and buy those I think I can build Transformers from. Usually a set or two from LEGO Creator fits the bill. And sometimes Ninjago too (sets with dragons). When I first set my eyes of LEGO Movie 2: Set 70827 Ultrakitty and Warrior Lucy .. I knew prospects were pretty high there. I delayed my purchase until recently when I saw one to the tune of 20% off retail price. Well, he's named Razorkatty because he shared similar color scheme as Razorclaw. Robot Mode! He's very articulated for something built from a single LEGO set. Leftover parts from the set were used to build a Squid-like rifle for him to hold. As usual... more photos in my blog link below: https://alanyuppie.blogspot.com/2019/06/lego-transformer-razorkatty-from-set.html Building Instructions will probably arrive a week from now ! Shall keep you guys updated! -

Technics Roboriders Instructions
Arlos Grandad posted a topic in LEGO Technic, Mindstorms, Model Team and Scale Modeling
Hello, We have technics roboriders 8509 to 8514 with their instruction books. What we don't have is the instructions for the combinations of any of these which are listed on the back of each booklet. As an example there is a model which combines 8509, 8510 & 8513. Is there a very old resource for these instructions please? Any suggestions will be super-helpful. Thankyou Neil -

Best way to create instructions?
LegoJalex posted a topic in Digital LEGO: Tools, Techniques, and Projects
When you want to create instructions for your models how do you do that? Is there any better alternatives then generating them in LDD? I tried Studio, but it seems to be a lot of work for more complex models. -
Pictures / LDD file + parts list
-
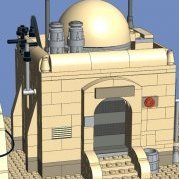
[MOC] Tatooine Building - Simple House [TAT01] (Instructions)
azzer86 posted a topic in LEGO Star Wars
Hi all - I’d like to present to you my interpretation of a Tatooine themed MOC building. It is the first of several planned builds I have for this 'theme'. I plan to label these as TATxx where xx increases with each build. It is based on background buildings seen in Episodes I and IV, whilst also drawing on the buildings in the SW BF2 game with my own spin/interpretation of it – i.e. what I think looks aesthetically pleasing and fits into the Tatooine 'world'. It contains a detachable roof which can be customised. For example, the dome piece (and mounting point) can be removed to create a flatter, large vent system instead. There is also a functioning door with two possible colours advised – one in DBG like those in Lego's own Mos Eisley sets, and a more movie accurate dark orange colour for extra customisation. This opening door function is neatly hidden away at the side of the building. The interior is mostly empty - mainly left up to your own interpretation, but I’ve included suggestions for light, gun and binoculars within the instructions. The removable roof allows easy access to provide extra scope and playability. One example that I like to think this is, is a home for a Mos Eisley Cantina patron with 'homemade aerials' trying to capture the local broadcasts or streaming the pod racing. The building really 'comes alive' when figures and details outside give it a richer experience. Any comments are welcome and please leave a message/query if you spot an error within the instructions. I shall try my best to quickly correct it. The instructions are available here: https://rebrickable.com/mocs/MOC-26468/azzer86/tatooine-single-house-building-tat01 Original post hidden in the spoiler. -
This MOC is my representation of the Motorbike of the "Classic" Ghost Rider (Johnny Blaze and Dan Ketch) from The Marvel Univers. It's inspired by "the Spirit of vengeance" of the terrific builder called Ben Cossy on flickr and MOCS based on the LEGO Marvel video games. The MOC has 111 pieces... X6 and it's the devil's number ! The Showcase video is online on YouTube and the Building Instructions are available on Rebrickable ! The Building Instruction is a PDF file : https://rebrickable.com/mocs/MOC-25824/BricksFeeder/ghost-riders-motorbike/#comments More shots below : I hope you enjoy the build! Let me know what you think about ! If you have some remark or problem with the instructions, let me know and I will correct. Don’t hesitate if you have questions!Moreover, could you post pictures of yours when you finish to build it and write a comment below please? Thanks ! :)
-

Is there a moral duty to publish instructions?
astral brick posted a topic in General LEGO Discussion
Before starting a flame, it is a rhetorical question, and the answer is, of course, no. Still, I cant help thinking of the amazing models I admire every day on flickr and the failed Ideas (due to lack of votes or non-approvals) lost forever, and I wonder if those afols realize that making one last effort to create instructions or to record a brief video tutorial could give their works the immortality they deserve. However, remembering Andy Warhol's controversial lessons, if there is the technical possibility to reproduce a piece of art, can we still consider it art? -

[MOC] New Holland TM140 + Claas Quadrant 2200 RC
eric trax posted a topic in LEGO Technic, Mindstorms, Model Team and Scale Modeling
Ever since Lego released the 42054 set, I've been waiting for a smaller size agricultural tire to be able to build a medium-sized tractor. Unfortunately, there are no smaller agriculture tires, but I decided to build a medium size tractor :) New Holland TM 140: The model was built to create instructions. Knowing this, I've created a compact chassis that I can use in the future. The tractor has a drive with a Large motor with gear ratio 1:7 and steering using a servomotor. Three-point hitch systems are raising by the medium's engine . The front one can be detached. In addition, the power shaft drives the medium motor (gear ratio 1:3). The model has 4 functions so it is controlled by sbrick I had to limit the amount of details so that everyone can easily build such a model after buying the instructions. The original fits very well with building from bricks. I am very happy with how it looks because it's hard to know that it's a LEGO model. The instructions have been created for me by M_Longer Creations. Thanks Marek! Parts list in Rebrickable, Bricklink XML, Brickstore and png versions can be found here: https://bricksafe.com/pages/M_longer/misc/nh140 Instructions can be bought at Sellfy and Rebrickable: https://sellfy.com/m1longer https://rebrickable.com/users/M_longer/mocs/ Claas Quadrant 2200RC I did not want to build only a tractor. I decided that I would build a straw baler. I chose the Claas Quadrant 2200 RC. It seemed to me that it would be possible to copy it very well in bricks. The original machine has very many curves. In the end, I managed to build everything and put a lot of details. An additional function is moving the straw bales and the next ones can be put on the top of the machine. More photos: Video: Thank you for reading and all the comments! :) -
Specifications: (source: feature video, see above) I do not own the rights for the original design: the ship is created for a hard sci-fi audio drama The Sojourn produced by Spacedock. The model is created using LEGO Digital Designer, rendered in POV-Ray and post-processed in Adobe Photoshop. The Instructions are available on my Gumroad Store FOR FREE: https://gumroad.com/l/sjrn_gvnvr Thank you for your attention!
-
.thumb.gif.ad7c8d88b264ee812194946c07404504.gif)
[TC15] Lego 852 Studless Version
mocbuild101 posted a topic in LEGO Technic, Mindstorms, Model Team and Scale Modeling
It's finally here - my studless remake of the very first Technic helicopter: It's been a bit of a long journey to get here, not only because of the work put into this model, but also because of the many failed TC15 entry ideas... Originally, I had planed on building a replica of the Hoversurf S3 2019 Hoverbike (which is basically a quadcopter you can ride on), but the small size of Lego propellers restricted me to such a small size, that I just couldn't fit any functions into it. Next, continuing the idea of some sort of quadcopter, I did some googling for other quadrotor aircraft, and although I managed to find some (in particular, the Curtiss-Wright VZ-7 and X-19), that idea also failed... Then, after a few days of thinking, I decided to just make something completely different - a flight simulator, based on the 8485 Technic Control Center. With this idea, I actually managed to make enough progress to post a WIP topic, and stuck with it for a several weeks, until I sadly had to abandon that as well... Finally, after trying and abandoning a few other ideas, and with only a few weeks left before the contest deadline, I stumbled across the idea of making a modern studless version of set 852 - the very first Technic helicopter, and one of the original four Technic sets released in 1977: Fast forward 3 weeks, the contest deadline has thankfully extended by 2 weeks (thanks @Jim ), and I've finally finished building... Features: Full studless construction - not a single stud in sight! Near perfect 3/4 scale (relative to the original set). Accurate collective rotor pitch control - unlike the original, where the rotor pitch is decreased when the swash plate rises. Manually powered drive train - can also be motorized, as seen in the video. Video: Instructions: (click on the image below to go to the Rebrickable page ) Links: Entry topic post Bricksafe (more photos and digital model files) Rebrickable (instructions) YouTube Original Set on Technicopedia Original Set on Brickset Renders: (made with Blender) Original post: All WIP photos: -
This creation is ispired by the Star Wars universe and condensed in the LEGO format of a Skyline Architecture set. There are a lot of scenes, locations and vehicles recreated from the first two trilogies. If you can't spot them all there is a list in the following link. Instructions There are more than 790 pieces so it's jam packed :) Dimensions 792 pieces cm 37.5x 10 x 19 inch 15 x 4 x 7.5 studs 47 x 12.5 x 23.5 weight 388 gr / 13.7 oz The vehicles design have been inspired by advent calendars and other creations in microscale I found around the web. Most (if not all) of them needed to be reduced in size to fit the Skyline or adapted to be attached firmly and integrated in the little scenes that have been recreated. Hope you like it! Let me know what you think about it :) P.S. I know that maybe one for trilogy would be better or even one for movie You can find more images on my flickr page
-
 Hi Eurobricks ! Building instructions of my pneumatic quick coupler (See on my Volvo excavator) are available on Rebrickable. https://rebrickable.com/mocs/MOC-20641/TeClem8/pneumatic-quick-coupler/#comments Hope you like my design :)
 -
 Hi everyone, I have already posted this gearbox in the Gearbox collection thread started by Didumos69, but now that I have finished the instructions (as promised@mocbuild101, here you are :-)) I thought it would be a good occasion to start a specific thread on this gearbox. I am currently working on a MOC which has this gearbox implemented (will start a topic for that one in the near future as well), for which I had some specific requirements: I wanted manual operation on standard LEGO 5+R configuration, but with a gearstick that would pivot in all directions from a single point (like in real car). Apart from that, I wanted a center console that was not more than 5 studs wide, so the gearbox had to be moved away from the gearstick. I took my inspiration by Thirdwigg's 6speed gearbox from his Cadillac ATS supersedan, Crowkillers 4speed gearbox from his Asassin X19 and the 5+R gearbox from Nathanaël Kuipers' Predator. I ended up mixing them all with some inspiration from the 42054 Claas steering mode selector as well. Note: the version in the instructions is using the new DGB driving rings and red clutch gears, they actually give a more solid build (when I shot below pic and vids I had already used mine in aforementioned MOC, so I converted it to the old rings and wheels. Works fine as well, just a bit less solid). Manually operated Direct operation special features: single pivot point for gearstick, linkage to gearbox, fits in 3studs wide center console number of gears: 5 forward, neutral and reverse Here's some vids (apologies for noob quality...) and the instructions: Gearbox in action Shifter linkage system in action Instructions PDF Enjoy and let me know what you think of it.

.thumb.JPG.3c74c0d405dc1afb04b2fa216ebc79e6.JPG)