
GoN2Broadway
-
Content Count
61 -
Joined
-
Last visited
About GoN2Broadway

-
Modern Military Figures
GoN2Broadway replied to GoN2Broadway's topic in Minifig Customisation Workshop
I used coated paperclips, and secured them to the BrickArms helmet. They are still movable, although perhaps a little tighter than on the Minifig.Cat helmets. Hope that helps! -
Modern Military Figures
GoN2Broadway replied to GoN2Broadway's topic in Minifig Customisation Workshop
KalSkirata - First of all, thank you for the very thoughtful response - I always love hearing someone say they love my figures, but it is always more helpful to here why they love the figure, and what can be done to further improve on future figures. With that said, thank you very much. Although I have made military-like figures before, it is only recently that I got into making a semi-real life modern military figure (well, figures). I am really happy that these figures have pushed some boundaries on military figures, although there are a lot of inspiring builders that I looked to in designing my figures. I won't hesitate to state that I looked at several of your figures for inspiration (in addition to Pecovam, Shobrick, and the Knight (KJ) among others), and developed from there. I am sure, in the near future, someone will take some of my ideas and improve on them, and we'll get some new amazing figures. Now to the figures - I tried really hard to balance my figures and have some who were packed to the max, and others who were armed, but only with what they needed. I agree that the commander and the scout were heavily packed - for me I also thought it made it look realistic, but I haven't done enough research to know what is typically included in a true-to-life field pack, or extended field pack, and so I may have beefed it up more than usual ;) I tried to keep it in the vein of everyone getting a sidearm, everyone getting an assault rifle of some sort (BA M4 or AC8), everyone getting some grenades (of varying types), and a few getting some advanced explosive items (such as the MGL or the bazooka). Obviously, some figures (such as the close-quarters expert shifted away from this approach). I am really glad that you noticed the flag and the skull and crossbones on the commander - not many people have noticed those, or brought attention, but I really tried to focus on the detail of those. The NVGs are from minifig.cat - search them on bricklink or google, and you'll find their store. For the goggles, NVG's, and other items, they are very reasonably priced, and the items look great! I'm glad you like the balance between tan and black - I noticed a lot of real-life images of troops in Iraq and Afghanistan utilized a more jungle-camo on the vests, but I wanted a more flat approach, and felt the black would look good. I'm glad to say that it turned out well, and I agree totally with you, in that it is a nice balance! In regards to modding protos - I try very hard to not just post pictures of my collection (in fact, if you look at my Flickr, you will not find a single image of my BrickArms proto collection - rather, I like to ensure that they are used and showcased on my figures rather than just collect them. Do I enjoy having varying types of protos, and "collecting" them - yeah, but I feel it honors the work and generosity of Will to showcase them with figures or in dio's rather than just posting images of my complete collection. I also don't mind modding the weapons (although I do understand the argument against doing so, as they are a little more special than the readily available production items), however, if I feel that a mod to a particular BAP will help enhance the item (and if I have more than one of the particular item) then I am perfectly willing to do it. Anyway, I'm glad you liked my approach with these mods! I'm glad you liked the wood grain on the trench gun - it was my first attempt at doing so (surprisingly), but it turned out well, and looks cooler in person than it does in the photos (isn't that almost always the truth?). I think the Emile armor worked great on this figure, and as I cut the back of the armor off to allow for the addition of the backpack to the figure, I have another piece of AMA armor that I can mod to something else - which gives triple usage for that armor set that I bought (I used the EVA helmet for my Future warriors commander). Thank you again for the very thoughtful, and kind response Kal! -
Modern Military Figures
GoN2Broadway replied to GoN2Broadway's topic in Minifig Customisation Workshop
Thecrazyone - Thanks - I've been working on various types of camo for a while :) dan3324 - Thanks - and in regards to modding BrickArms - it's not a difficult thing to do, but like anything else, the best results come from taking your time. That applies to designing (before you do any cutting or gluing), cutting, gluing, and painting. If you rush any of these steps, you will have a messy mod - there are a number of areas to look at for modding help - several places here on the Eurobricks forums, on the Minifigure Customization Network, and perhaps in this case, most importantly the BrickArms forums (specifically the Weapons Modification section). I hope that helped a little! -
Modern Military Figures
GoN2Broadway replied to GoN2Broadway's topic in Minifig Customisation Workshop
Thanks Dan! You have a very good eye - most people who have tried that mod in the past (from my knowledge) have used the BrickArms SMLE or M1 Garand Rifles (most likely because they come in brown), but I felt the BAR worked better for the stock and receiving end of the Trench Gun as it fit perfectly with the barrel, and it even had a nice ejection port. -
Modern Military Figures
GoN2Broadway replied to GoN2Broadway's topic in Minifig Customisation Workshop
Thanks Fuzzylegobricks! I uploaded this last night on my Flickr and other forums, but thought it would help some of the people out there to know what I use and how I make a lot of my figures: I usually don't post how I make things for my figures, however, I did want to share some tools to use for making figures for yourself. A lot of times, people email me and say they don't have many items or money to make great mods - well, I'm here to tell you that there should be no excuses - most of what you need for core details on figures can be bought for less than $25. Go to Walmart - Get some good scissors, wire cutters, and tweezers - these should be fairly cheap, and most likely you all ready should have several of these around the house. In addition, go to the crafts section and purchase some Acrylic paints (yes, they will be thicker than what you want, but will work) - these should be $1.99 each, and if you get a few core colors, you can begin working on mixing colors. You can also go to Hobby Lobby, and pick up the following: Get scrap sections of black, brown, grey, or other colored cloth. If you have the ability, purchase a fabric stiffener. If you watch the sales at Hobby Lobby, you should also be able to go purchase some good sets of brushes at Hobby Lobby for 50% off each - which can let you get some very nice sets. Finally, pick up some ribbon - which has sizings and price indicated in the image above. If you have the ability, I would suggest looking at a store called Harbor Freight for a Hobby Drill (pin vice) (should be $3.99 or less), and pick up a utility knife set. I would recommend going for the nicer utility knives, as the rubber handle is very nice to work with. Finally, I would suggest getting a small file. The other things that I use VERY often in my mods are coated paperclips - Red's and blacks are used the most for me. With that said, you should be able to make a great deal of figures, and do a number of different things - as illustrated in some of my recent figures. Please understand - these are just a few items that I have found useful, and by no means is exclusive. I will not claim to know everything that is useful, but these should be fairly inexpensive, and should allow for much more flexibility in your mods. I hope this was helpful! -
Modern Military Figures
GoN2Broadway replied to GoN2Broadway's topic in Minifig Customisation Workshop
Charlieboy - Thank you very much! I wanted to do varying levels of complexity on the figures - obviously the commander and the scout are loaded to the max, whereas the close-quarters expert is given only a trench gun. I don't know which are most effective, and to be honest, they are all completely playable (I can absolutely vouch for that ;). I figured the scout and the commander are given full field packs, whereas the others are a little lighter (and I tried to keep the sniper as light as possible ;) I do really enjoy the sniper, and his rifle surprised me with how pleased I was with the results. Thanks! KielDaMan - Thank you very much for the kind words! And no kidding on the planning/trial-and-error - I was playing with designs on the figure one evening, and about 1:30 am decided to go to bed, and as I was about to fall asleep I woke myself up thinking - "what about making a Lego carabeaner..." which then kept me up thinking how I could do that - and when morning came, I was up and making my idea happen! Anyway, I'm glad that all the hard work comes through in these creations! -
Faction Contest - Modern Military Extravaganza I'm in the process of moving, purchasing a new home, and starting a new job in the next couple months, so my figure posting will be much more sporadic than it has in the past! However, I have been working on these figures for several weeks, and am extremely happy with how they have come out. As some of you may or may not know, I started and have been participating in Project 365 x 7, in which I wanted each figure to be better than the last. Sometimes I was able to make each figure better than the last, and other times I feel I may have been less successful in that. With these figures I focused on several areas: 1) I really wanted to step-up my BrickArms weapon modifications. 2) I suppose this is an offshoot of the above goal, but I really wanted to spend some time making the various lenses on the rifles and night-vision goggles. 3) Building off of one of Brandon's (Catsy) ideas, I have recently been wanting to make the body armor for my figures more... bulky; or more true-to-life versions. 4) I also wanted to make the best military figures I could, which included varying types of camo designs, as well as armor/helmet/weapon combination's. Well, as many of you may be aware, within the last month (+ or - a week), I have been spending a lot of time on military figures; some which were better than others, but all of which were learning experiences. That still doesn't answer how did I achieve these goals? Well, let's get to the figures, and I'll answer that question at the end of the post (I will mention, throughout this entry, I will be putting images of BrickArms weapon modifications and other items, which I will place in the corresponding threads; however, they were so integral to the creation of the figures that I really feel they should be included in this topic as well. With that, here you go: Modern Warrior - Commander: Front: Sides: Back: Gear: Pack with Items (The machete, combat knife, combat shotgun, and grenade are all removable): Helmet: Weapons: Obviously the AC8 mods were inspired by Brandon's (Catsy) versions, however, I would like to show the evolution of my two designs to illustrate the growth over time of complexity in the figures: Modern Warrior - Scout: Front: Sides: Back: Weapons: Overview: Primary Weapons: Showing the progression from my previous Jungle Trooper's BA M4 Mod (before I had an ARC; and yes, I did do some painting on the ARC): Although I am wanting to save the majority of my thoughts until the end of the figures, I do want to point out the progression from a plain red colored dot and some white color, to the gemstone technique used on the ARC proto - a technique that I feel adds a lot of complexity to the weapon, and the figure as a whole). Modern Warrior - Sniper: Front: Side: Back: I made his wire-cutter's from a red-coated paperclip and ribbon - I am not ecstatic about this design, however, it works at this point :) To note: on his arm is a topography map (which I don't know is used anymore, at least in this manner, on modern troops), but I am happy with how it turned out! His Barrett M82 Sniper Rifle: Modern Warrior - Close Quarters Specialist Front: Closeup on the Trench Gun (with wood grain): Modern Warrior: Demolitions Expert: Front: Side: Back: BA HAC Mod: Modern Combat Heavy Gunner: Front (with Minigun) Front (without minigun): Side: Back: His Auto Shotgun: So, my final thoughts - how did I do in achieving my goals, or how do I feel I did? 1) I really wanted to step-up my BrickArms weapon modifications. Well, with the use of a separate vendor, as well as many items from a variety of BrickArms items (primarily AC8's) I really feel that the weapons I have included with these figures are a step up from what I have done in the past, and certainly reflect many of their real-life counterparts. Although I know there are a great many areas that I can continue to improve in my weapon modifications, I feel that these have come off very well and are a step above what I have done in the past. I also spent my first time attempting to give a weapon some wood pattern designs on the trench gun, which I think look great in the image, and even better in real-life (in my opinion). 2) I suppose this is an offshoot of the above goal, but I really wanted to spend some time making the various lenses on the rifles and night-vision goggles. In addition to the BrickArms weapon mods, I also spent a great deal of time working on improving the weapons sights. I spent time looking at War Gaming gemstone painting techniques, which I spent a great deal of time working on. As you can see in the above weapon evolution images, these have changed dramatically! 3) Building off of one of Brandon's (Catsy) ideas, I have recently been wanting to make the body armor for my figures more... bulky; or more true-to-life versions. 4) I also wanted to make the best military figures I could, which included varying types of camo designs, as well as armor/helmet/weapon combination's. I think this will answer both questions: I think this area really shows the work on these figures - I began incorporating clothe elements and ribbon in my designs, which allowed a great many things: In my opinion, I feel that the armor looks very realistic, and it very much enhances the figure; in addition, it allowed me to make the armor extremely playable - ALL grenades, knives, machete's, and guns are removable. The only items that are not removable are the shotgun shells and the caribeaners. In addition to the body armor modifications used here, I also used cloth/ribbon to accent the BrickArms Modern Combat Helmet's, which I think really helped to enhance an all-ready great product. Finally, I really LOVE the REAL CLOTH Lego Bandanna (created originally more due to a lack of Lego bandanna's) - it turned out amazingly well (in my opinion), and really helped enhance the figure! I also was able to make knee-pads for the Lego military figures using ribbon and a couple modified pieces - I think these also help enhance the figures! Overall, I think these figures are my best work yet, and I hope I have done the BrickArms proud. Feel free to share your thoughts, criticism, or agreements - I appreciate them all! As always, thanks for looking, and I hope you enjoyed them!
-
Jay Maynard, Computer Analyst and Tron Enthusiast
GoN2Broadway replied to GoN2Broadway's topic in Minifig Customisation Workshop
I feel really bad now! I didn't mean to explode your mind, although, I'm glad that you liked it enough for that to happen ;) Thanks! -
Jay Maynard, Computer Analyst and Tron Enthusiast
GoN2Broadway replied to GoN2Broadway's topic in Minifig Customisation Workshop
Thanks KielDaMan! While I usually just focus on the figure, I wanted to spend some more time on the vignette as well, and I notice that a lot of the best vignettes you see are always very well done with small details. I'm glad that my work not only on the figure, but in customizing items in the background was noticed as well! Aside from the phaser and energy sword (which were just cool on their own), everything else done was customized! Anyway, thank you for the kind words! -
Jay Maynard, Computer Analyst and Tron Enthusiast
GoN2Broadway replied to GoN2Broadway's topic in Minifig Customisation Workshop
Thanks! It has taken a while to be inspired, but I think this did it for me! (It definitely did it for my wife - she thought it was hilarious). I'm glad the doughnut was enjoyed - it was a nice little inside joke (chak-late/chakram) - yeah... lol. The bad thing about leotards - they show every flaw! -
Jay Maynard, Computer Analyst and Tron Enthusiast
GoN2Broadway posted a topic in Minifig Customisation Workshop
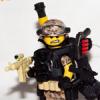
Here are the specs for my cosplay character: Name: Jay Maynard Gender: Male Theme: Film Character: Tron (Tron Reference Image) Cost of LEGO parts (Based on BL Prices): approx $3.00 Cost of Custom materials: BrickArms Chakram Disc - Approx $10.00 - Unknown cost due to prototyping; Sculpy - spprox $.50; Doughnut - approx. $1.00 (made from BrickArms Lewis Gun Ammo Drum) Total Cost of figure: $14.50 Jay Maynard, A Tron for all seasons Jay is getting ready for another big day of going to the Chicago Comic Con, where he is delighted to have another chance to show off his wonderful homemade electroeluminiscent Tron suit. Regardless of what your thoughts are upon this man, one must respect a man his size squeezing into a white leotard! For today's venture he has with him his "Limited, Ultimate Collectors Edition Signed BrickArms V1 Chakram disc" (which of course comes with authentication documents), his homemade helmet (he is quite proud of this creation - he went to his local Walmart and bought a relatively inexpensive bike helmet, spray-painted it white, and hand drew the images to match his leotard). Of course, it should be mentioned that Jay likes to start each convention morning with his favorite breakfast - Tron Chak-late doughnuts - made locally. Although Jay is an avid Tron fan, he is also a fan of many other genres and themes, which is evident in his home decorating. Visible in his entry-way are authentic handmade props for the popular video game Halo - he cherishes his Energy Sword Replica, Plasma Pistol Replica (with working lights), and Needler (it shoots foam nerf darts). He also has a Movie Prop replica of a Star Wars Clone Trooper from the 301st Squadron, which he has been known to wear! Although it receives less attention now, he also still cherishes his first love - a replica of the Star Trek phaser. Jay is also an avid collector of Lego, and he likes to consider himself a true AFOL (Adult fan of Lego) - he recently purchased the Lego Star Wars Venator (largely for the Chancellor Palpatine minifigure) and the Castle themed Medieval Market Village (largely for the village maidens whom he finds rather attractive...for a Lego minifigure). Needless to say, Jay is truly a Tron for all seasons, and a nerd to boot, but it's hard not to love someone with so much enthusiasm! Jay Maynard, Tron enthusiast, Front Image: Jay Maynard, Tron enthusiast, Side Image 1: Jay Maynard, Tron enthusiast, Side Image 2: Jay Maynard, Tron enthusiast, Back Image: ----------------------------------------------- Now the rest of the story: When this contest was first announced, I very much wanted to participate, but knew that I needed to make something unique and interesting to have a chance to win. So what was a person to do who has very little experience in Cosplay? I searched the internet of course. Well, I found a lot of interesting images (and a very cute Boba Fett-ette), but nothing that truly sparked my interest or that I felt deserved to be immortalized (or de-mortalized...) into Lego! Meanwhile, at the same time, I had received one of the BrickArms Chakram discs, and although I wanted to make a Tron figure I felt that I should wait due to the massive influx of creations since the release of Catsy's. However, upon my tron research I came upon the following site: Tron Guy - aka - Jay Maynard. Yes - Jay Maynard is a real man, and I have modeled my Cosplay figure from him. I of course have taken some liberties, such as his housing decorations and breakfast choices, however, the enthusiasm that comes through in the story above is true. This man goes above and beyond the call of ... duty(?) in his efforts to share his love of Tron, and I for one think something should be done for that (I just don't know what), so I made him into a Lego figure! Now you know the rest of the story. As always, thanks for looking! -
I also have been occasionally keeping check on this tab - While I love Lego products, I also have enjoyed many of the products that MB has brought to the public which Lego would never produce. While collecting these sets, I have in the past noticed slight quality issues - not in the pieces in general but in the fact that occasionally a large piece would keep popping off other smaller bricks. With that in mind - I also bought the Hornet from the first wave - I noticed that still had some of the lingering effects of MB bricks popping off - and while I agree AwesomeStar that the vehicle looks wonderful I was a little frustrated with how the bricks kept popping off. Regardless, I still enjoyed the set a great deal and still bring it out quite often (when I'm in a Halo mood). The set I wanted to mention on this thread specifically though is the MB Halo Pelican that is out/coming-out. First of all - I want to start with I SERIOUSLY LIKE/LOVE this set. Why do I like this set so much? First of all - I had no quality issues in this set - something that made me extremely happy. Second - my wife was VERY happy with how long it took me - almost two days (not straight though obviously ;). For a Lego product at this sets price cost I would have been done in about an hour. This ship is 99.9% brick built - something that I know many people still appreciate. The only truly specialized piece is the cockpit, and that would have been created in a Lego set as well. I can't say how impressed I was with the build - it was very enjoyable and I know I got my money's worth. The finished product looks just like the in-game vehicle and I just can't stop playing with it. Incidentally, with a little modification, I could also get the Pelican to attach the MB Halo Warthog to the back of the craft. I doubt this was meant to happen, however, I was able to get it to work with minimal modification. If you see this set in store, and if you are not opposed to buying MB - I HIGHLY recommend looking at this set and seriously considering it for your collection. You won't be disappointed!
-
Aliens: Colonial Marine
GoN2Broadway replied to GoN2Broadway's topic in Minifig Customisation Workshop
Thanks for your thoughts DrNightmare - The gun actually has no fingerprints on it, but rather it's how the drybrushing on the weapon turned out. I'm tempted to redo the pain with a flat black base, then do green highlights that would match the armor, then possibly do a drybrushing of the weapon with a metallic dull silver. I'll let you know how it goes ;) -
Colonial Marine's are some of the toughest units throughout the galaxies, and this unit proves his worth. Sporting a Brickarms Combat Shotgun, Brickarms Helmet, and a modified Brickarms weapon (inspired by Catsy and Thel) that functions as a flamethrower :) He also is protected by a modified Brickforge Space Marine Armor :) The helmet modifications are: I need to do one last coat of paint on the helmet to cover the super-glue residue, but I'm very happy with how it turned out. Thanks!
-
Predator Clan Leader and Young Predator
GoN2Broadway posted a topic in Minifig Customisation Workshop
The Predator culture revolves around the hunting and stalking of dangerous lifeforms - the thrill of the hunt. After making a kill, Predators typically skin or decapitate the carcass, converting it into a trophy. Unlike most species, the Predator does not hunt for sustenance or the elimination of threats, but rather for entertainment - they will only attack life forms that have the ability to provide them with a challenge. This Predator is the Patriarch of one clan, and is watching over the young Predator's Blood Trial. His own Blood Trial was decades ago, and he has risen through his victories as head of the Clan. The torso, arms, and legs are all hand-painted by myself as well as all the armor, helmet, hair, etc. He does feature this particular clans mark on his helmet. His weapons include: Dual Plasma Casters, Smart Disc (with Brickarms Upgrade), Extended Retractable Spear, and Extended Wrist Blades. Too much? I think not ;) Hope you like :) This predator uses a Brickarms monopod to connect the spear to his back - The Smart Disc uses a Brickarms MK2 Frag Grenade with another 2 elements :) I think it turned out pretty well. This young Predator is beginning his Blood Trials - which are to take place on an isolated section of the planet Zeta-XM2 where he will face Colonial Marines on a preliminary scouting mission, as well as Xenomorphs. If he survives the hunt and is victorious, he can place the family mark upon his skull and helmet; if not, he must commit suicide. The torso is decaled, and the Legs are hand-painted. His weapons include: Plasma Caster, Smart Disc, Retractable Spear, and Wrist Blades. Hope you like :) I have been intending on making him for a while, I just needed to get the parts, and then Brickarms Forum Member Thel' Vadamee created a Predator really inspired me in terms of the hair - I think I have figured out how to do it in a way that is at least close to his :) I will also keep this a secret as Thel originally wanted his kept that way (unless someone like me tried to figure out how he got it looking so good ;) If you are wondering which is his: http://forums.brickarms.com/yaf_postst29853_Predator.aspx Thanks!