
D3K
-
Content Count
1317 -
Joined
-
Last visited
Everything posted by D3K
-
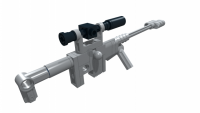
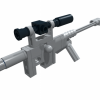 I've been playing around a lot with pneumatics lately, and want to show you one of my recent MOCs. This one has been made over the last week, from a smaller, more yellow prototype. It is fairly small (scaled to the tracks, as they are the size they are), and the width of the body is 15 studs, compared to 8043's 19. Also, it's manual. No compressor or anything. I'll go ahead and show it off in "Excavator mode" first As you can see, the range of movement is quite decent, and it folds up pretty nicely for a transport configuration. The boom is lifted by two of the old style long pneumatic cylinders, and the dipper and bucket are each controlled with one normal cylinder. There is a third pneumatic circuit going to the end of the boom, but it's not in use when it only has a normal excavator bucket mounted. There is also a dozer blade on the chassis, operated by two small pneumatic cylinders. Next I have fitted the material handling claw, and as you can see this is where the extra pneumatic circuit comes in to play. The claw is operated with two small pneumatic cylinders. An added feature present is many material handlers is a lifting operator's cab. This has been implemented with a normal pneumatic cylinder. Next up is a picture of the top of the superstructure, with the pneumatic lines and some detail of the cab lifting function Now, if you've made it this far. you might wonder where the pneumatic pump is ? As I said, the model is afterall manual Well, it is actually mounted horizontally inside the superstructure. The 2L black pin connector (on the right hand side of the grey "air filter") in the above picture is connected to it, and by pushing it forward, you pump air into the system. Here is a picture from an early stage in the build that shows the principle: Also the valves are hidden on various places inside the superstructure. Well, that's it more or less, hope you guys like it. Like I said, this was put together fairly quickly, so there is definitely room for improvement both aestethically and build-wise (the inside is per now a mess of reinforcing and pneumatic tubing with not much system to it Lastly, another picture with one of my other recent pneumatic MOCs (still a WIP): EDIT: All pictures, as well as some others, can be found in a lot higher resolution in this Bricksafe folder I have recently started using my aging DSLR again, so it might be worth a look if you want to see more details
 -
Hi all! I finished this build yesterday, and am quite happy with the resulting model, so I took it out for some pictures today. Unfortunately the batteries in the model died out before I had a chance to film it, so I'll have to do that tomorrow (feel like I need to prove that all the functions actually do work on this one ) So here it is, the Tow Truck Mk II, a combination of a European truck with a typically American "rotator crane"(??) on the back (a Eurotator?) First some information regarding this MOC (of course, you don't have to read it ) As many of you might know, I built a pneumatic tow truck/recovery truck roughly two years ago, and a lot of you even seemed to like that model! When I finished that model, I wanted to make an RC PF version with the same functions and body, and I also wanted to make one powered by just one motor, with function switching gearboxes as the ones you see in most of the official non-RC PF sets released by TLG. Well, it only took about to years to get around to actually doing it! Due to the fundamentally different techniques building with pneumatics vs mechanical functions, some compromises had to be made, and some features could even be added! Firstly, this model has no suspension. The back of the model is pretty densely packed with axles and gears and functions, so fitting live axle suspension while maintaining a somewhat acceptable overall rigidity in the model was deemed impossible (for me) very early on. Also, du to the various functions going to the front, suspension there was not worth it either. Secondly, the swing-out outriggers of the original model from 2013 needed to be unnecessarily complicated, bulky, and not very strong, so I opted for an alternative solution. However, I did manage to make the fourth axle steered, something the 2013 model did not feature As you can see, it uses the genreal colour scheme and a lot of the stickered pieces from 8109. The model was initially all yellow, like the last one, but I wanted to spice things up a little, and am very happy with the resulting colours Okay, enough babbling, here are a couple of more pictures: In the above picture, everything is deployed/opened. The motorized functions are: 1. Tiltable cabin (small LA) 2. Front stabilizers/outriggers (small LAs) 3. Front winch 4. Middle outriggers (worm drives, self locking geometry) 5. Rear stabilizers/outriggers (small LAs) 6. Wheel lift elevation (small LAs) 7. Wheel lift extending (large LA) 8. Wheel lift tilting (small LA) 9. Crane rotation (worm drive) 10. Crane lifting (large LA) 11. Crane boom extending (worm drive/z8 gear/gear racks) 12. Crane winch Other features are: -Openable doors -Working V8 engine -Openable side- and rear panels (to access battery box, as well as some chains and attachments for the towing fork) -Proportional steering with Ackermann geometry on axles 1, 2 and 3. The crane superstructure has two gearboxes for the three functions up there. That means there is a constantly running single axle going through the turntable, and the cranes functions are selected up top. This allows for infinite rotation, with none of the cranes' functions being affected. Yeah, I know that bull barmight be ever so slightly overkill, but IMO it's not too bad It can even lift things directly in front of it Lastly, the underside shot: Also, for those who haven't seen them yet, here are a couple of quick renders showing the internals of the model: And with colour coding for the various functions All pictures and renders can be found in higher resolution in the appropriate Bricksafe folder. Overall I'm quite happy with the resulting model, but even though all functions work, at least one of them is not ideal (cabin tilt; I'm looking at you). Also, I feel the crane superstructure could be made more elegant. Anyway, hope to be able to make the video tomorrow! Comments, thoughts and criticism is as always appreciated!
-
[MOC] 6x4 PF Dump Truck
D3K posted a topic in LEGO Technic, Mindstorms, Model Team and Scale Modeling
I present my latest MOC, a 6x4 Dump Truck: Click pictures for highres, or visit the BrickSafe folder if you want to It is based off of the chassis I made for my 8x4 Recovery Truck last year, but obviously has lost an axle, and been adopted for remote control with Power Functions. It features: -Drive with two XL-motors -Steering with Servo-motor -Independent suspension on front axle -Live axle suspension on rear axles -Dumpable bed with one M-motor and two LAs -Openable cabin -Openable doors -V6 engine driven from both rear axles, via a lockavle central differential -PF LEDs up front -PF LED reversing lights I found a sloution to steer the rear axle, using a turntable and a linkage to the servo motor, combined with pendular suspension, but it had too much slack, and wobbled all over the place, so I ditched it. I also made a mechanism to lift and lock the rearmost axle, but that to turned out less than satisfactory, so I ditched that as well Pictures! There you can see the red lever above the XL-motor, that engages the central diff The bed is quite spacious I was unsure if the M-motor would be sufficient to tip the bed, but it turned out very well, and it has no problem, even with some load! Close up of the tipping LAs. The driving rinf you can see above the rearmost axle is from the locking mechanism I tried to make, that didn't work. I then forgot to take it out Here the cabin is tilted forward. The battery box is held in a solid structure behind the cabin, as you can see. The servo for steering is placed vertically just below the battery box. Close-up of the V6 engine, including "twin turbochargers" The side panels taken off the battery box compartment, shows the wiring and placement of the servo At the front of the bed, we have a spare wheel, and some tools ...for when you need to change a tyre (obviously) The rear axles with left wheels removed for better view. You can also see where the tipping LAs are attached And of course, the under belly shot An LDD representation of the drive line. Green is where the power from the two XLs come from, purple is the axle to the engine, cyan and orange are axles 2 and 3 respectively. All in all I am pretty pleased with the result, as I've been wanting to build this for a long time! Hope to make a video of it in the not too distant future! I will also perfect the LDD model, make it available for those who want it, and post it on rebrickable. I might even make instructions for it, if I fin the time, and can get LDraw to work again -
[MOC] Swingloader Mark Two
D3K posted a topic in LEGO Technic, Mindstorms, Model Team and Scale Modeling
After I built my first big MOC construction vehicle, this attempt at a different kind of loader, some nine months ago (boy, time sure flies), I've been wanting to redesign it, implementing techniques and mechanisms I have learned since then, to make a better functioning, better looking, more professional build, without cutting so many corners as I did the last time. So without further ado, I present to you THE SWINGLOADER (mk II) Firstly, I had a pretty good idea in my head of how to make the setup with the PF motors, and stack the four functions I wanted on top of each other in as small a space as possible. This is the first try, which turned out okay, but neede some minor redesign during the course of the project: In the final version the top two motors are PF-L motors, that operate the lifting an tipping of the bucket (axles 2 and 3 from the top). The two lower motors are PF-M. One controls the two small LA's for turning the machine, and the other controls the turning of the digger (uppermost axle) The lowermost axle is of course the drive axle, driven by a PF-XL motor (not in this picture) Anyway, here is a couple of detailed model images and explanations: The first two shows pretty much every axle, gear, actuator and motor in the model (yes, the two top motors are IRL PF-L motors) This is the final setup I used, and as far as I can tell, is completely accurate to the final model. Here follows some pics of the individual functions First, the drivetrain and steering: The portal axle reduction gives it a nice and slow speed, but it can be increased both there, and from the motor and down to the axle. The twin small LA's gives it a nice and accurate steering (thanks again, jorgeopesi ), although I would have liked it a bit faster Also, I managed to implement a simple mechanism for a functional sttering wheel : It turns ~90 degrees to either side as the loader articulates Next up is a representation of all the three functions that go to the front: Swinging: Lifting: Tipping: And after all that was figured out, I just needed to build a shell around the thing and but on some wheels! So here it is as it stands today: TA-DAAAA: As you can see, I opted for a much smaller type loader, more akin to the ones you see on construction sites in the city and stuff, and maybe closer to the real SwingLoader brand of swinging loaders It might from the above picture seem like there is a lot of free space from the front of the loader to the bucket.. ...but this is why it has to be like that: This time around, finding a working linkage geometry didn't take nearly as long as last time (even though the entire digger is built from scratch). As you can see on the next picture, it really does tip nicely when on top The battery compartment opens like this, for easy battery replacement: And the doors open up like this, to reveal a IR-receiver/uncomfortable seat for the driver. Second to last, here is the mandatory under belly shot, nothing to fancy about it ...except for the fact that I now see I forgot to put in two 3L friction pins to attach the two yellow 3x5 L-shaped liftarms And maybe the setup for of the rear pendular suspension! I almost forgot about that Making it with two small turntables makes it extremely strong, both when it comes to supporting weight, and stress in the longitudinal direction! This is actually a key factor to the rigidity of the entire rear of the loader! :thumbup: And lastly (well almost, anyway), the tiny tiny tiny detail that makes me loose my sleep: The transmission of power to the lower axle here, as you can see, happens via a part that doesn't exist. That is the 24 tooth end of a 4L differential, that I had to sever from the rest of its body, to keep the lowermost gear from coming ever so slightly in contact with the small LA's when the loader is turning to either extreme. The setup works almost as smoothly with these replaced by 16 tooth gears, but just not quite... So to sum it all up: -Driven 4WD by PF-XL motor -Steered by PF-M motor, via two small LA's -Turning of the digger by PF-M motor, worm gear on turntable -Lifting by PF-L motor, via two LA's -Tipping by PF-L motor, via one LA -Sixth channel open for powered accessories (you can see the output in the last image) -Easy access battery box through openable engine cover -Strong pendular suspension on the rear axle -Four PF-LED lights -Openable doors to the operator's cabin -Adjustable mirrors -Unfortunately no PF-seatbelts for the driver this time All in all I am very pleased with the result, and will try to make a video as soon as possible to show off the functions! And as a final feature, I built a crane attachment, similar to the ones I've seen in pictures like this: Here it is, folded as compactly as possible: And here it is fully extended: As you can maybe spot from the above image, the crane and loader is ready to accept a powered winch somewhere, but I haven't gotten around to designing one that is easy on the eye. This is the reason I put the output from the sixth channel in the cabin, for future additions. And here it is lifting a sort of I-beam: Pheew There you have it! I think I covered most of it, but feel free to post questions, critisism, praise and suggestions on improvements! As I mentioned, I will do my best to make a video of it in action! Thanks! -
I got some rubber tracks from BrickLink here the other day, and to my pleasant surprise they fitted nicely over the Wheel 30.4mm D. x 20mm ! As I am waiting for the last parts for my Container Stacker MOC, I thought I'd make something else in the meantime, and decided to try to make something like a smaller edition of the 8043 B-model tracked loader, using these new rubber tracks. Although it is somewhat similar to the aforementioned 8043 B-model, it is built from the bottom up using just my imagination, in the course of a couple of days. (My girlfriend is celebrating easter abroad with her family, so I have plenty of time to be creative ) This is the first time I've used studded construction in a MOC since I came out of my dark ages (Albeit just in the lower chassis), and a lot of memories came back to me from doing that! Anyway; this is the result: The yellow bucket is from my old 8862 Backhoe from way back in the day. Both the driving and the other functions are quite quick, and a lot of fun to play with. It uses PF-M motors for all four functions, and PF LED lights for playing at night when the power is out, The construction is very sturdy, if you for instance push down on the bucket, the mini LA wil start to slip before the rest will start to wobble or bend noticably. The back end comes off easily, and hides a lot of the wiring. The battery box can be removed after pulling out two Axle 4 with stop from below. I "cheated" a little with the digger apparatus, by making the entire arm a sort of four bar linkage (or whatever it's called), so the geometry (and thereby the bucket) stays the same for the entire travel of the LAs. This is probably not very true to real life, but it is a lot easier to create. When I made my Swingloader, I think 50 % of the time I used building that thing, was figuring out a good linkage for the tipping function. As you can see, the tipping works really well. A view from the bottom. You can see the axles for removing the battery box, as well as the gear train. Different speeds can be achieved by using different gear ratios. I spent a couple of hours yesterday to build the entire model in LDD, and it turned out 99,9% accurate, I used "illegal" building techniques on two occasions. One you can see in the above two pictures (attachment of the rear mudguards. The other is where the IR Receivers are attached (I had to use one of these in LDD, instead of one ot these , which is used in the real life model. If anyoneone wants to build this, just shoot me a PM with your e-mail, and I will send you the .lxf file. The model has just over 600 pieces. And here is a video of it in action:
-
[MOC] Recovery Vehicle/Tow Truck Mk II
D3K replied to D3K's topic in LEGO Technic, Mindstorms, Model Team and Scale Modeling
Hi guys! I am glad to see there is still some interest, and again, I am sorry to say I can't be sure when the digital file will be finished.. I still have the truck built, but dismantled into larger components as part of the plan to finish it, but like I said in the other topic, time and technical problems has put the project on a halt. As for which sets you'll need, I really can't point the finger at any one set. As a matter of fact, I'm not even sure the 8109 is really needed, apart from some of the stickers and the two panel pieces used on the cab roof. You'll obviously need a LOT of gears, as well as ten wheels/tyres and a bunch of red and yellow parts. That is, of course, if one wants to build it in those colours. I didn't concider which sets I was using when building it, as I simply took the needed parts from my stockpile. If I had to say one set, I'd say 42009 would get you a long way. Once the LDraw file is complete, I'll make a BOM, and it'll be a lot easier to see what is needed -
As I've stated in other topics earlier, I recenty got back into Technic, and I'm finally starting to get enough pieces to make my own creations! I thought I'd make a thread where I can show off my stuff (hope that's okay), and hpefully get some feedback, critisism and tips on improvements from the EuroBricks Technic community. As I'm just starting to get used to the whole studless construction techniques, I hope you're not expecting miracles just yet, but hopefully we'll get there in due time! (btw love the lego emoticons!) So here it is; my very first MOC! (Still a very much work in progress) I'm not quite sure what kind of vehicle this would classify as, it's not a hot rod, and it's not a buggy, and definately not a tractor, but something inbetween! The features I've managed to implement are: -RC drive via two PF-M motors linked together via differential -RC steering via one PF-M motor (with working steering wheel) -Inpendent double wishbone front suspension -Pendular suspension + shock absorber on the rear axle -Opening hood View of the steering. Found out I'd add the steering wheel after I had already installed the battery box, so I had to do a somewhat intricate bypass solution there It works allright though! No self centering though.. yet! A view of the rear suspension setup, as well as axle. I only have one differential yet (actually got it by accident when I bought the 8043 secondhand), but more are on the way! I know the entire rear of the car/buggy/tractor/hotrod looks very empty, but as I said; a work in progress! View of the front suspension and temporary grille. The shocks here defiantely have to be of the harder type. On the way! The entire front can come off pretty easily to make modifications. Bottom view of the drivetrain, as well as the vertical placement of the motor for the steering. Overall I'm happy with the result so far! Things are working, and the structure seems solid enough! I just spent a couple hundred Euros on bricklink ordering new pieces, among them new differentials, harder shocks, bigger wishbones and wheel hubs for the front, an XL-motor ++ lots of other things that'll come in handy in the future! So what do you think?
-
Hi! I'll keep that in mind for when the file is eventually finished! Thanks! Yeah, the model was finished in physical form, and worked as intended: The topic can be found here
-
Hi guys! It's been a long time since my last post, and even longer since I actually built something new! I still frequent the forums to keep up-to-date on what the guys and gals here are up to, but I can't say I've contributed much this year... I have been busy with work and new hobbies (Enduro biking, mostly), and haven't really felt the urge to build - which kind of annoys me! I want to make something! I also want to finish the CAD file/instructions for the Tow Truck, but I sat down on my computer, destroying its screen... bummer I do still have it assembled, solely as an inspiration to finish the CAD file, but so far it hasn't panned out unfortunately.. I'm sorry I can't give you an estimate at this point as to when/if the instructions will be completed...
-
[TC9] Motor Grader/Dump Truck
D3K posted a topic in LEGO Technic, Mindstorms, Model Team and Scale Modeling
Got this idea in my head when we first started discussing an A+B model contest, and once the information topic was up and clarified the rules, I got to work and threw this together. It's kind of hard to sort of anticipate what kind of parts are going to be needed for the B-model. Some things are obvious (like the pneumatics, wheels and some panels to make the dump bed), but others less so. My plan is to firstly finish this first model, and check that it's within the size regulations. Then redesign it to comly with the rules (as I'm sure I won't get it right the first time). Then I will make a digital model of it to remember what it looks like, and digitally modify it where needed when I create the B-model. If I at that point see the B-model absolutely needs some parts not found in the initial A-model, then I'll use the digital model to try and implement them in the A-model. Finally, I will rebuild the A-model with whatever changes are needed, and that will be the actual A-mode entry! The reason for choosing the grader as the A-model, is simply it has more functions than the dumper B-model. Anyway, enough talk, I do actually have a couple of pictures of the early stages of the A-model (as it stands today): The working functions so far are: -Front axle steering via rack and pinion -Front axle pendular suspension -Blade lift/lower independent left/right with long pneumatic cylinders -Blade shift left/right with long thin pneumatic cylinder -Pivot point can be steered left to right the same angle as front axle to allow offset grading position Depending on how big it turns out, I might implement a front blade and/or a rear ripper. I doubt I'll have room to fit a fake engine in the rear, but we'll see Hope you like the idea! This is of course in the very early stages of the build, so expect a lot of changes -
Coastguard Mini Helicopter
D3K replied to steph77's topic in LEGO Technic, Mindstorms, Model Team and Scale Modeling
Very nice indeed! -
Yet Another Wheel Loader
D3K replied to Alasdair Ryan's topic in LEGO Technic, Mindstorms, Model Team and Scale Modeling
Looking forward to the (promised) review, as I haven't bothered building it myself And great to see you finally have a decent camera at hand! -
Technic 2016 Discussion and Speculation
D3K replied to Ondra's topic in LEGO Technic, Mindstorms, Model Team and Scale Modeling
Please point me toward the source of this information. Buckets that wide seem rather strange for such a machine...? -
Technic 2016 Discussion and Speculation
D3K replied to Ondra's topic in LEGO Technic, Mindstorms, Model Team and Scale Modeling
Seeing as nothing (at least as far as I can remember reading/seeing) regarding 2H sets have been 100% confirmed. As far as I know, we only have the set numbers and names due to someone trying/looking up different combinations in the lego.com products pages. If the three/four sets are indeed the Volvo excavator. a Claas tractor, a bucket wheel excavator and an "ultimate IP" car, here is just my completely objective and somewhat logical conclusion to what we might see when the sets are revealed: Claas tractor: Flagship set, possibly womehat similar to the Unimog in size, functions and building style. Obviously as a tractor, so probably no live axle suspension etc. It could be RC, but that could pose a problem for more complicated attachments if they do make it of a modular "make-your-own-attachments" setup similar to the Unimog. Volvo Excavator: Mid size set, utilizing four of the new 2x11 pneumatic cylinders. Given the scale of these cylinders, they would fit a semi-large excavator (8043 size) pretty much perfectly, and I suspect their mere introduction last year, along with the V2 pneumatics, means they'll be heavily used in a (licenced) set this year. Remember, 8043 only had a little over 1100 parts, but was expensive due to the PF components. I think (hope) this will be a decently sized wheeled excavator, with manual pneumatics, maybe with the possibility to add a motorized compressor. Price point could in this case easily be in the $100-120 range. Bucket Wheel Excavator: If anything, I think this will be the smaller of the sets, in the $50-60 range. Either that, or it will indeed be a huge set, but I don't think they'd make a huge set of a so specialized and unknown type of vehicle. IP Car: If this will indeed turn out to be a $300 UCS Technic set, I would be very glad indeed! Given of course that it introduces true to life solutions for gearboxes, and preferably some really advanced building techniques. If it is a licensed set as some seem to think, speculating in the actual brand is pretty senseless before we have some actual information pointing towards one or another. I know the BMW i8 was featured briefly in that one commercial, but I sincerely hope that is not the case As for RC: I highly doubt it, unless they make acompletely new RC drivetrain system with stronger, redesigned axles and joints to go with stronger motors. I know the norm from the last couple of years' flagships have been RC model one year, and non-RC model the next. But nowhere is it written in stone (at least to my knowledge.. maybe in TLG headquarters in Billund?) that this is an absolute rule. Same logic applies to the sets' numbers. Again; this is just my thoughts/speculation on 2H, given the information we have (or lack thereof). Can't wait till we see actuual pictures! -
Opinion on Status of SBrick
D3K replied to knotian's topic in LEGO Technic, Mindstorms, Model Team and Scale Modeling
Well put! -
Technic Pub
D3K replied to jantjeuh's topic in LEGO Technic, Mindstorms, Model Team and Scale Modeling
Happy holidays people! Hope you all have a good time, and that some of you hopefully have more snow than we do here (record high temperatures for this time of year, and obscene amount of rain)! -
Opinion on Status of SBrick
D3K replied to knotian's topic in LEGO Technic, Mindstorms, Model Team and Scale Modeling
Legally and "purely" it's the same as any other 3rd party parts, whether it be other brands like MegaBlocks, RC tires, etc etc, however, SBricks seem to be more widely accepted by the community than say, using MegaBlock parts. Them being allowed to use in several of the recent EB Technic Contests, while other third party stuff is not allowed, is kind of "unfair," but obviously I can see the logic behind it, as Vengit has been providing prizes for said contests. -
General Part Discussion
D3K replied to Polo-Freak's topic in LEGO Technic, Mindstorms, Model Team and Scale Modeling
That does indeed fit reasonably well, but there are those huge balls though. A brick built solution with almost the same form factor and connection options is fairly easy to build: -
Technic 2016 Discussion and Speculation
D3K replied to Ondra's topic in LEGO Technic, Mindstorms, Model Team and Scale Modeling
On what, exactly, are you basing this conclusion/assumption? -
Technic 2016 Discussion and Speculation
D3K replied to Ondra's topic in LEGO Technic, Mindstorms, Model Team and Scale Modeling
Haha, I can only imagine the outrage if the preliminary picture of the fire truck showed red #3 connectors :-D -
I just noticed this too! Was going to buy some of the new Technic pieces (btw, all new parts from 42043 seemed to be available, except the pneumatics) a couple of days ago, but B&P started acting up (as it often seems to do), and when I was going to try again today, it was simply gone! I really hope they haven't abandoned this service!
-
2016 Technic Reviews
D3K replied to Jim's topic in LEGO Technic, Mindstorms, Model Team and Scale Modeling
Hey Jim! Just one quick question: Is it correct that the only set featuring the new 3L axle with stop is the Drag Racer? I know it's only pointed out in that review, just want to make sure if that is indeed the case Thought this was a pretty unnecessary part to introduce, and what do you know; I've already come across a situation where it is needed! Also; is there only one of them included in the set? Thanks -
MINDSTORMS TANK : Holds up to 80KG
D3K replied to Burf2000's topic in LEGO Technic, Mindstorms, Model Team and Scale Modeling
WHen I read the name of the topic, I immediately knew it was a Burf2000 creation Really impressive, looks a bit more smooth than the wheelchair -
[HELP] MB Actros 4150K
D3K replied to Dafgek81's topic in LEGO Technic, Mindstorms, Model Team and Scale Modeling
Heyy,look at that! It's definitely starting to shape up! Like I said to you; I really hope this model lives up to you expectations, as you seem to have invested a lot of time and money in research and parts! I have examined the LDraw model earlier, and it's definitely not a straightforward build if that is all you're going from! Do the functions so far work as expected? -
[HELP] MB Actros 4150K
D3K replied to Dafgek81's topic in LEGO Technic, Mindstorms, Model Team and Scale Modeling
Get this error message when I click: The page you requested cannot be displayed right now. It may be temporarily unavailable, the link you clicked on may be broken or expired, or you may not have permission to view this page.