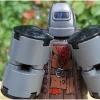
Jareth Posted May 3, 2012 Hey there, I finally decided to shed a little more purist attitude and try and carve some legos. I decided to make Vambraces (forearm armor) from Lego Bamboo Pieces. (Vamboo? Bambraces?) Anyway, the results are pretty good, So I thought I'd share how I made them. First you'll need these pieces http://www.bricklink.com/catalogItem.asp?P=30176 These pieces are made of a softer than normal plastic that makes it ideal for carving. You will also need... Exacto Knife with new blade Cutting Surface (I used a padded envelope from bricklink) Small Pot Metal Strainer Cooking Thermometer Water Bulldog Clip Minifig Painter's masking tape Band aids Antibiotic ointment First thing is to cut the top of the piece so it is level with the upper leaf. Then the bottom so it is level with the Bottom Leaf. Now carve a U Shape out of the bottom of the piece away from the leaves. After this step you will probably need to use the ointment and band aids. Next time I do this, I will use the bandaid first to protect my thumb before cutting it. Carving slowly will reduce the chance of injury. Now, testfit the vambraces by removing the minifig hand and slipping the vambrace over the arm and putting the hand back in. You may need to carve more, especially if you want the arms to move. Ok, Now take the vambraces off again. Put the water in the pot, and the strainer and thermometer in the top of the pot. There should be enough water so the piece can be submerged in the strainer. Like this, but don't put the legos in yet. Boil the water and wait for it to cool down about 20 degrees. Now put the vambrace in the bulldog clip and submerge the vambrace. (The Magnet Minifig is there for another reason) Wait about 5 minutes and take it out and immediatelly bend the leaves back and hold them. I could not get a picture of this step due to the use of both hands and the speed that I Needed to work. Now Tape the leaves together with the piece of the Painter's Tape. Wait about 24 hours and unwrap them. They should look like this. Now they can be placed back on your minifig of choice. I bet they would look good with the pumpkin head or on a Poison Ivy fig. Plant people Rule! Share this post Link to post Share on other sites
Darkdragon Posted May 3, 2012 Interesting idea here. I think it looks neat, I especially like the way you remolded the leaves into the upright position - great idea there. You don't really need to boil the water and then cool it, you can just turn up the head a little at a time to get it to the temp you want (170f/75c) which is what I do for magnets all the time. Anyway, a bit of an idea from me : you could carefully carve a little more off the plant base to contour it and make it look smoother and less bulky. It would take time, but do it a little shave at a time to get a nice clean look and I think you'll be even happier with your result. Share this post Link to post Share on other sites