Sign in to follow this  
SNIPE

Ultra strong new Lego building method

Recommended Posts

Hi,

Over the past Three days I have been working on an idea I had about 8 months ago,

It is a way to build large Lego supports that can withstand extremely high weight loads, I came up with the idea after seeing a television program on a TV presenter and his team who built a 1:1 scale two story, detached house entirely out of Lego, in the video there was experiments on trying to get a girder or whatever you might call it. to support the weight of the person behind the project (AKA: the presenter), they did some interesting stuff but they were just not substantial enough. so, instead they used a wooden frame to support the building for either side wobble from the wind and weight, or to lay the bricks on , or both (not 100% positive).

At that moment of seeing it I started thinking and began experimenting myself (only with less bricks than the projects you see here) and realized that advanced building does not have to be standard building, so a few months later I started building a prototype model for an even bigger house than the one on that I saw on TV, it will be a two story with a loft, it will be about the same length and width as the one on the TV, but a different height and of course, weight.

I would build the necessary key parts then see if anybody such as The Lego Group are interested (parts such as the wall bricks, the corner bricks, the floor bricks the roof bricks and he roof slope bricks). Maybe they will do something like this or the same as this in LegoLand or something ~

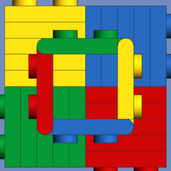
so I finally sorted my bricks out and built the red and yellow prototype (Prototype 1.0). it was good because I could stand on it and it did not break, when I did this I thought it was amazing until...

I came up with the thought that actually, that brick was an odd shape and I then built a second model that was roughly the same dimensions but used a different building method again, this one did not creak as much when I stood on it or placed amplifiers and/or drawer cabinets on top of it (this model is Prototype 1.2).

For a reason I don't recall (I probably thought it was the right way) I put Prototype 1.0 and Prototype 1.2 together to create an 'L' shape (Prototype 1,7, AKA: the first model of the corner brick for the walls), however, it was on the wrong axis because Prototype 1.2 increased the height when it should have been on the 'length' axis and came out that way, since I was not really used to building like that it took a little thought and many calculations to get it right but I finally came up with the final prototype of the first class of prototypes (the second class is in the screen dumps as 'Prototype 2.0' but it is a digital model), (since I do not have the right bricks or necessary amount of them yet).

It is like the recent model in real life but it is the right color and has been strengthened by an advanced inner structure (I cannot guarantee if it will make a difference yet because it has not been tested but I have a good feeling it will make it stronger)

The part of the model I worked on most was the part of the corner block that attaches to the side wall (this means you will see the studs or clutches because of the orientation of the 3D model).

In the real life model the side part is slightly less strong (it creaks more when it is being tested) so that's what I am working on at the minute.

Note that the blue brick (Prototype 1.2 is also part of the corner brick and it will simply attach onto the corner brick as the 'straight brick of the front and back wall', that is because it is the same height and width as the relative part of the corner brick.

When I tested these, I put them through two tests, putting one foot on them then putting two feet on them, standing up both times, and the other test was, placing an amplifier, a drawer-cabinet and then both on-top of each prototype model, they both worked well prototype 1,0 and 1.2 but due to progress, the blue wall brick (Prototype 1.2) and the corner brick (Prototype 1.7) seem to be best, Also the side part of the corner brick seemed to be working fine with the support I added (although it was not completely finished as I do not have enough bricks to complete the support struts).

So here are the images (screen shots) and videos,

Hope you enjoy them.

http://img717.images...46/file7462.mp4

http://img842.images...7/file7462k.mp4

http://img17.imagesh...46/file7462.mp4

http://img4.imagesha...4/file7462b.mp4

http://img585.images...46/file7462.mp4

Here is all three models , one has the internal foundations highlighted in purple for the major bits, the lesser structural parts in white , the increments of the white and purple struts are in red and the canter plates are in green.

The other is the correct color of black compared to the real color of the specified bricks , the other looks more realistic to the black bricks in real life (that's the dark black model)

screenshot20110828at004.png

screenshot20110828at004.png

screenshot20110828at004.png

screenshot20110828at004.png

screenshot20110828at004.png

Here is the internal Foundation:

screenshot20110828at004.png

screenshot20110828at004.png

screenshot20110828at004.png

screenshot20110828at004.png

screenshot20110828at004.png

screenshot20110828at004.png

screenshot20110828at004.png

screenshot20110828at004.png

screenshot20110828at004.png

Here is the Shell on it's own:

screenshot20110828at004.png

screenshot20110828at005.png

screenshot20110828at005.png

screenshot20110828at005.png

screenshot20110828at005.png

screenshot20110828at005.png

screenshot20110828at005.png

screenshot20110828at005.png

screenshot20110828at005.png

screenshot20110828at005.png

P.S , the width of a block (8 bricks laid out in alternate form in columns (not rows) of three (like a normal brick wall), actually makes it stronger, much like adding another layer of bricks on top of a 3 layer brick wall (built in the standard way of course).

So adding another layer of bricks vertically is just the same, the load makes it stronger, like if you stand on a normal lego wall, it pushes the bricks together more.

It would also be cool to hear your ideas on what you would like to build using this modelling/building system.

For further explanations, here is a LDD snapshot of two trees (they can be two kinds of trees if think of it that way) in two different building designs

11he460.png.Note that these two trees are not meant to be identical or not meant to be 'better' by how they look (they are rough models just there to show how this way of building models is put into practise).

Edited by SNIPE

Share this post


Link to post
Share on other sites

Hi,

Over the past Three days I have been working on an idea I had about 8 months ago,

Interesting idea. Would you mind sharing the LXF-file. It would make it easier to look into your technique.

Share this post


Link to post
Share on other sites

Hi,

Here are the LDD files:

http://www.brickshel...orner_block.lxf

http://www.brickshel...orner_block.lxf

http://www.brickshel.../only_shell.lxf

The L plates strips that are in stacks of 3 should actually be a these:

702.gif?0

Also when I tried to put two 8x16 plates inside of the gap in Prototype 1.0 they made it weaker somewhat, maybe that's a different story with the new models, I also think that larger bricks could be stronger, maybe 2x6 or bigger instead of 2x4

more info on the construction method and the corner brick is at:

PDF Document Here

so the actual brick count of the model is:

originally all three models come to 1791 bits, that is 597 bricks per model but the models (as explained above) have less than that in real life (only one model is used in real life and its color is 'black') so it is 359

Here s how those bricks are allocated:

in the real model the pink ,white and black L bricks come to 116 bricks (76 pink L bricks, 38 white L brick, and 2 black L bricks)

(in the LDD model that's 228 pink L strips in the LDD model, 114 white L strips, and 6 black L strips

the outer shell comes to 192 bricks

the red bricks come to 46

the green bricks come to 4 bricks

the pink brick comes to 1 brick

Edited by SNIPE

Share this post


Link to post
Share on other sites

The problem with building sideways like that is that there is no real interlocking to prevent the bricks from simply separating when a large force is placed on it vertically. Imagine what would happen if you attached a very heavy weight to the end of that L-piece (the left hand side in your first image) without anything to support it underneath.

Building stronger beams solely out of basic bricks/plates really requires you to stagger them in such a way the the pieces interlock in 3 dimensions, whilst avoiding doing so in a uniform way that would allow a shearing force to separate the pieces.

Hi,

Well,

With girders, they commonly do not have loads either side pulling it, they have a under-load where something is under it and a load on-top of it.(my building does not have side loads pulling on it)

The sides eventually will slope down, this is because it is less likely to come undone ,try making a wall of bricks using the standard method and leave one brick in the middle sticking out then try and pull it out, it is harder than say if it was on the top row of the wall.

This is the same principal as the sides but they are in columns (vertically) (if this is a real building it is in between two other non lego objects anyhow, they should not be attached , they should just be there because it was imagined that way (AKA being open to the public and being in a row of other buildings)

When you get past the slopes on the sides there is another stright wall that is covering that up so it looks like the normal wall of a building.

I cannot guarantee anything because theory is not enough.

PS: the corner brick is not the L plates, those are internal

You would have several L plates stacked up to create the edge of a large wall and the ends of the corner bricks hold the straight bricks

The screen dumps have the L brick oriented as how it would be in the building, it is not on its side, it is built that way.

When a heavy load is applied on it , (the corner bricks are actually the strongest points of the assembly) i think it will be fine because of the hundreds of layers of alternating bricks (straight and corner bricks are stacked and they imterlock with each other ( in the snapshots there is only one interlocking point to attach a straight brick(look at the bits sticking out of one end))).

Hope that helped and fixed any doubt of a error.

Speaking of errors , there is a build error in the LXF model (nof the one of the

substander itself, the whole assembly and the outer structure (shell).

That is fixed and will be uploaded soon.

Edited by SNIPE

Share this post


Link to post
Share on other sites

Hi,

Today I built two straight bricks on top of each other (not offset because i did not have enough bricks to have two on one row then on placed alternately in the middle of a new row on top of those)

I only JUST had enough bricks to complete it, the hardest part was getting the struts (walls of the brick) to join together using only 2z4 and a few 2x6 bricks (the L brick design is not going to be possible due to a short amount of those bricks online)

So I made a new way of being able to have one brick go one direction and have the other one going the opposite (like an L shape but with two bricks) whilst making sure there is no bricks that stack on top of each other in series (aka not alternately) because that is the strongest way to build a wall.

In the video I point to the parts where the corner bricks would attach to , the corner bricks will also not have L plates and use the same brick to brick locking, I might take out the 2x6 and black 2x2 bricks and use 2x8 bricks when I get more bricks).

Here is the strength test video , shame I don't have anything heavier to test with it.

when I get enough bricks I would hope to make an entire layer (aka four walls that are two layers (two of these bricks) high, including the four corner bricks, it would be approximately 1 meters long, 1.5 meters wide and two bricks high).

http://img190.images...3/file28397.mp4

The modified LXF files should be uploaded soon. (one for the straight and one for the corner brick)

Edited by SNIPE

Share this post


Link to post
Share on other sites

Hi,

After much work and brain frying I got it finished,

Here is the finished model in LDD of the corer brick and the front/rear wall brick and the side left/right wall brick aligned correctly but not put together (should be three 'bricks' in the LDD file all together.)

Note that the corner brick has both those straight brick type elements already attached because it makes up the correct length for each end of the wall and does not require a half width straight brick or a brick moved to be latitudinal to start the opposing wall of the corner.)

Here is the .LXF file

http://www.brickshel...front_brick.lxf

And here is a screen shot:

24xgits.png

Note that these colors are only for marking areas of the build, and this is not the roof of floor corner/straight bricks because they have the blue 2x8 bricks attached so you can put another layer on-top of it.

The color it will hopefully be (all of this assembly) will be 'black'

Edited by SNIPE

Share this post


Link to post
Share on other sites

Create an account or sign in to comment

You need to be a member in order to leave a comment

Create an account

Sign up for a new account in our community. It's easy!

Register a new account

Sign in

Already have an account? Sign in here.

Sign In Now
Sign in to follow this  

  • Recently Browsing   0 members

    No registered users viewing this page.