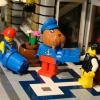
Siegfried Posted January 18, 2010 To remove keyring, grasp firmly and pull! You expected more? OK... First off, I've used this for over a year after TLG sent me a free one as part of my LEGO Club magazine. I got another free one as part of a spend over xxx amount offer so he's surplus! The key ( ) thing that I wanted to share is he's not glued. I thought he was from the start so the first thing I did was try to crack the "seal" as I was concerned that I'd break the head if it was fixed from the inside. But this achieved nothing but damaging the poor fellow as I found that the mouth did lift a bit, just enough to show me that he's moulded different to the regular figs. As you can see in the photo they've added an extra tube inside so they can use the normal pin and that's how they kept the mouth closed. The hole in the head is without glue as well. So all you need to do is pull/twist it out! So there you are. A "new" Rock Monster minifig ready for.... dunno. He needs some love eh? Anyone know what colour paint Dark Grey is? Share this post Link to post Share on other sites
LuxorV Posted January 18, 2010 Thanks for this tutorial, Siegfried I'll add it to the Index. LuxorV Share this post Link to post Share on other sites
-JD- Posted January 18, 2010 Thanks for this review! I recently got a Captain Rex keychain and did this. However, his helmet is stuck on his head. Is it glue? If so, does anyone know how to remove the glue from inside the helmet so I can use the head? Thanks. Share this post Link to post Share on other sites
The Who Posted January 18, 2010 I recently got a Captain Rex keychain and did this. However, his helmet is stuck on his head. Is it glue? If so, does anyone know how to remove the glue from inside the helmet so I can use the head? Thanks.Yes it's glued, but I don't have any idea how to get rid of the glue. Thanks Siegfried! That was, well, really simple. Any reason the shark is in the first picture? Share this post Link to post Share on other sites
Tom Bricks Posted January 19, 2010 I do this to all my keychains. I have more than a few hats with holes in them now. Share this post Link to post Share on other sites
Siegfried Posted January 19, 2010 Any reason the shark is in the first picture? He's the replacement! If so, does anyone know how to remove the glue from inside the helmet so I can use the head? Not safely. I've de-keyringed minfigs ones in the past, but I've never tried to remove the head from the hat/hair/helmet/hood. (All "H"! ) Share this post Link to post Share on other sites
Svelte Posted January 19, 2010 He's the replacement! Aaah, the cycle of life. It's a shame these are so disposable. As collectibles, I've never really seen the point of keyrings since you can't use the LEGO ones without them getting scuffed quick smart. That said, I have 2 Catwomen ones lying around in a cupboard if you want to 'fix' her Share this post Link to post Share on other sites
Siegfried Posted January 19, 2010 That said, I have 2 Catwomen ones lying around in a cupboard if you want to 'fix' her Errr.... yes! It's a shame these are so disposable. As collectibles, I've never really seen the point of keyrings since you can't use the LEGO ones without them getting scuffed quick smart. I'm not much of a collector, I just use things. Thus it's either a keyring or it becomes a mini-fig. Share this post Link to post Share on other sites
Svelte Posted January 19, 2010 Errr.... yes! You have to give them back Share this post Link to post Share on other sites
Siegfried Posted January 19, 2010 You have to give them back Cat's don't like being "fixed". I bet she'd scratch my eyes out. Share this post Link to post Share on other sites
LuxorV Posted January 19, 2010 Please stay on topic!! LuxorV Share this post Link to post Share on other sites
YG-49 Posted January 22, 2010 So there you are. A "new" Rock Monster minifig ready for.... dunno. He needs some love eh? Anyone know what colour paint Dark Grey is? Oooh! That's a good idea! Make a real Rock Monster instead of these weird elemental things... Share this post Link to post Share on other sites
ILikePi Posted January 22, 2010 Thanks for showing us this procedure! I never knew about the tube for the rock monster; I just thought that there was an even larger than normal screw that extended all the way into the rock monster's feet! I've always hated how the "rock" printing scratches off so easily on the body of the rock monster. Stupid Made in China™ printing! Share this post Link to post Share on other sites
Hound Knight Posted January 22, 2010 Siegfried, I've found Testors' "Flat Gray" to be an *almost* perfect match for LEGO dark bley. So all you need to do is pull/twist it out! Reminds me of the pigeons in Bolt. "Twiiiiist, and pull!" Share this post Link to post Share on other sites
Zorro Posted January 23, 2010 Hmmm...I didn't know it was this easy. Thanks for sharing this intell with us SiegMeister. Now where did I put my keyring-monster...? Share this post Link to post Share on other sites
Siegfried Posted January 23, 2010 Siegfried, I've found Testors' "Flat Gray" to be an *almost* perfect match for LEGO dark bley. Thanks! I'll look for it. Share this post Link to post Share on other sites
speederbike Posted January 23, 2010 I have a question about those keyringfigures. Can you take them apart like normal figures? Or are there parts glued to the boddy? Share this post Link to post Share on other sites
Dennimator Posted January 23, 2010 I have a question about those keyringfigures. Can you take them apart like normal figures? Or are there parts glued to the boddy? All the parts are glued, except for the arms (or droid legs for R2 units). However, that´s no big deal for this one, as the normal fig is one piece, too. Share this post Link to post Share on other sites
speederbike Posted January 23, 2010 All the parts are glued, except for the arms (or droid legs for R2 units). However, that´s no big deal for this one, as the normal fig is one piece, too. Thanks, for the answer. About the parts, I didn't only ment this one but your answer was clear. Share this post Link to post Share on other sites
escortmad79 Posted January 23, 2010 Is it the same process for removing the keyring part on minifig keyrings? Share this post Link to post Share on other sites
Steel Dragon Posted January 23, 2010 Is it the same process for removing the keyring part on minifig keyrings? Minifigure keyrings are usually glued (all of mine are, at least), but the arms, hands and legs (not hips) are all removable. Share this post Link to post Share on other sites
LuxorV Posted January 24, 2010 Is it the same process for removing the keyring part on minifig keyrings? You can find more info by looking at this gallery by SlyOwl P.S.: there also are links on this and various other topics in the Minifig Customisation Index LuxorV Share this post Link to post Share on other sites
robuko Posted August 22, 2010 Has anyone successfully de-ringed Ahsoka? The headgear seems to be qute soft plastic, I am hesitant to use the candle flame technique in case it melts too quickly. The shape of the headgear makes it a bit tough to snap off the ring smoothly. Thanks Robuko Share this post Link to post Share on other sites
Lord_Bloodwort Posted September 21, 2010 Has anyone successfully de-ringed Ahsoka? The headgear seems to be qute soft plastic, I am hesitant to use the candle flame technique in case it melts too quickly. The shape of the headgear makes it a bit tough to snap off the ring smoothly. Thanks Robuko I don't have pics, but i've yanked the pin in my ahsoka, and she turned out all right. The horns are glued on though. I mangled the fin on Rex's helmet as well. If you take a thin bladed knife, you can sometimes cut the glue seal holding the hips on. You just have to be extremely careful. I wound up cutting ol Rex in half. Fortunately, a quick head and arm swap onto a regular clone figure (and some superglue on the bisected clone) and they're both good as new! Just can't get Rex's helmet off. The rest of my keyring minifigs have just had the rings snapped off, 2 Royal Guards, Chewie, Boba Fett and R2. Share this post Link to post Share on other sites