woody64 Posted November 20, 2007 (edited) 92b I did a 2nd trial to adapt the painting of A.Adam "Austrians Thermopyles". Hope to add some further pictures soon ... Andreas Edited November 18, 2009 by SlyOwl Share this post Link to post Share on other sites
Fordo Posted November 20, 2007 Cool Vig like all the decals you got on the French and Austrians, Viva La France! Share this post Link to post Share on other sites
Col. Whipstick Posted November 20, 2007 I'm struggling to tell the French from the Austrians... can you give us a summation on the original painting? The exact battle, historican context etc. Share this post Link to post Share on other sites
Captain Green Hair Posted November 20, 2007 Looks almost exactly like the painting *y* Love the custom torso's, wich nation are they? Share this post Link to post Share on other sites
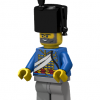
woody64 Posted November 20, 2007 Looks almost exactly like the painting *y* Love the custom torso's, wich nation are they? Hauptmann Hensel: Geniecorps (Pioneers and Sappeurs), commander of the defenders Artillery Supply Staff: Brown/Blue Artillery: Brown/White Infantry: White French Infantry ? The exact battle, historican context etc. It happend during the french offensive 1809 through the Kanaltal. The Austrian forces were ordered back and the defenders got the task to hinder the french corps as long as possible. They did it for some days with a corps of less then 300 soldiers. After all the french stormed the fort with the help of one troop searching their way trough the mountains in the back of the defenders. That's why it's called the Austrian Thermopyles, since the end of the story reminds to the greek story. The 300 soldiers had a loss of 80 dead and further 80 wounded whereas the 17th may was reported with 1300 dead and wounded by the french. I found a very good sumary but unfortunately only in german: 1809 Andreas Share this post Link to post Share on other sites
Mister Phes Posted November 20, 2007 I'm struggling to tell the French from the Austrians... can you give us a summation on the original painting? The exact battle, historican context etc. The torso of that soldier leaning forward is what I'd imagine for the torso of solider in a French sub-theme. Distinctly different from the blue coat Imperial Guards. Share this post Link to post Share on other sites
woody64 Posted November 20, 2007 (edited) And here are the decals for the torsos: Hensel (I have to admit already in the new design according to Mosana's howto) Austrian Infantry Austrian Artillery French: But here are Mosana's decals, which I prefer over my old ones: Edited December 15, 2007 by woody64 Share this post Link to post Share on other sites
Asuka Posted November 21, 2007 An interesting work with very fine decals indeed! :'-) Share this post Link to post Share on other sites
MagPiesRUs Posted November 21, 2007 A very nice MOC. Add a few more barrels, and dropped rifles, and it'll be perfect *sweet* I especially love your decals, and I like how that last one goes down the legs *wub* Share this post Link to post Share on other sites
Mister Phes Posted November 21, 2007 Your French torso is everything I imagined *y* and everything I wish The LEGO Company would actually produce. Share this post Link to post Share on other sites
woody64 Posted November 21, 2007 Your French torso is everything I imagined *y* and everything I wish The LEGO Company would actually produce. Don't you think that's the better one ... Share this post Link to post Share on other sites
Mister Phes Posted November 21, 2007 Hmmmmm... It does look more refined... But the only way to tell is to print them out and stick them on a torso so get to it X-D Share this post Link to post Share on other sites
woody64 Posted November 22, 2007 Some more pics ... Share this post Link to post Share on other sites
Mister Phes Posted November 22, 2007 That soldier walking through the door way looks like a French ImperialScouts. X-D In the overhead shot if it weren't for the legs I couldn't tell that was his back. Share this post Link to post Share on other sites
woody64 Posted November 22, 2007 That soldier walking through the door way looks like a French ImperialScouts. X-D In the overhead shot if it weren't for the legs I couldn't tell that was his back. For this scene I made special decals nearly for all of the figures. The french one got also decals for the back as also visible in the original painting. The french officers got also different fronts as in the picture. Andreas Share this post Link to post Share on other sites
Mister Phes Posted November 23, 2007 Did you design the torsos in Illustrator? Share this post Link to post Share on other sites
woody64 Posted November 24, 2007 Did you design the torsos in Illustrator? No, although I'm a linux guy I used the good old mspaint as shown in mosana's tutorial - shame on me . But at the end it is easy to use with the needed functionality and the tutorial gives some usefull tipps how to achieve the necessary results. andreas Share this post Link to post Share on other sites
Mister Phes Posted November 24, 2007 And also inefficient and cumbersome when you want to make changes X-D Share this post Link to post Share on other sites
woody64 Posted November 24, 2007 And also inefficient and cumbersome when you want to make changes X-D That's true, but for the decals I can make also different changes fast ... Andreas Share this post Link to post Share on other sites
woody64 Posted September 18, 2009 The fort was also used during WWI. Woody64 Share this post Link to post Share on other sites